Put together collections of customizable buttons for use in Explore, Search, and your Researcher hub.
Access Explore Builder from Builder or by appending /explorebuilder to your Alexandria URL.
Related Tips
Explore FAQs
Explore Builder Video
Explore
Researcher’s Explore interface is fun —patrons simply click buttons to explore their library resources. You can customize these buttons, and sets of buttons (called “panes”) in Explore Builder. Include whatever resources your patrons need—that means Researcher modules like Search or Scout, links to outside resources; popup messages, instant searches, and more. You can even choose the pictures and the text that will best engage your audience.
The Explore Pane comes loaded with various icons in ready-made sample panes that you can adapt to create your own interfaces; everything you need to customize and configure individualized Explore panes, buttons, icons, and actions. Selecting a pane from the Panes List will populate the Explore Pane section.
What is a pane?
Each Explore pane is a collection of buttons. Each pane can hold a fixed number of buttons in a 8 x 2 grid pattern. Blank or empty buttons act as placeholders for each unused position in the grid. Depending on the Researcher interface you’re using, you can display up to two Explore panes simultaneously.
What is a button?
Each button in a pane consists of an icon, descriptive label, and associated action that is performed when the button is clicked.
Click a button to select it; once selected, you may change the placement of the button in the pane. Simply click, hold, and drag a button from one location to another. If there’s already a button at the destination location, the two buttons will trade places.
When you duplicate or move a button, its attributes are moved along with it.
What is an icon?
An icon is an image used for each button. You can add icons by dragging-and-dropping images directly onto blank (or occupied) buttons—either directly from your operating system desktop or from the Copy From Pane feature. The Explore Pane accepts most standard image files (e.g. SVG—preferably, GIF, BMP, PNG, JPG), but we highly recommend using scalable vector graphics (SVG). If you’re not using SVGs, make sure that your icons have dimensions no larger than 90 pixels wide by 90 pixels high for optimal quality.
Navigation
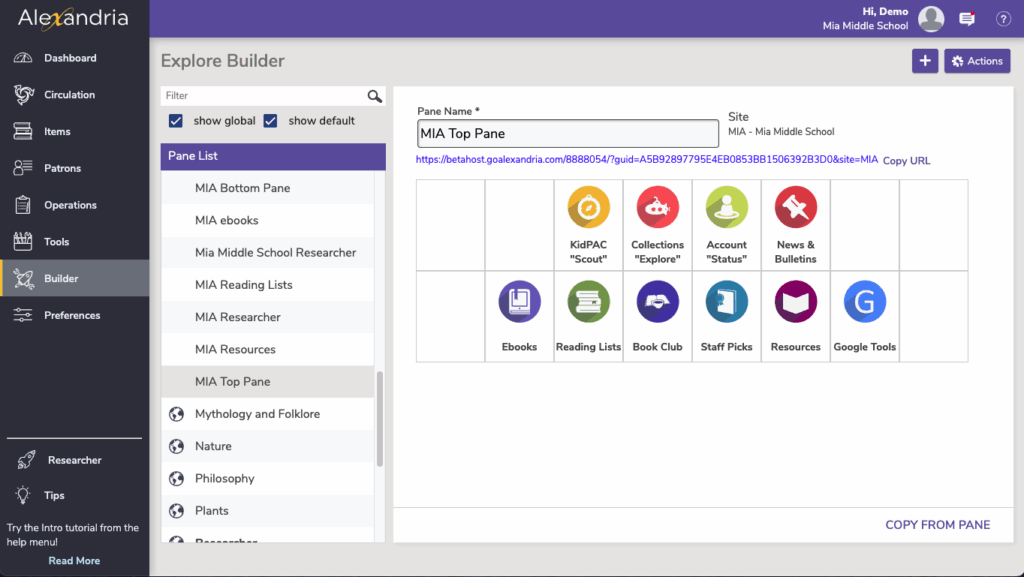
The Panes List on the left is a list of the default, global, and local panes. Select a pane from this list to display the contents of that pane (e.g. the buttons, icons, and actions) in the Explore pane to the right.
The Explorepane on the right consists of the Explore Pane Buttons/Actions/Icons section where the contents of the selected pane are displayed—in full—allowing you to modify or remove them completely.
A Note for Centralized Catalog Users If you are Centralized Catalog, each time you access the Explore Builder, it will default to whichever site you are logged into, depending on the sites that you, as an operator, have permission to access. To create Global panes (usable by any site), log in to the union site, where you can create a default Explore interface which can also be shared with individual sites.
Panes
The left-hand side of the module contains the record list, where all the Explore panes matching your search criteria are displayed. This section also contains shortcuts where you can Add or Remove Explore panes.
By default you’ll see your local (i.e. user-created) panes in alphabetical order.
Select a pane from the Panes List to display the contents of that pane (e.g. the buttons, icons, and actions) in the Current Pane section (i.e. the right-hand portion of the Explore Builder)
Controls
Add. Create a new Explore Pane by clicking the plus button. Provide a name for your new pane (required). The name can be changed later.
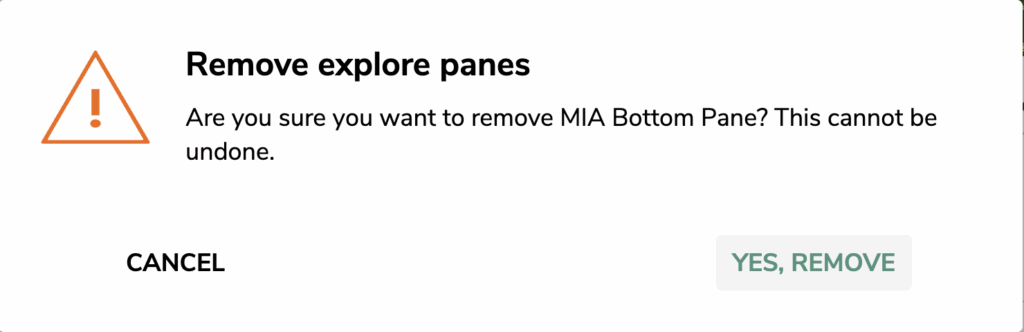
Remove. Selecting the minus button completely removes the selected pane from the Panes List. This can not be undone, so think twice before making this selection. If you’re not sure, you may want to Export the pane first for archive and backup purposes. The default Researcher pane can not be deleted or edited; however you can make a duplicate for which you can.
Actions. The Actions gear/cog menu contains specific actions and functions unique to the currently selected pane.
Duplicate pane. This duplicates the currently selected Explore pane, including all buttons, icons, and actions; duplicated panes are given the same name as the original unless otherwise changed.
Remove pane. This removes the entire pane from explore builder.
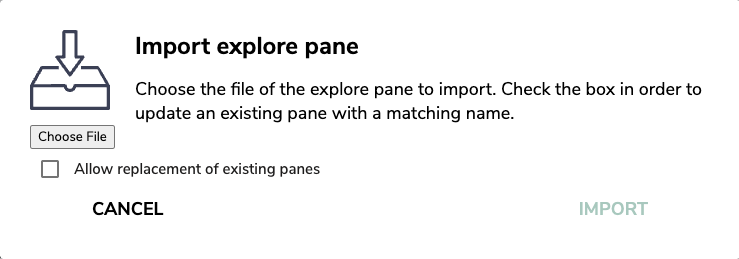
Import pane. Browse your computer to locate and import the .txt file of a previously exported pane. A pane can also be imported by dragging and dropping the file onto the Panes field.
Export pane. This selection instantly queues the currently selected pane to export from Operation Management. Exported panes can later be imported back into Alexandria using the Import Pane selection (above).
Export all panes. This selection instantly queues your entire panes database (including Alexandria’s global defaults) to export from Operation Management. Exported panes can later be imported back into Alexandria using the Import Pane selection. This is especially useful when configuring the Alexandria Explore interface in a Central or Distributed Catalog; you can create and configure your Explore interface in one location and then share it with others who will adopt your interface.
Resize image. Hold the “option” key when in the action menu to make this option appear. This allows you to resize the image, which only needs to be done if explore panes are taking a long time to load.
Settings
Every Explore Pane has the following pane-level options:
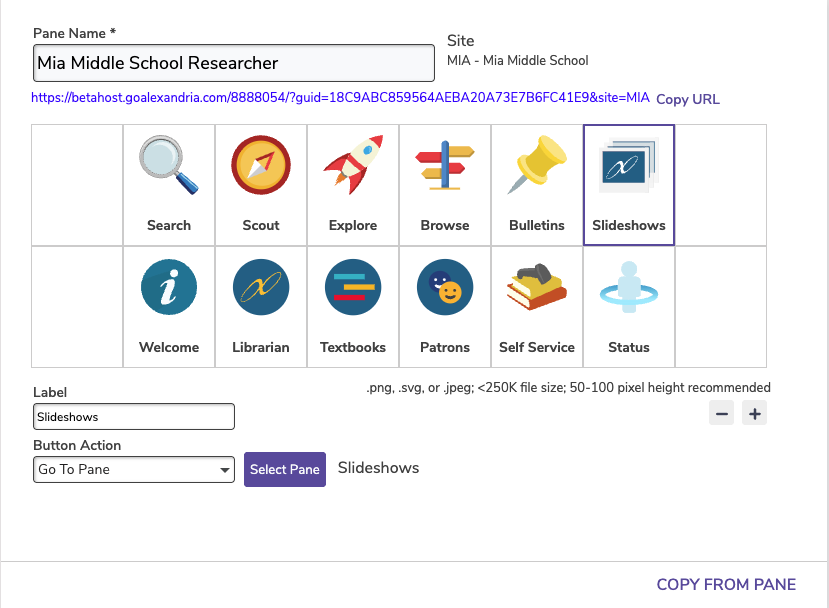
Pane Name. Provide the Explore pane’s name (required). This name is essential when selecting the default Search and Explore starting panes in your Researcher Preferences or when assigning buttons the Go To Pane action. The site that this pane belong appears to the right of the pane name field (e.g. COMPanion Demonstration Library).
URL. Displayed directly beneath the pane name field, this non-editable URL provides a direct link to the Explore pane in a new browser tab. Use this to preview how panes will look and behave in the Explore interface, or copy the URL to link directly to a pane from a Bulletin Board, website, etc.
Configure Explore Buttons
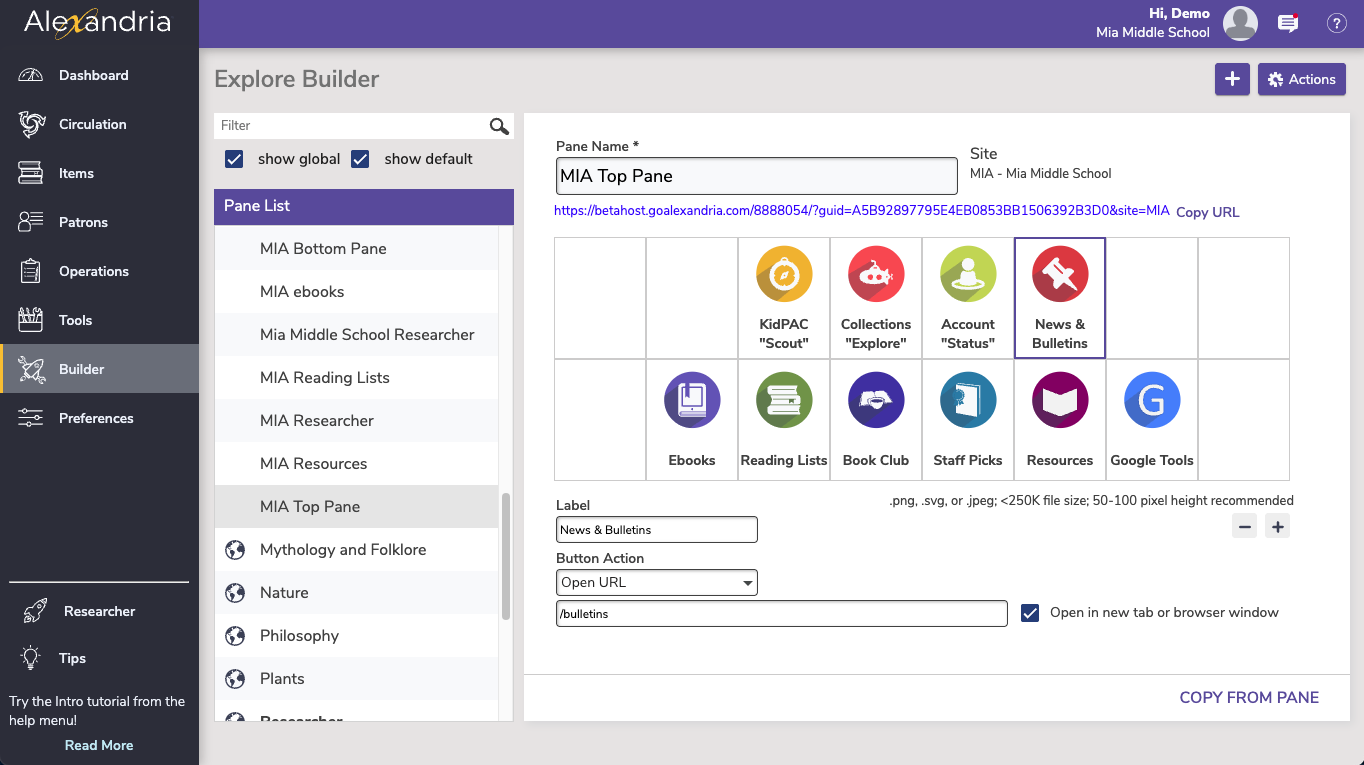
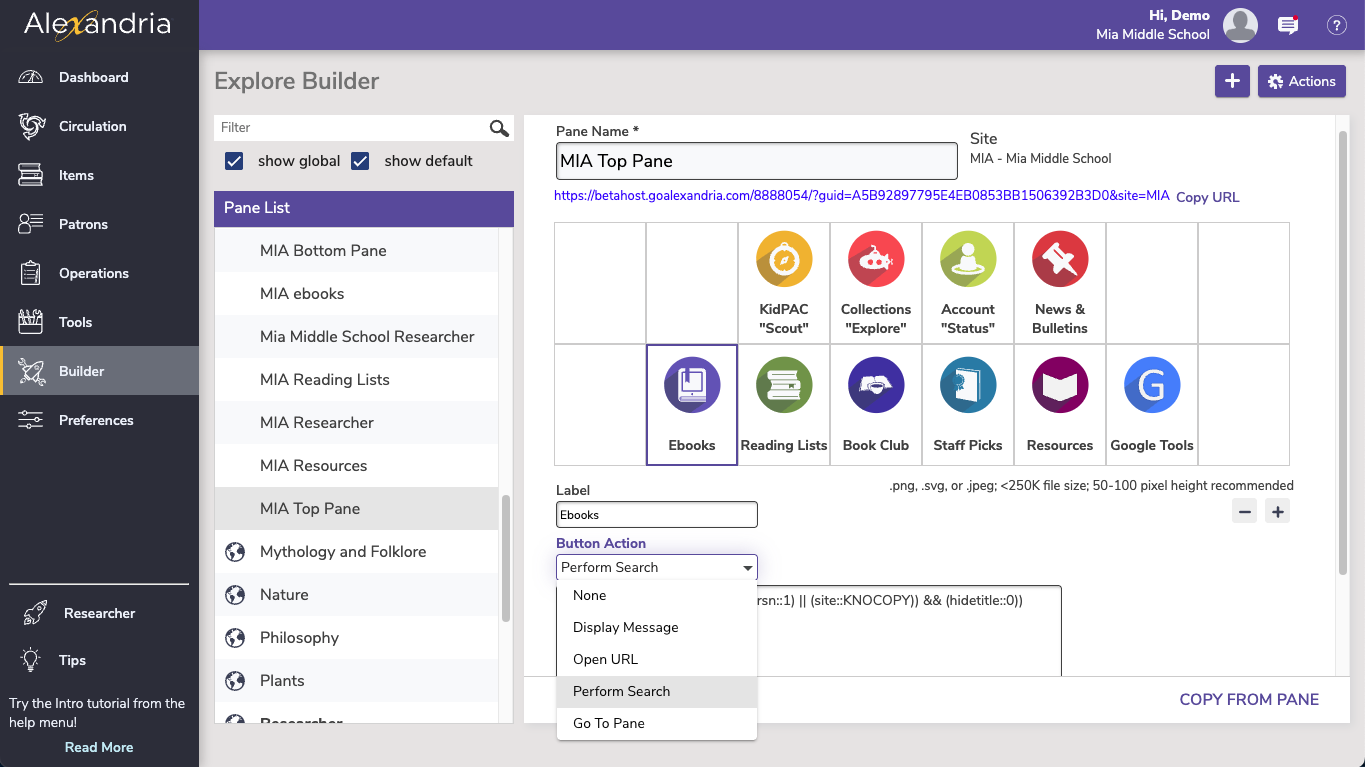
Select a button or an empty space to activate Actions section. There you can edit an existing button or set up a new one.
To add an icon, you can also drag and drop an image from your computer to an Explore pane.
Label
Enter a label or title for this button, which will be shown directly below the button image in the pane. This is optional, but highly recommended to describe the button.
Action
Use this dropdown menu to assign the selected button one of the following actions:
None. A button can be assigned an icon, but the button does nothing.
Display Message. Allows you to enter a simple message (up to 1000 characters) that displays in a popup dialog. This field accepts html, so you can format your text.
Open URL. Enter a valid URL, and your patrons can click this button to go to that URL. This is useful if you’ve cataloged a number of helpful websites for your patrons. If Open in New Browser Tab is checked, URLs will open in a new browser tab when the button is clicked; otherwise, the Explore interface will be replaced with the destination URL. You can also create custom Slideshow URLs.
Perform Search. Enter a search term (e.g. cats) or assemble your own search strings query as needed (e.g. ((title::harry–harry potter))).
Search is a powerful feature that can be customized through the use of various search strings such as ((NewTitles::%today)) to search for titles that are new today. To learn more, read Search Strings.
Go To Pane. Link to another (existing) Explore pane and create a powerful iconic interface tree. You can even make buttons that go ‘back’ and ‘next’.
When you’ve finished editing the buttons for each pane, click Save to keep your changes or Revert to cancel them.
Copy from Pane
The bottom of the Explore Pane includes the Copy From Pane option. Click this to open the Copy From Pane, which allows you to look at an existing explore pane and copy its buttons or icons for use in the pane you are editing.
Copy (via drag-and-drop) any buttons (including their actions and/or icons) from the bottom Copy From Pane onto blank (or occupied) buttons on the Explore Pane you are editing. Whenever a button is dragged from the Copy From Pane onto an existing button, it replaces that button entirely.
When you have finished copying buttons from one pane to the next, click Close to collapse the Copy From Pane. Then you’ll be able to individually modify the icons, actions, and the placement of the buttons in the selected Explore Pane. Alexandria will remember and restore the last pane you had selected the next time you use Copy From Pane.
Import Explore Panes
The Explore Builder allows you to import and export Explore panes. This way, you can share your creations with other libraries or librarians in your district or around the world.
Select Import Pane from the Explore Builder’s primary Actions menu to import an exported pane (or panes).
Choose File. This opens your standard operating system explorer (i.e. finder) window, allowing you to specify the location of the file you would like to import.
Allow Replacement of Existing Panes. When this box is checked, imported panes will replace existing panes of the same name. When this option is not checked, all panes will be duplicated, even Global panes; however, duplicated Global panes (when imported to a site that is not the union site) are no longer considered Global and will no longer be affected by the Show/Hide Global Panes control.
Step-by-Step—How to…
Create an Explore Interface
To create an Explore interface for your library, you can:
Start with a clean slate; hide the default (i.e. Global) panes and build your own interface entirely from scratch.
Use the Global panes as a starting point and adapt them to accommodate your specific needs.
Import a ready-made pane or panes created by someone else.
Creating an Explore interface for your library is easy to do. Here’s how:
From Builder, go to Explore Builder, or go directly to /explorebuilder.
In Explore Builder, click the plus button; this creates a blank Explore pane, which allows you to customize and configure individualized Explore panes, buttons, icons, and actions.
Or, select an existing pane you want to use as a template, and select the Actions menu > Duplicate Pane.
In the new Explore Pane, select one of the blank (or occupied) buttons.
Once a button is highlighted, give it a Label.
You can add icons by dragging-and-dropping images directly onto blank (or occupied) buttons—either directly from your operating system desktop or from the Copy From Pane dialog. We recommend SVG (scalable vector graphics); otherwise, make sure that your icons (GIF, BMP, PNG, JPG)are no larger than 90×90 pixels.
From the Action dropdown menu, select the desired action (Display Message, Open URL, Perform Search, or Go To Pane). If you select Display Message, enter your message. If you select Open URL, provide the complete URL (including http://) and decide if you want to Open in New Tab or Browser Window. If you select Perform Search, enter a search term (e.g. cats) or assemble your own search strings query as needed (e.g. ((title::harry–harry potter))). If you select Go To Pane, use the Select Pane dialog to link to another pane in the Explore interface. When finished, click OK to close the Select Pane dialog.
Click Save in the upper-right corner of the window.
If properly configured, the next time you use the Explore interface, your panes, buttons, icons, and actions will be integrated and functional.
Customize Search Interfaces
You can include one or two explore panes in your Search interface.
Create the panes you want to use in Explore Builder.
Go to Builder > Display and scroll down to the Explore Pane area. Set the Search (top) and/or Search (bottom).
These panes will now show in Search.
Modify the Researcher Pane
Modify or customize Alexandria’s Researcher pane by adding, deleting, or changing its buttons, icons, and actions. Alternatively, you can choose a completely different Researcher pane by using the Set as Researcher Pane. This is useful if you’d like to completely remove access to some of the Researcher’s patron interfaces (like Scout or Explore) or change where some of them take you (e.g. Bulletins).
The default Researcher pane cannot be deleted or edited. If you would like to make changes to this pane, you must first duplicate it by clicking on the Actions dropdown menu, selecting Duplicate Pane, and clicking Save. Then you can edit the duplicated pane. Be sure to set it as your Researcher Hub pane in Builder > Display.
Go to Builder > Explore Builder.
From the Panes List on the left, select (highlight) the current Researcher pane. Most often, this is Alexandria’s default “Researcher” pane; however, it may have been previously changed to another pane. Regardless, the current Researcher pane will always appear bold in the Panes List.
To remove a button from the pane, select the minus button.
To change a button’s name, select it and type the new name into the Label field (e.g. Weekly Bulletins).
To change a button’s graphic, select it and click plus button and choose a new image from your computer. Alternatively, you can drag-and-drop a new image directly onto blank (or occupied) buttons.
To change the action of a button, select it and choose an option from the Button Action dropdown menu. It can display a message, open another website, perform a search, or go to another Explore pane.
When are you finished, click Save.
The next time you visit your Researcher hub (/researcher), it will show your changes!
Change the Designated Researcher Pane
You can elect to use a pane other than the default by changing the Default Explore Pane in the Display section of Builder.
Create Custom Slideshow URLs
Use Explore Builder to set a custom Slideshow URL based on specified search strings. This allows you to build Slideshows for holidays, seasons, famous people or any other topic. It’s a fun and dynamic way to present new and exciting books to your patrons!
To select a new pane, go to Builder>Researcher, Display Tab, and look for the Explore Panes section. Here you’ll find the Researcher Hub setting; you can select the pane you want from here.
If you want to change the pane itself, go to Builder>Explore Builder, and make the changes to the appropriate Explore Pane.
How can I make changes and updates to my Explore search buttons?
That’s all done through Explore Builder! And you set which ‘pane’ you want to show in Explore (or Search, or Researcher hub) in Builder.