Show off the items in your collection on a slideshow!
Patrons can get to your slideshows from the Researcher hub, if you’ve set up links to /slideshow or to the individual slideshows.
Related Tips
Slideshow FAQs
Slideshow Video
Slideshow Builder
Alexandria’s Slideshow is a fun way to dynamically display a range of titles from search or saved results to promote a theme or subject. You can run Slideshow on a TV monitor, or set it up on a computer or tablet so patrons can select items in the list. It’s a great way for your students to see some of the items available in your library without logging in to Researcher.
Access the default slideshow, which is saved in Slideshow Preferences, by adding “/slideshow” to the end of your Alexandria login URL. But you aren’t limited to just one. You can build multiple Slideshows and add a button to your Explore window for each. Go to Custom Slideshow URLs to learn more.
How It Works
Slideshow displays titles that match the search criteria entered in Slideshow Builder. The search criteria can be a general search term, a complicated search string syntax, or items from one of your saved lists.
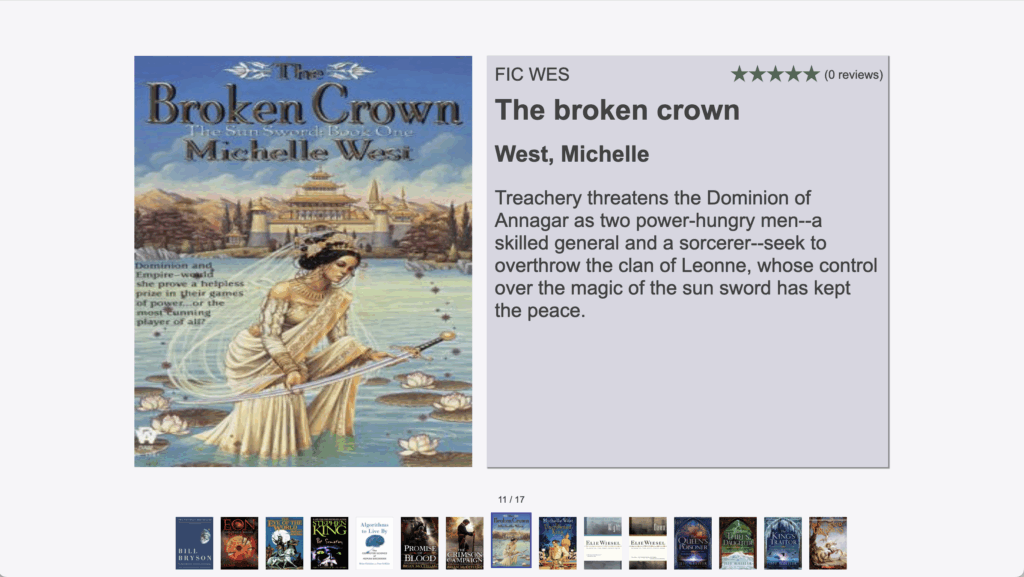
The current slide displays title cover art on the left and details on the right. In a Split layout, click the arrow to the left of the cover art to go back a slide, or click the arrow to the right of the item details to go forward a slide. In a Preview layout, a carousel containing the items in your list is displayed below the current slide. See the different configurations in the demo!
Click on an item in the carousel to display the slide front and center.
Titles are displayed in the order in which they appear in the search results. The current title will automatically transition to the right every few seconds, as set in Slideshow Builder. When an item is selected, the auto-rotation will stop for one minute so the patron can view the item details, then it will resume with the next item in the carousel. Once the slideshow is complete, it will start all over again.
To search for a title in the slideshow, click the search icon in the top right corner of the window to open Search with the same search string used for the Slideshow you were viewing.
For Slideshow to work, your search results must include a minimum of 5 items. If there aren’t enough matching records for your query, Slideshow will display an error.
Custom Slideshows
Use Explore Builder to set a custom Slideshow URL based on specified search strings. This allows you to build Slideshows for holidays, seasons, famous people or any other topic. It’s a fun and dynamic way to present new and exciting books to your patrons!
1. Log in
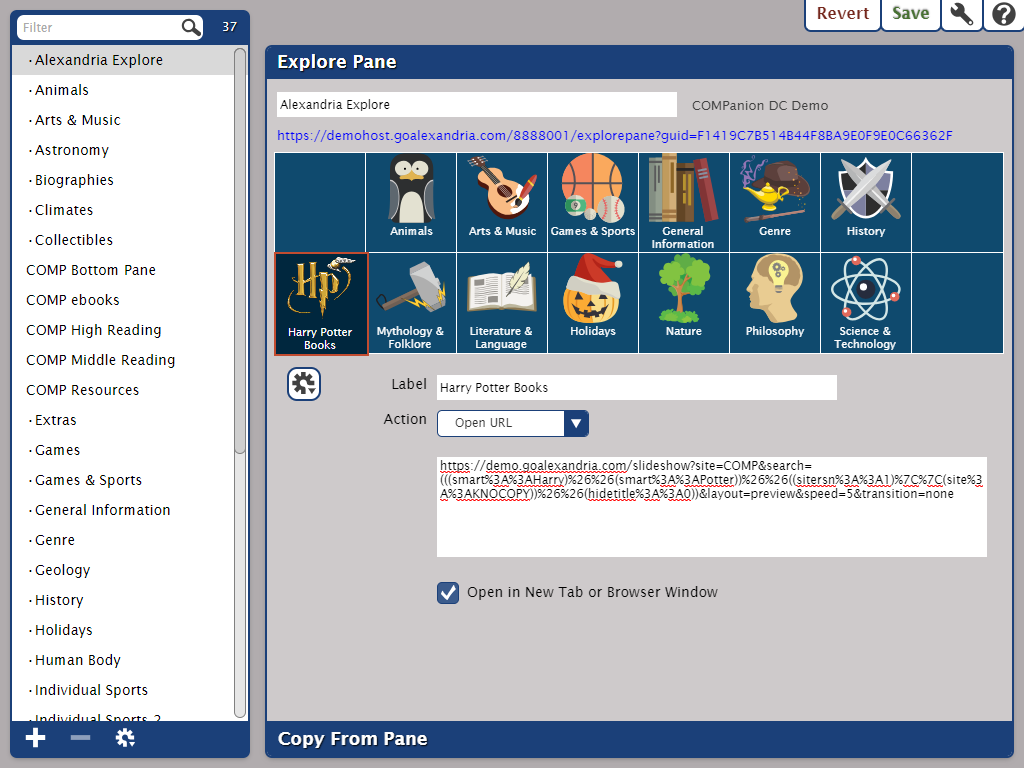
Go to Builder > Explore Builder, or enter /explorebuilder at the end of your Alexandria URL.
2. Select a pane
Select the Explore pane you want to add a slideshow to, or add a new pane.
3. Add an image
On your computer, open a File Explorer (Windows) or Finder (Mac) window.
Locate the image or icon you wish to add to Explorer, then drag that icon into an empty pane.
Click Save.
You can use virtually any image as an icon. We recommend using .jpg, .jpeg, .svg, .png, or .tif images that are roughly 128×128 pixels at 72dpi.
4. Configure the button
Now you need to configure the icon to point to your Slideshow URL.
Label. Enter the name of the slideshow. This will also be the name of the button.
Action. Select Open URL.
5. Add the URL
In the box below, paste the complete URL of a previously created slideshow, or create a new one. If you don’t have a URL yet, build a new slideshow in Slideshow Preferences, then click Copy URL, and paste it in this box in Explore Builder.
Here’s an example: https://yourlibrary.com/slideshow?search=((Smart::space))&layout=preview&speed=5
You can also edit the URL to set custom search string variables for topic, layout, and speed.
Search. The subject or topic your Slideshow will cover, i.e. “Space” or “Egyptology”. You can use more complicated or specific search strings here.
Layout. Set it to Split or Preview.
Speed. The number of seconds each slide will be displayed before rotating to the next one.
6. Save
When you’re done, hit Save in the top corner of the window.
Your Explore window will now feature the icon you chose. Click on it to open the slideshow!
Slideshow FAQ
Can I have more than on Slideshow?
While you can only have one Slideshow active from the primary /slideshow location, you can always show additional Slideshows by creating Explore buttons that link to a Slideshow URL.
Tip: Custom Slideshow Buttons
You know you can go to /slideshow to view a slideshow of items as determined by your settings in Preferences > Researcher > Slideshow.
You know you can create an Explore button that links to your Slideshow.
But did you now that you’re not limited to a single slideshow? You can set up as many custom slideshows as you want, each with a specific URL.
Now, let’s add a search string. At the end of the Slideshow URL, add ?search=search string. For example, if you want a slideshow with books about space, you’ll enter ?search=((smart::space)).
Search strings can be complicated, but they don’t have to be. For an easy way to get a search string, go to Search and perform a search or open the list you want, then click Share and copy the search string. You can paste the whole thing at the end of your Slideshow URL.
But wait, there’s more! You can add the parameters for speed, layout, and transition.
For speed, add &speed=3 for 3-second intervals.
For layout, add &layout=split or &layout=preview.
For transition, add &transition=fade or &transition=drawer or any other transitions that you can see in your Slideshow preferences.
Go to your site’s Slideshow Preferences and tap View Slideshow. Copy that URL and manipulate the settings in another tab or window to see what works.
Here’s a breakdown of what your URL could look like:
Now you can use that custom Slideshow URL with any Explore button to lead your patrons to your beautiful Slideshow.