
Take a look at Inventory and watch our Inventory Workshop.
Inventory

Inventory and clean up your collection using the easy Inventory module.
Access Inventory Management from Tools or by appending /inventory to your Alexandria URL.

Related Tips

Inventory FAQs

Inventory Videos
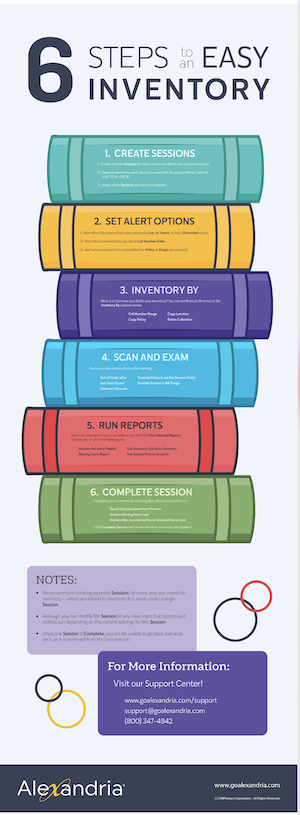
6 Steps Infographic
Inventory is a survey of the items and materials you have in stock, so you know what you have, what’s missing, and what needs to be replaced, reordered, or discarded. It can help you organize your materials and update all of the catalog listings in your database to match the physical items in your library. You can even generate reports for statistics, missing items, and more. Once you know what you physically have in your collection, you’ll be in a better position to make future acquisition decisions. In short, inventory is a critical part of library management.
We’ve made performing inventory quick, easy, and extremely efficient. Learn more in these articles:
Inventory Management

Inventory through Circulation

Speed Up Your Inventory
Inventory Management
Tabs: Setup | Scan | Exceptions | Review | Complete
Welcome to Inventory Management
End-of-year inventory procedure doesn’t have to be long and painful.
Inventory Management is designed to simplify the inventory process by providing you with convenient access to all of the reporting and utility tools needed to analyze and organize your collection. It allows you to perform site-based inventory sessions, optionally limited by specific Call Number ranges, copy Policy, or copy location.
Performing inventory on your collection can be a lengthy process. Once you have begun an inventory, Alexandria will regularly save all of the information entered until you are finished; we call this an inventory “session”. You can stop or pause your session at any time and when you resume, Alexandria will be ready for you to begin again where you left off. You can create as many sessions as you need to fully inventory your collection. When all sessions are completed, you’ll rest easy knowing that your entire collection has been inventoried.
If you’re running a Centralized Catalog configuration where each collection is physically housed at a different location, each site must perform their own, independent inventory. A single-site configuration can perform inventory in one large session, or several smaller inventory sessions.
| Did you know? Each time an item is circulated (checked in or out) or inventoried using the Inventory (“I”) or Inventory Bookdrop (“IB”) commands, its Inventory Date is updated. |
For collections with only one site, “site” becomes synonymous with “collection”. In a Central Union environment where each collection is physically stored at a different location, each site is required to independently perform their own inventory.
Inventory Management allows you to perform site-based inventory sessions, optionally limited by specific Call Number ranges or Policy.
You can create as many sessions as you need to fully inventory your collection. When all sessions are completed, you’ll rest easy knowing that your entire collection has been inventoried.
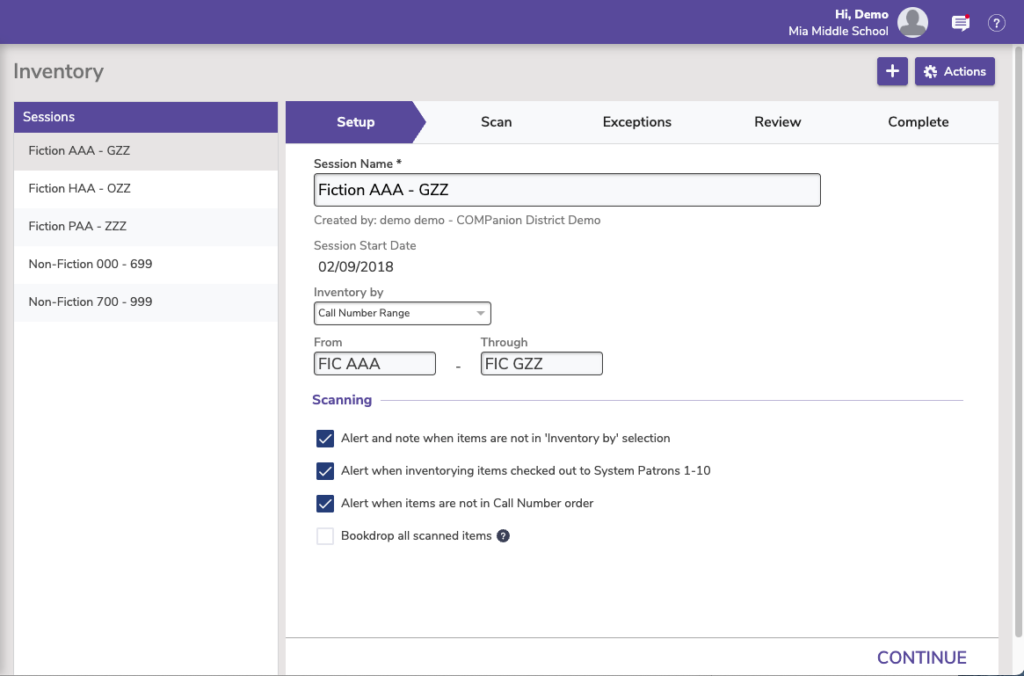
Setup
When starting in the Inventory Management window, you must first create an inventory session. Sessions let you break your collection down into smaller sections that make your inventory more manageable. Optionally, these sessions can be based on Call Number ranges, Policy, or Copy Location. Don’t worry, however—if you scan items that fall outside a session’s selected range, they are still inventoried. Keep in mind, once you have set the Call Number range, Policy or Copy Location it can not be edited (to change it, you’ll have to create a new session). If you elected to inventory your Entire Collection but have decided to break it up, you will need to delete the session before creating new ones.
The session Setup will only impact the exception alerts, notes, and reports for each session; for example, you may want audible alerts when inventorying items checked out to System Patrons during one session and not another.
You may select Entire Collection if you are planning to inventory your entire collection in one session (not recommended).
Once an inventory session is complete, you are given the option to run final reports and perform utilities based on the session information selected here. Choosing to inventory your entire collection in a single session may have unintended outcome if you fail to inventory every available item before clicking Complete Session. When finished, the session is considered closed and will be officially removed from the Inventory Sessions list.
The Inventory Date for each copy is updated and stored independently of individual sessions; they are not cleared or discarded when a session is removed. When a session is removed, only the session alert notes and the ability to print inventory exception reports are irrecoverable. However, general inventory reports can always be performed from Reports at any time.
After a session has been completed and removed, all associated inventory reports will be stored and accessible from the Operations Management window for the next 60 (to 90) days.
Note that Inventory Management shows you sessions specific to your site.
- Session Name. The name is only relevant during this session, and will be referenced later during the inventory steps.
- Session Start Date. This date is set when you scan your first item. Usually, that’s what you want, but occasionally you may need to move the date back to cover other items you have scanned elsewhere. Use the Modify Session Start Date button to change the date.
- Inventory By. Set the parameters for your session. Call Number Range, Copy Policy, Copy Location, or Entire Collection will determine what Alexandria understands you want to be included in this inventory session. Session reports, exceptions, and utilities will all rely on this setting.
- Alerts. Pick the type of audible alerts you want as you inventory items in this session.
- Bookdrop all scanned items. When this is checked, Alexandria bookdrops items found during inventory that are currently checked out to patrons (not counting hold requests), including items designated as Lost, On Repair, On Order, In Processing, In Transit, or items checked out to the Unknown or System Administrator system patrons. However, items that are Discarded, For Library Use, or Archived will not be bookdropped. Usually you’ll check this option when performing inventory, unless for example you are scanning items in a teacher’s classroom (and want the items to remain checked out to the teacher).
Scan
Next, scan all of the items in the specified range for this session. As you scan items, they will appear in the log below with those most recently scanned at the top of the list. If your copies are shelved in the proper call number order with statuses of Available, you should rarely encounter any Exception Note entries.
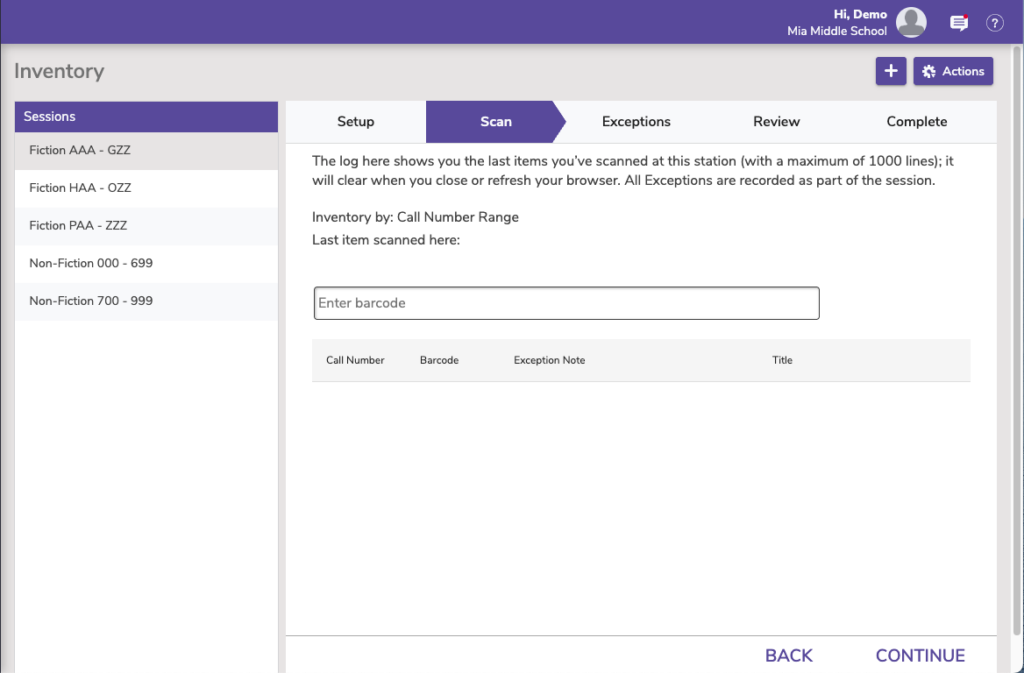
However, when an item is found out of call number order, has a status other than Available, or any other detectable irregularity discovered during this session, an Exception Note is recorded to the log and those entries are kept for the duration of the inventory session.
The visible log is here to help you remember what just happened. Although it is limited in size and does not show your previous, off-screen progress, exceptions are recorded as part of the session, and Inventory Dates are updated for each copy scanned.
Exceptions
Problems encountered during inventory are called exceptions. Problems include things like scanned items that are checked out to a System Patron, from the wrong site, are out of Call Number order, are not of the specified policy, or have an unknown barcode. The Exceptions tab provides a summary and tallies the number of Exception Notes triggered during the current session.
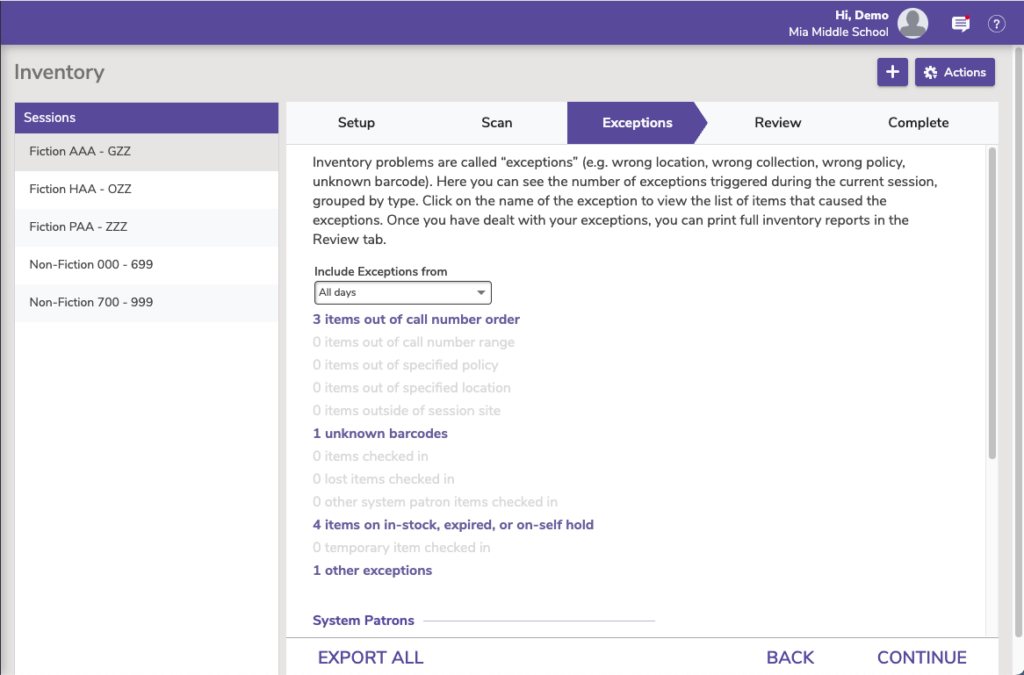
Include Exceptions From
The selection you make from this drop-down menu will filter the Exceptions tab to only include exceptions for All Days, Last 7 Days, Yesterday, and Today.
Exceptions are grouped by type. Click on the type to view (and print) a list of items that caused the exception.
Export All Exceptions
Export a .txt file that details the exceptions for this inventory session, including date, time, call number, barcode, title, and note. The .txt file can be opened in a spreadsheet for further data manipulation. It’s a great way to evaluate the information for discrepancies so you can clean up your data.
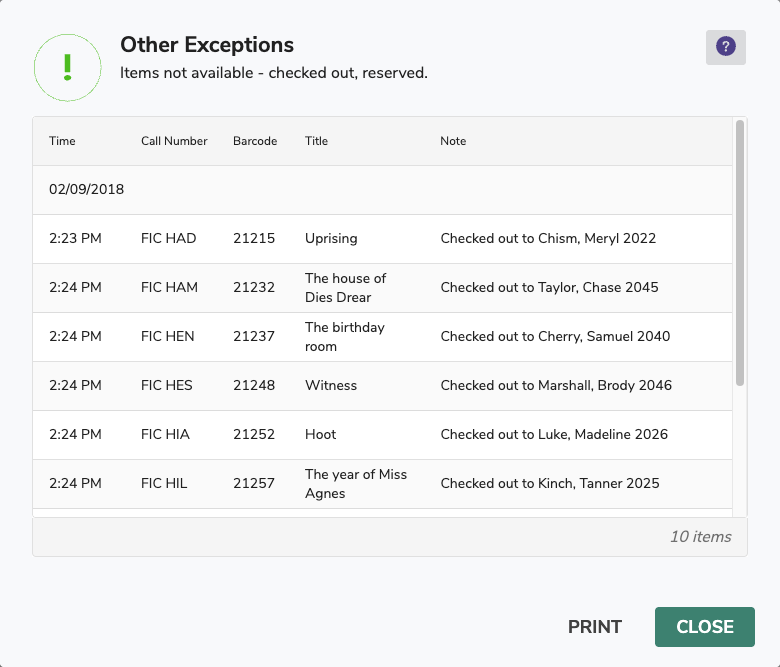
Clicking any of these exceptions opens a quick inventory report dialog so you can handle each different type of exception.
For a more permanent record, you can Export All Exceptions, or run an Inventory Exception report.
Types of Exceptions
- Call Number Order. The most common exception occurs when copies are found out of ascending call number order. Alexandria monitors all the copies scanned while in Inventory Management, or in Inventory (I) / Inventory Bookdrop (IB) modes, and expects that inventory is being performed shelf-by-shelf from the first call number to the last.
- As your inventory progresses, if a scanned item has a copy call number lower than the preceding copy call number, two question marks (??–>) will be placed in front of the log entry for that copy. If those question marks appear in the log, the copy that was scanned, and the copy preceding it, should be examined to determine if they are out of shelving order.
- Unknown Barcode. Another common exception alerts you that an unknown copy barcode has been entered. First, check to make sure that the copy actually belongs in your collection. Next, scanner technology continues to improve, but misreads are still possible, so enter the copy barcode once again by scanning (or typing) to ensure that it was correctly entered.
- If the same exception message occurs, open up the Items Management window and search for the copy by title. If the title entry appears but a copy with this particular barcode is missing, add a new copy using the barcode of this item. If the title does not exist, you’ll probably want to catalog the book. In order to complete the inventory process quickly, it may be wise to set aside any items that need to be cataloged for processing until after the inventory is complete.
- Status. When processing in inventory mode, watch the status of each copy. Copies on the shelf should normally have a status of Available. If a copy appears as Checked Out or Lost or Discarded, it is important to find out why the copy has that status. Copies which have a Lost or Checked Out status may need to be bookdropped and returned to circulation.
 | When inventorying via Circulation in Inventory Bookdrop (IB) mode, copies that are checked out (or Lost) will be bookdropped. If inventory is performed in Inventory Bookdrop (IB) mode, review the Transaction Log for status changes. Copies that were previously designated as Lost or Checked Out will be changed to Available. Such changes may require that a refund be issued or a fine adjusted. |
| Are you inventorying with a transaction script? Once you’ve imported the script, go to Operations Management, and you’ll find find inventory exceptions in the Transaction Script operation summary file. |
Review
The Review tab is used to prepare and process helpful summary reports detailing the items inventoried during the current session.
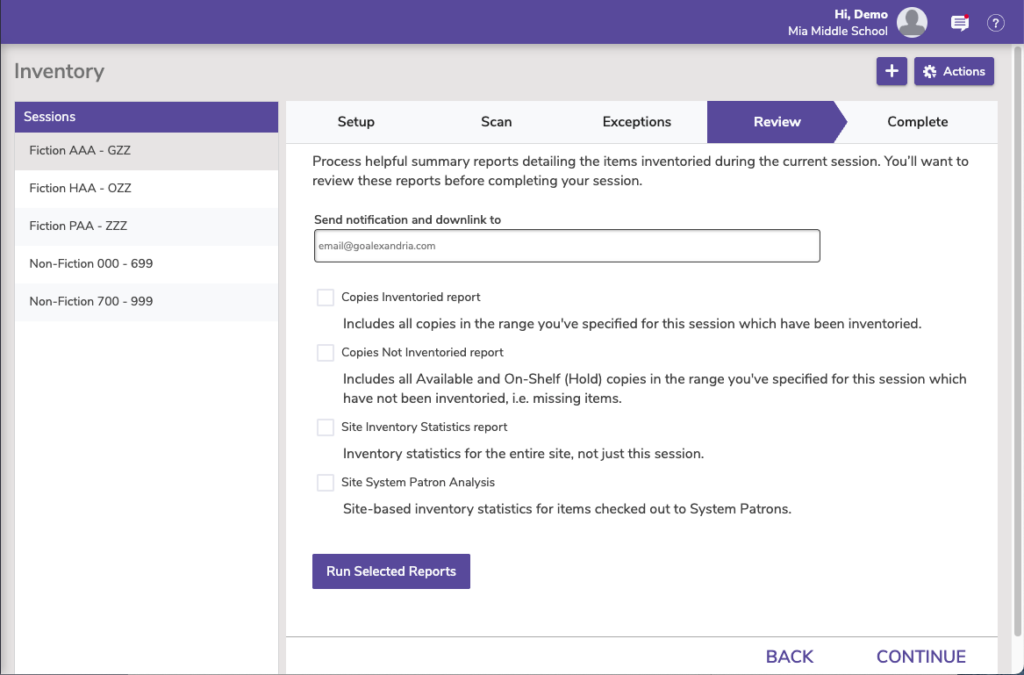
Email Reports to. Enter the email addresses to which you want to send the selected reports. Separate multiple email addresses with a comma.
| Reports | Description |
|---|---|
| Copies Inventoried report | Includes all copies in the range you’ve specified for this session which have been inventoried. |
| Copies Not Inventoried report | Includes all Available and On-Shelf (Hold) copies in the range you’ve specified for this session which have not been inventoried, i.e. missing items. |
| Site Inventory Statistics report | Inventory statistics for the entire site, not just this session. |
| Site-System Patrons Analysis | Site-based inventory statistics for items checked out to System Patrons. |
When you’re ready, click Run Selected Reports, then go to Operations to view the progress and download the completed PDF(s).
See also Inventory Reports.
Complete
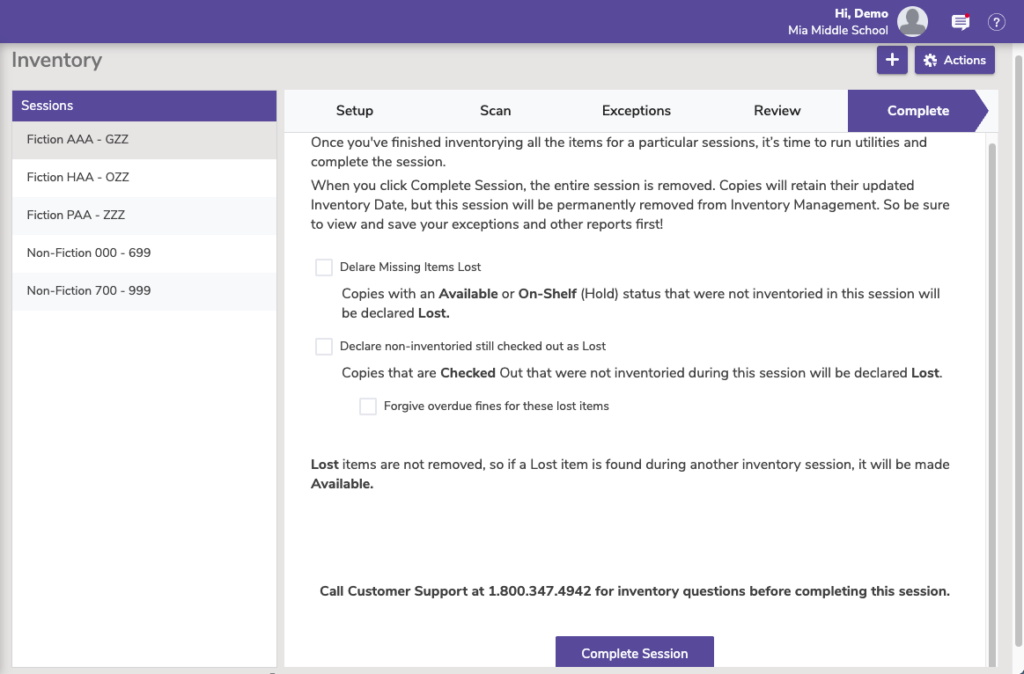
Once you’ve finishing inventorying all the items for a particular session, it’s time to “complete” the session. If you’re satisfied with the results, the utility operations (detailed below) can be scheduled to run automatically before the inventory session is removed. Once you’ve selected the utilities you want performed, click the Complete Session button.
Completing an inventory session can not be undone. During this process, all selected utilities are scheduled and the inventory session will be removed. The copies inventoried during this session retain their new Inventory Date and are not otherwise modified.
All the settings for this session will be cleared when you click Complete Session. Copies will retain their updated Inventory Date, but this session will be removed from the Inventory Management window.
Utilities
- Declare missing items as Lost. This utility moves copies with Available statuses that were not inventoried this session to the Lost system patron. If these items have been misplaced, they may be found during other inventory sessions. (So don’t remove them yet!)
- Declare not-inventoried items still checked out as Lost. This utility declares copies that were not inventoried during this session and are currently checked out to patrons other than the System Patrons (barcodes #1-10) as Lost. These items, which may have been improperly bookdropped, are sometimes located during other inventory sessions.
- You can also select to forgive all associated fines for lost items.
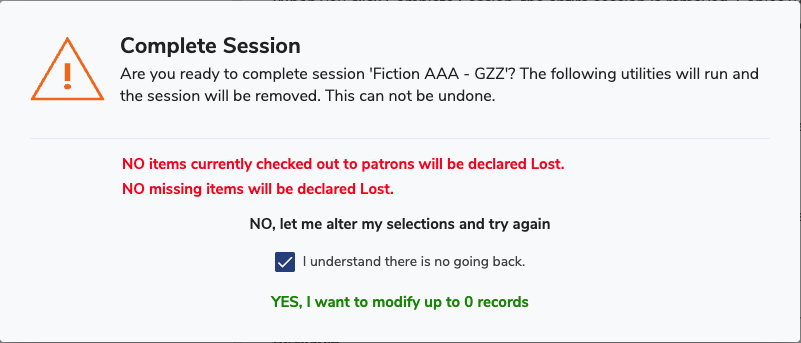
The Complete Session dialog will show you an estimated number of items that will be declared lost according to your selections here. READ IT CAREFULLY—don’t declare a bunch of items lost accidentally!!!
Inventory through Circulation
We recommend that most Alexandria users perform inventory by using the Inventory Management module. The advantages to the Inventory module are that there are several exceptions reports that are not otherwise available and all of the reports and utilities needed to finalize the inventory session are set up automatically. However, if you use call numbers in a non-standard way, or if you have a process in place where you have used the Circulation window for inventory in the past that you don’t want to change, using the Circulation window to perform your inventory may be a better option for you.
Inventory Modes
In Alexandria, each time an item is circulated or entered using one of the Inventory modes listed below, the Inventory Date of that copy is updated with the current date. Once the entire collection (or specific range) has been processed using one of the inventory modes, you may perform inventory reports and utilities. The reports will show which copies have an Inventory Date within a particular date range and which copies do not. Many operators use the Inventory Bookdrop (IB) or Inventory Bookdrop Suppressed (IBS) mode.
- Inventory Bookdrop (IB). Along with updating the copy’s Inventory Date, copies scanned in this mode are also bookdropped. When performing a complete inventory of items that are still on the shelf, it is a good idea to use Inventory Bookdrop (IB) mode so that copies checked out to teachers, students, or a System Patron (such as the Lost Copies System Patron) will be checked in and shown as Available again.
- To start Inventory Bookdrop (IB) mode, type “IB” in the command line followed by enter.
- Inventory Bookdrop Suppressed (IBS). This mode behaves the same as Inventory Bookdrop, but will suppress all dialog windows, e.g. Lost Item, Overdue Charge, Unknown Barcode, and simply process the window. Choose this mode if you are using a wireless scanner and will be away from your Circulation screen.
- Any Exceptions that occurred during the inventory session can be viewed in an Exceptions Report.
- To start Inventory Bookdrop Suppressed (IBS) mode, type “IBS” in the command line followed by enter.
- Inventory (I) and Inventory Suppressed (IS). If an item (or items) need to remain checked out to a patron, such as a classroom set for a teacher, or if you are inventorying the On-Hold area of your library, then using the Inventory (I) or Inventory Suppressed (IS) mode is appropriate.
- All materials that are scanned or typed when in these modes will be recorded as inventoried but will remain checked out.
- To enter Inventory (I) mode, type “I” and then press enter in the command line. Once in this mode, barcodes can be scanned (or typed) to record them as inventoried on the current (or specified) date.
- To start Inventory Suppressed (IS) mode, type “IS” in the command line followed by enter. This will suppress all dialogs (fines, holds, etc), so after you are finished, you’ll want to review exceptions carefully.
Inventory Methods
Your options are:
- Perform the inventory on a laptop or tablet.
- Perform inventory using a wireless scanner.
- Perform inventory by use of a transaction script file.
The most common way to use the Circulation window for inventory is with a wireless laptop or tablet. Using a cart, you can quickly move throughout the library as you scan your copies. Any copy scanned in the Circulation window will update the copy inventory date in the Alexandria database.
If a reliable wireless scanner is available and can reach all the shelves in the library while in “live” scan mode, then inventory can be processed using this method. Please be aware that exception dialogs will halt the inventory process unless you are in a suppressed (IBS or IS) mode. If the wireless scanner is used in “live” mode, an assistant should watch the main Circulation window for exceptions, or enable Alexandria’s event Sounds and make sure that the speakers are turned up loud enough so that the operator scanning copies can hear any exception sound events that might occur. To avoid exceptions, the wireless scanner can be used to scan into another program and a create a transaction script file, or scan in IBS or IS mode.
Creating and Importing Transaction Script Files
Another method of performing inventory is to create a transaction script file. A transaction script file is a text file that contains a list of copy barcodes with each barcode separated by a carriage return. Learn how to create and import a transaction script file.
Inventory Exceptions
During the inventory process, it is crucial that you periodically check the Transaction Log for exceptions.
See Exceptions up above.
Inventory Reports
The two most commonly-used inventory reports are Copies Inventoried and Copies Not Inventoried. Both of these reports templates can be found by opening the Reports window, adding a new report, and clicking on the Inventory category. All inventory reports require an Inventory Start Date; look under the Options tab to set this date. These inventory reports will generate results based on the Inventory Date for each copy.
Inventory Utilities
Use the Declare Missing Copies Lost utility for copies that have a status Available but were not inventoried; the utility will check out these items to the Lost Copies System Patron.
As with every ‘removal’ utility, a current archive or backup should be made prior to running the utility.
Non-inventoried items can also be manually checked out to the Lost Copies System Patron. Copies that are checked out to either the Lost Copies or the Discarded Copies System Patron can be removed by running the Remove Discarded Copies utility or the Remove Lost Copies utility.
Videos