
Policies
SYSTEM-A/TT

Policies establish rules that regulate how library resources are used by your patrons.
To access it directly, add /policies to the end of your Alexandria URL. (Meanwhile go to Tools > Policies)
Table of Contents
Use Policies to establish rules that regulate how library resources are used by your patrons; this includes how items circulate, how long items may be checked out, how much overdue fines cost, whether an item can leave the building, how circulation periods are computed, and so forth. Policies are important for the purposes of circulation, reports, and statistics.

For example, you can set policies that allow tenth graders to check items out for longer periods of time than second graders; the borrowing period for reference items can be set for one day, while fiction and non-fiction works can be set for two weeks.
Alexandria collects statistics on each group of patrons, such as the types of items they borrow and when they are returned. These statistics are generally used to determine usage patterns for the library so that management can schedule staff accordingly and make educated administrative decisions.
 | Learn more about how policies work with statistics on Alexandria Statistics. |
Each group of patrons and items (for which usage statistics are collected) can be assigned a separate policy. For example, if each grade level of students has its own policy, the statistics generated are more useful and accurate than if you have only one policy for all students.
 | Centralized Catalog libraries need to realize that Policies are global, so that means that everyone needs to “buy in” to making the changes especially for Item policies since Policy Mapping might become useless if you do not keep things standard and simple. For instance, if you have a fiction policy that is different for each school, your Policy Mapping will not know which fiction policy to use for items that have call numbers beginning with FIC! This could lead to a great deal of extra work every time you import items. |
The Policies window is divided into two distinct sections that function independently of one another and allow you to create or customize the settings of a particular Patron or Item policy.
An operator can move through any of the policy sub-tabs located at the top of the window (Check Out, Overdue, and Other) at any time, no matter the current mode (i.e. Standard or Exceptions).
Standard Mode
Every patron must belong to a Patron policy; the rules of a particular Patron policy apply to every patron under that policy. An Item policy will be applied to every item in your collection; the rules of a particular Item policy apply to every item under that policy.
The settings of a particular Patron policy apply to every Item policy. For example, selecting 3rd Grade as your Patron policy and changing the Maximum Loaned Items to 6 will limit every patron in the third grade to six items of any Item policy, whether it be Fiction or Non-Fiction.
Exceptions Mode
The standard settings configured for Patron Policies and Item Policies are considered the general rules for the selected patron and item groups (e.g. 6th Grade and eBook). Exceptions to the way these combined policy groups interact in Standard Mode can be adjusted by clicking the Exceptions button, which will then turn yellow to indicate you’re in Exceptions Mode. This mode allows you to modify the behavior and relationships between selected patron and item policies to further customize your policy settings.
For example, if you have a policy for “Staff” and another for “Projectors”, you may want your staff to be able to check out projectors but only staff members and no other patrons under any other policies
Read Policy Exceptions for more information and step-by-step instructions.
Policy Short Codes
Short codes are mostly for reporting and help quickly identify a policy in a small space. For example, if the patron policy name is “3rd Grade”, you might provide “3GR” as the Policy Short Code. Or for Items, for example, if the Policy Name is “Fiction”, you might provide “FIC” as the Policy Short Code name.
Look for Policy Short Codes on reports such as the Super Summary for statistics on items checked out to patrons of this policy.
Statistics Groups
Statistics Groups provides an alternate statistic and/or way to track groups of patron policies. For example, you may have an item policy to dictate rules for Bestseller Fiction, but you want statistics to aggregate with the regular Fiction policy.
Read more about Statistics Groups and why you might use them.
Step-by-Step Instructions
Create a New Item Policy
- Go to Tools > Policies.
- Click Add from the actions menu.
- Enter the new item Policy Name and Policy Short Code and optional Statistics Group in the fields provided.
- Make a selection from the Defaults from drop-down menu and click OK; the new policy will take its defaults from whatever is selected from this drop-down menu.
- Next, tab through the various Policies (Check Out, Overdue, and Other) providing appropriate values to the fields, drop-down menus, and check boxes in order to create your policy.
- When you have completed your new policy, click on the Save button.
- Repeat this process until you have made all your new item policies.
Create a New Patron Policy
| Many school libraries and public libraries create policies based on their patron’s age and/or grade. Alexandria does not automatically change or set any patron policies just because a policy matches their age and/or grade. An operator (e.g. librarian) must set the patron’s policy either using patron imports or manually in Patrons Management. |
- Go to Tools > Policies.
- Click Add from the actions menu.
- In the Add Policy dialog, enter the Policy Name and Policy Short Code and select an optional Statistics Group.
- From the Defaults dropdown menu, select which policy to duplicate values from.
- Click Add.
- Next, tab through the various Policies (Check Out, Overdue, and Other) providing appropriate values to the fields, dropdown menus, and checkboxes in order to create your policy.
- When you have completed your new policy, click the Save button.
- Repeat this process until you have made all your new patron policies.
Modify a Policy
| Changing a policy will not affect past transactions. To change the fine rate on a book that is currently checked out, check the book in to forgive the fine, then check it out again to the same patron and use the Set Due Date command to assign the original due date. |
- Go to Tools > Policies.
- Select the policy to be modified, from the appropriate section (Patron or Item).
- Make the appropriate changes to the values in the Policy fields, dropdown menus, and checkboxes.
- When you’ve finished modifying the policy, click Save.
Note you can run the Change Patron Policies utilities to change multiple patrons at once.
Duplicate a Policy
Duplicate a policy when the policy values are exactly the same as or there are only minor variations from an existing policy.
- Go to Tools > Policies.
- Click Duplicate from the actions menu.
- Enter the new Policy Name and Short Code and select an optional Statistics Group in the fields provided.
- Make a selection from the Defaults from dropdown menu and then press <enter> or click OK; the new policy will duplicate the values of whatever is selected from this drop-down menu.
- Make the appropriate changes to the value(s) in the Policy fields, drop-down menus, and checkboxes.
- When you have finished modifying your duplicated Policy, click the Save button to keep your changes; otherwise, click Revert to discard them.
- Repeat this process until you have finished making all your new policies.
Remove a Policy
| Standard, System, and Textbook policies cannot be removed. |
- Go to Tools > Policies.
- Select the policy that you would like to remove—Item or Patron.
- Click Remove from the actions menu.
- Click Remove on the confirmation window when it asks if you are sure you want to remove the policy.
- If you’re removing an item policy that is in use, you’ll be given an option to update the affected records to the policy of your choice.
- When a patron policy is removed, you’ll be prompted to choose a replacement policy for the impacted patrons.
Assign a Patron Policy
- Go to Patron Management.
- Find the patron whose policy you want to change.
- Unlock the record.
- Click on the Policy dropdown menu.
- Select the policy for this patron.
- Click Save.
Assign an Item Policy
Both Titles and Copies have policies. If the Title Policy is the same as any of its copies’ policies, then changing the main Title Policy will also change the matching Copy Policy—as they are in sync. However, if any of the copies’ policies are different than the main Title Policy, then changing the main Title Policy will not affect these copy policies.
To assign a policy to a title:
- Go to the Items module.
- Search for the title you want to assign a policy to.
- Click the padlock icon to unlock the record for editing.
- Click on the Policy dropdown menu, and select the policy for this title.
- Click Save.
To assign a policy to a copy:
- Go to the Items module.
- Search for the title you want to assign a policy to.
- Click the Copies tab.
- Click the padlock icon to unlock the record for editing.
- In the copy list, locate the individual copy you want to assign a policy to.
- You can use the data in the Information tab to the right (Barcode, Call #, Accession Date, etc.) to help you differentiate one copy from another.
- Click the Policy dropdown menu, and then select the policy you wish to assign to this copy.
- Click Save at the top-right of the window.
Patron Policies
Any time the rules differ for a patron group you will need to create a new patron policy and assign it to the affected patrons. Policies are required for every patron and every item (or item copy). Policies are used to give detailed statistics for patrons and/or items for a specific time frame. Policies are also a selection in almost every patron, item, and circulation report.
Patron Policy: Check Out
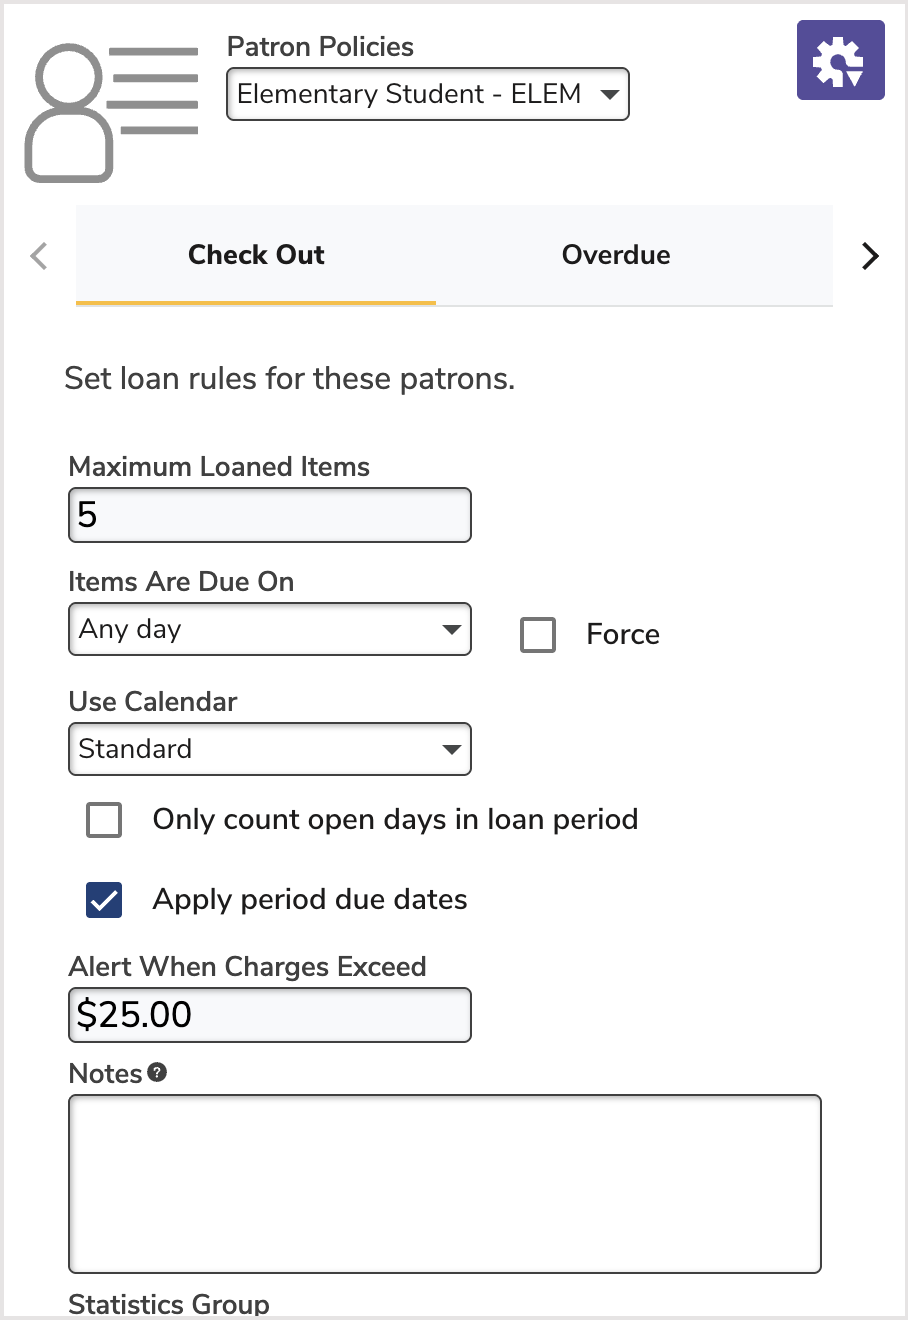
Maximum Loaned Items. The maximum number of items that the patron type (under this policy) can check out before circulation privileges are denied. COMPanion recommends not setting this number above 50. However, this number corresponds directly to and is determined by the power of your computer system. An operator with the appropriate security level can override the resulting alert window and allow checkout regardless.
Items Are Due On. If you select a day of the week from this drop-down menu, all loaned items are due back (for patrons under this policy) that same day each week. You can choose between Any day (meaning item due dates are based on the number of days these items can be loaned option) or Monday through Sunday. If the day of the week you select happens to fall on a Closed day, then Alexandria will try the specified due on date again in a week. If next week’s due on date also happens to be Closed, Alexandria will make the item due on the next available Open date. For example, if a library requires that certain items are due back on Fridays—setting this preference to Friday allows due dates would be calculated for the specified circulation period and then advanced to the next open Friday.
Force. If a due on date falls on a Closed day, this checkbox forces the item to be due on the next open day specified in the Items Are Due On drop-down menu described above. Therefore, if a due on date is Thursday, items will always be due on a Thursday.
Use Calendar. Select the calendar used when calculating due dates (under this policy). Items are never due on Closed Days and circulation periods may be shortened by the Period Due dates specified on the calendar chosen—if period due dates apply. If you remove a calendar that is being used by a policy, the Standard calendar automatically replaces it. All changes made (closed dates, period due dates, etc.) will be generated by Alexandria using this specific calendar.
Only count open days in loan period. Check this box if you want the loan period to only count open days. For example, a loan period through a week that contains two bank holidays would end up adding two extra days to the duration of the loan.
Apply period due dates. Set up a Period Due date in the Calendars Preference window (by clicking twice on an empty calendar day). Period Due dates are fixed due dates that require items to be returned to the library, regardless of the loan period or any other circumstances. You may have as many Period Due dates as you require for your library. If you choose to apply period due dates to patrons under this policy, due dates for items are automatically adjusted during checkout. This allows items to circulate for their normal circulation period until the circulation period would extend past any period due date specified in the designated calendar. If period due dates apply, the circulation period is shortened and the due date is set to the period due in the specified calendar.
| This feature is immensely useful for libraries that require all books returned in order to perform an inventory or move the collection. |
Alert When Charges Exceed. The total fine amount that a patron (under this policy) can accrue before circulation privileges are denied and an alert window appears during checkout. If the patron’s total fines exceed this value, an alert will appear when this patron becomes the Current Patron. If you want an alert for any patron with fines, set this value to “$00.01”. If you want alerts for patrons with larger fines, determine that value here. An operator with the appropriate security level can override the resulting alert window and allow checkout regardless.
Patron Policy: Overdue
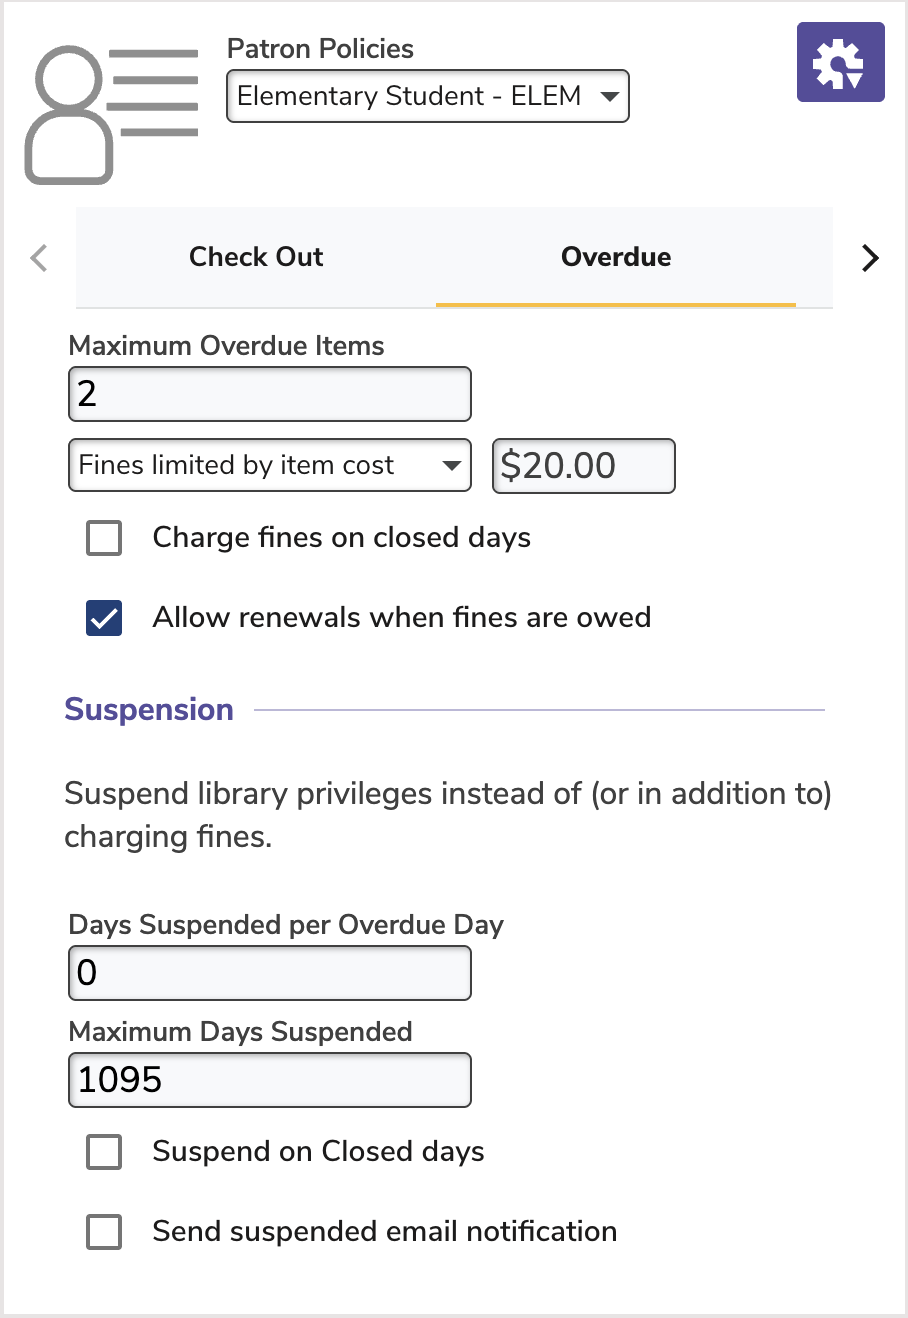
Maximum Overdue Items. The maximum number of items (under this policy) that patrons can have overdue before circulation privileges (i.e. new item check out) are denied. An operator with the appropriate security level can override the resulting alert window and allow checkout regardless.
Fines limited by item cost. Choose this option to limit overdue fines to whatever the Replacement Cost / Purchase Cost value is.
Maximum fine for an overdue item. This value limits the total amount (the maximum fine) that can be charged for an overdue item before it no longer accrues fees. One example would be if a patron had three overdue items; if this policy was set to $5.00, the patron would not exceed $15.00 in overdue fines for just these three books. If you want to allow unlimited fines, enter a large value here. If this option is selected and set to $0.00, patrons in this policy will not accrue overdue fines.
Charge fines on closed days. When checked, a patron will be charged the fine rate for every day each item is overdue, even on library closed dates (e.g. weekends and holidays), excluding grace days. When left unchecked, a patron will only be charged for days the book is overdue when the library is open, excluding grace days.
Allow renewals when fines are owed. If this box isn’t checked, patrons will be unable to renew any items that they have checked out until their fines are paid.
Suspension
You can choose to suspend patron library privileges in lieu of (or in addition to) fines.
| Run a Suspended Patrons report to see all suspended patrons. |
Days Suspended per Overdue Day. Enter the number of days that a patron’s library (i.e. circulation) privileges should be suspended per overdue day. For example, if the value in this field is set as 2, then for each day an item is overdue, the patron will have circulation privileges suspended for two days. If the item were three days late, privileges would be suspended for six days, beginning with the first overdue day. Note that the dialogue box in Circulation regarding this policy will NOT suspend the patron if you select “Cancel.”
Maximum Days Suspended. The maximum number of days that a patron can be suspended. This is only active if Days Suspended per Overdue Day is greater than zero.
Suspend on Closed Days. If a patron has been suspended for overdue items, the suspension will count Closed Days (i.e. days that the library is closed) as part of the suspension time if this option is checked. This is only active if the Days Suspended per Overdue Day value is set to anything greater than zero.
Send suspended email notification. If this option is checked, an email notification will be sent to the patron if a suspension is incurred. This is only active if Days Suspended per Overdue Day value is greater than zero and the library email address has been set, the library SMTP server has been set, and email notification is enabled.
Patron Policy: Other
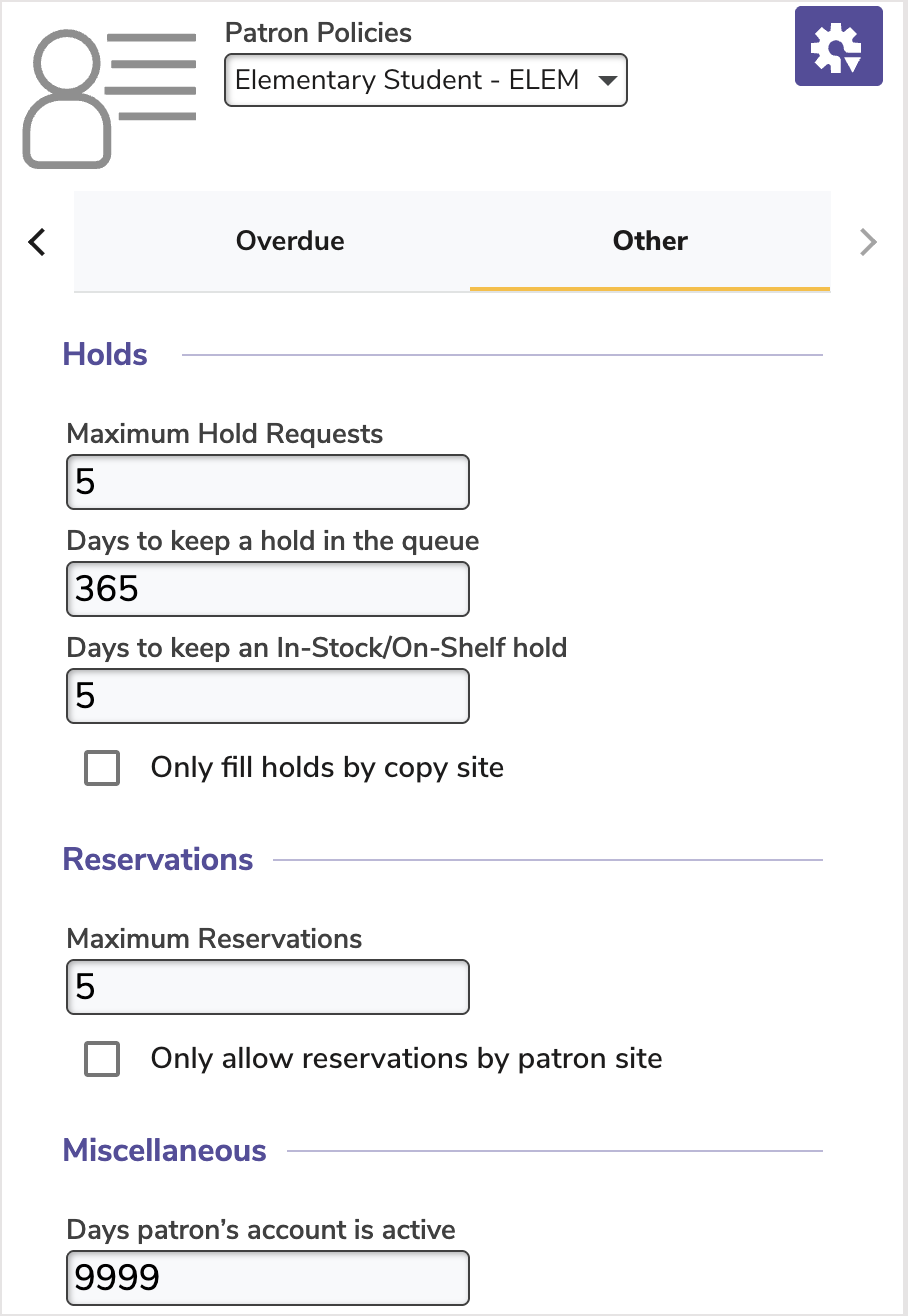
Holds
Maximum Hold Requests. This is the maximum number of pending hold requests that patrons (under this policy) can have active at any one time before additional holds are denied. An operator with the appropriate security level can override the resulting alert window and allow checkout regardless.
Days to keep a hold in the queue. The number of days a patron’s hold request will stay active (i.e. how long Alexandria keeps a pending hold). Hold requests that exceed this given time limit (e.g. no copies of the title were returned) are automatically removed from the system.
Days to keep an In-Stock/On-Shelf hold. Once a copy is returned and fills a requested hold, it will be reserved for this many days for the patron to pick up (i.e. the number of days a patron’s in-stock hold will be kept). In-stock hold requests that expire (e.g. when a patron doesn’t pick up the copy during this time) are automatically removed at the beginning of each day; a notice is prepared so that items may be returned to an available status, returned to the shelves, or held for another patron in the hold queue. This setting also applies to on-shelf holds.
Only fill holds by copy site. If checked (in a Centralized Catalog environment), patrons may only place holds on items from their local library / school collection. An alarm will sound and a warning message will appear if an attempt is made to place a hold on an item from another library (i.e. items with a different library identification).
Reservations
Maximum Reservations. This is the maximum number of reservations that a patron is allowed (under this policy).
Only allow reservations by patron site. If checked (in a Centralized Catalog environment), patrons may only place reservations on items from their local library / school collection. An alarm will sound and a warning message will appear if an attempt is made to place an item from another library (i.e. items with a different library identification) on reserve.
Miscellaneous
Days patron’s account is active. This value is used as the default account expiration date for newly added patrons (i.e. how long, in days, that patron’s account is valid). Usually, this is one year. When an account is expired, an alert will appear on the Circulation window when that patron is accessed or attempts to check an item out. (If account expiration is disabled, this field is also disabled.)
Note if a patron has been assigned one policy, and later has that policy changed to one with a different number of days the account is active, the expiration date of the patron will not automatically change. If you do not want to renew accounts, set this to a very high number.
Self-Service check out (SIP2 only). When checked, SIP2 self-service check out will be allowed for this patron group. Default is checked.
Self-Service payment (SIP2 Only). When checked, patrons are allowed to make self-service payments at SIP2 stations. If this is unsupported by your SIP2 hardware, then this field is ignored.
Item Policies
Whenever the rules differ for an item group, you need to create a new item policy and assign it to the affected items. Follow the steps below to manage the item policies for your library.
| Many school libraries or public libraries create policies based on medium type or call number range. Alexandria will not automatically change or set any item’s policy just because a policy matches the medium type or call number range. The librarian must set the item’s policy either during an item import, running the Change Copy Policy utility or manually in the Items management window. |
Item Policy: Check Out
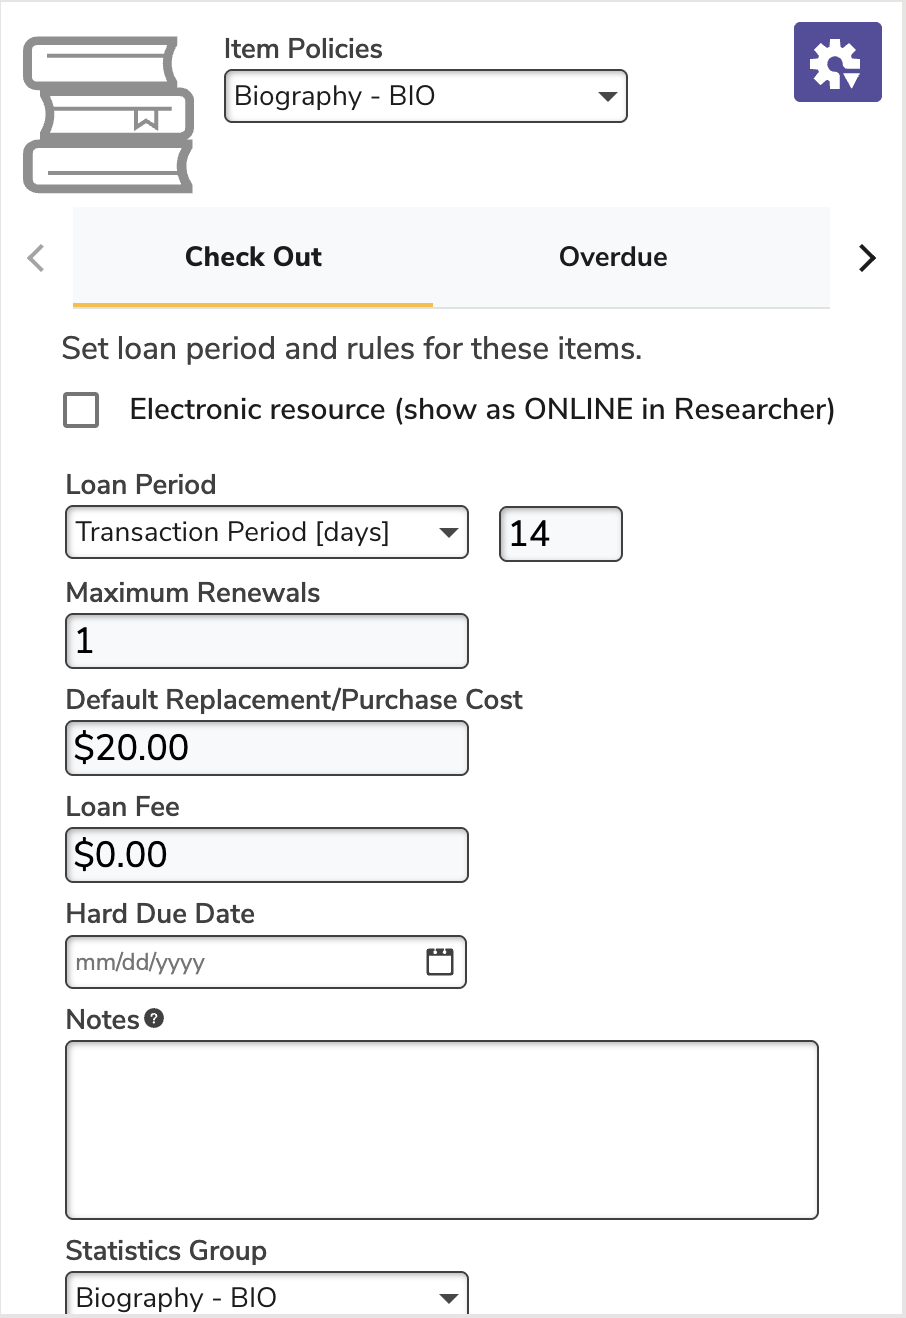
Electronic resource (show as ONLINE in Researcher). Checking this box modifies the results in the Details list in the Researcher with respect to availability and allows more convenient access to the electronic resource (i.e. eBook).
Loan Period. This field allows you to specify the number of days that items can be loaned; i.e. the number of calendar days used to calculate a due date. A setting of 0 means that items can never be checked out or taken from the library; essentially a No Loan Period. Also, you have the option of easily setting the loan period as Same Day Check Out, meaning that items are due back the same day that they were checked out. Items, however, will never be due on a Closed date. If the library is closed and there is not a Period Due date specified in the near future, the due date will be advanced to the next open date.
Maximum Renewals. Set the number of times that the same item, under this policy, can be renewed. If you don’t allow items to be renewed, set the number to 0. If a patron tries to renew an item that has already been renewed the maximum number of times, a warning message will appear on the Circulation window indicating that the patron has exceeded the policy limit for renewals. An operator with the appropriate security level can override the resulting alert window and allow checkout regardless.
Default Replacement / Purchase Cost. Set the default (average) replacement and purchase cost for items using this policy. This is the amount charged to a patron when an item is lost, never returned, or irrecoverably damaged and the item doesn’t have an individual Purchase Cost and/or Replacement Cost specified in the Copy Information (where these amounts can be modified at any time). Your Fines limited by item cost policy preference (see Overdue preferences) determines whether Overdue fines are allowed to exceed the Default Replacement / Purchase Cost value. This policy saves time by automatically supplying a default Purchase and Replacement Cost when adding an item (either manually or by import) to your collection; these values are automatically entered so that certain collection reports will provide some worth for your items. Default is $20.00.
Loan Fee. If your library charges your patrons a fee for checking out an item type (i.e. renting), this is the field where you specify the fee amount for items using this policy. This fee is charged automatically when the item is checked out. The fee is recorded as “Loan Fee for {item title}”. Default is $0.00. For example, a public library may “rent” a DVD or Blu-ray player; their policy might have a set loan fee amount of $10.00 so that anyone checking out a DVD player is charged $10.00 automatically.
Hard Due Date. Using this policy, you can set a fixed due date on which all items (i.e. everything) are required back to your school or library, regardless of the number of days an item can be loaned. Generally, this date is set for equipment checked out to classrooms, test preparation materials (e.g. ACT, SAT, AP), textbooks, the end of a school year or semester, or quarter changes. If the date entered here is after today’s date, it is used as your due date. Otherwise, Alexandria computes a due date according to other policy settings.
Statistics Group. Provides an alternate statistic and/or way to track groups of item policies; for example, you can use a Laptop policy with a more general statistics group of Equipment.
Item Policy: Overdue
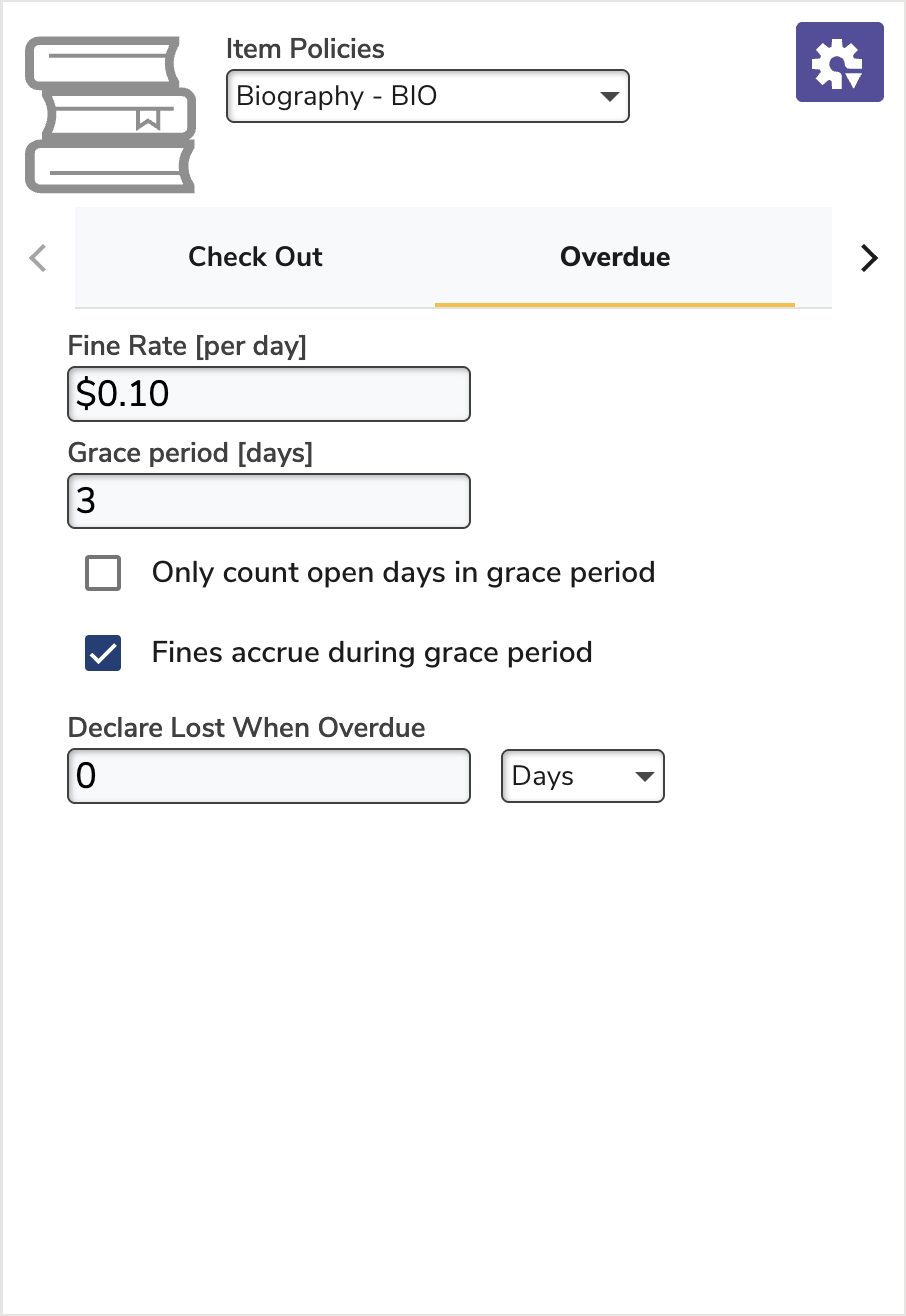
Fine Rate (per day). Set the fine rate that is charged to the patron for every day that the item is overdue (under this policy). The fine rate is computed daily. If you don’t charge fines, enter $0.00.
Grace period (days). Specify the number of days this item type can be borrowed past its loan period before fines begin to accrue. For example, if you set the grace period for two days, patrons are not charged fines until the third calendar day an item is overdue. At this point, they are charged fines for three overdue days. Unless Only count open days in grace period is checked, it doesn’t matter if the library is open or closed on those days, the grace period is only computed on calendar days. For easy check-in, set the grace period one day longer than your commonly closed periods. For example, if you are commonly closed on Saturday and Sunday, set the grace period for three days. Therefore, if the book is due on Friday, and it’s turned in through the bookdrop on Saturday, when you check it in on Monday, no fines will be charged.
| Once the grace period is over, patrons will be charged for each day the item is overdue. Adjust the Only count open days in Grace Period and Fines Accrue During Grace Period settings to customize whether you charge fees past the grace period on open days or on all days. |
Only count open days in grace period. By default, days on which the library is closed do not count against the Grace Period. Use this preference to reverse that policy.
Fines accrue during grace period. By default, we do not charge fines for overdue items during the Grace Period. Use this preference to reverse that policy.
Declare Lost When Overdue. If an item has been overdue for a significant amount of time, the odds are that it will not be coming back. This preference allows an operator to set the number of days that an item can be overdue before it’s automatically declared lost. Daily Operations, reports, and utilities will be adjusted and the offending patron will be assessed the appropriate charges without an operator having to do anything.
If you do NOT want items to automatically be declared lost, leave this set to 0.
Item Policy: Other
Holds
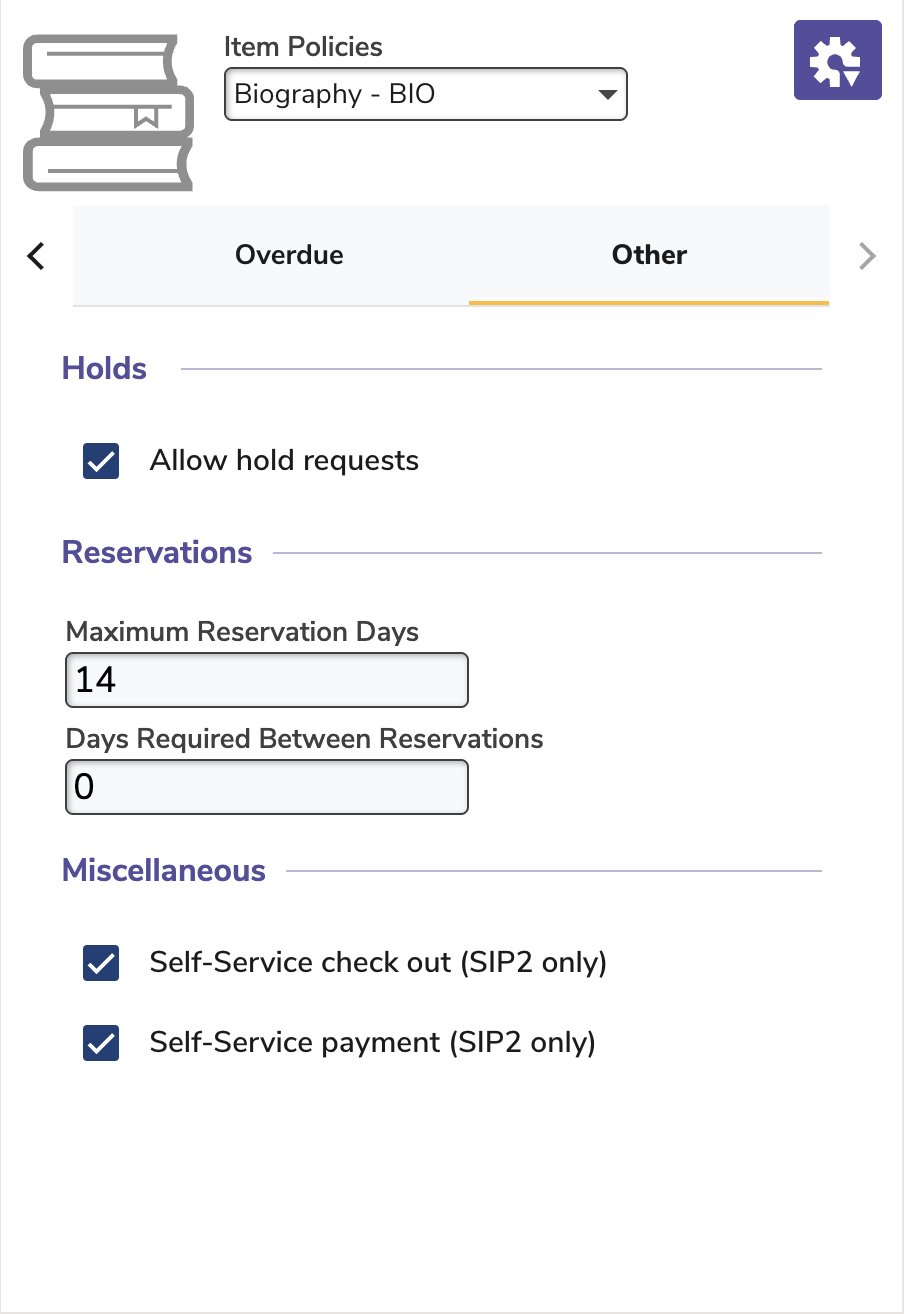
Allow hold requests. This box must be checked in order to allow patrons to place a hold request on an item (under this policy) without getting an error message every time. If you don’t check this box, patrons cannot place hold requests on items under this policy. An operator with the appropriate security level can override the resulting alert window and allow checkout regardless. Default is ON.
Reservations
Maximum Reservation Days. Set the maximum number of days that a reservation may be placed on a specific item copy (under this policy). If items aren’t allowed for reservation, set the period to 0 days. If none of the copies allow reservations, the Reservation window will not open and a note will be made to the transaction log. Reservations may exceed (or may be shorter than) the number of days an item may be checked out.
Days Required Between Reservations. Generally used by a central distribution agency; this policy creates a buffer period of open days allotted for delivery, processing, and pickup before a reservation so that items are ready to distribute to the next patron in waiting. If a patron tries to check out a book whose reservation period coincides with their loan period, a warning message will appear and that patron’s loan period will be cut short. Also, if your library requires time to process an item that has been returned, this setting will enforce the processing time between reservations. For example, certain equipment may need to be calibrated after each use. If the calibration time takes two days, and you enter the value “2” in this preference, Alexandria will make sure that reservations are separated by at least two days.
Miscellaneous
Self-Service check out (SIP2 Only). When checked, SIP2 self-service check out will be allowed at SIP2 stations for items under this policy. Default is checked.
Self-Service payment (SIP2 Only). When checked, self-service renewal will be allowed for this item type at SIP2 stations. Default is checked.
Policy Exceptions
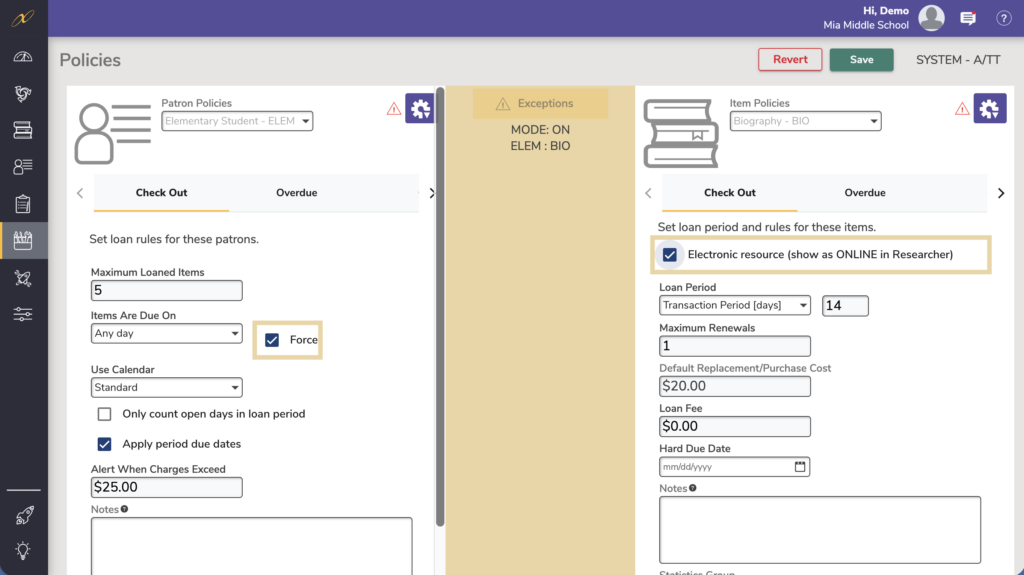
The standard settings configured in the subtabs of the Patron Policy and Item Policy sections are the general rules for the selected patron and item groups (e.g. 6th Grade and eBook). Exceptions to these rules are set in an appropriate combination of a patron and item policy. Exceptions mode allows you to modify the behavior and relationships between selected patron and item policies to further customize your policy settings.
The standard settings configured in the subtabs of the Patron Policy and Item Policy sections are considered the general rules for the selected patron and item groups (e.g. 6th Grade and eBook). Exceptions to the way these combined policy groups interact in Standard Mode can be adjusted by clicking the Exceptions tab, which will then turn red to indicate you’re in Exceptions Mode. This mode allows you to modify the behavior and relationships between selected patron and item policies to further customize your policy settings.
For example, if you have a policy for “Staff” and another for “Projectors”, you may want your staff to be able to check out projectors but only staff members and no other patrons under any other policies
One rule of thumb when creating an exception is to set up the policy based on how it will apply to the majority of users, and then set up the exceptions.
For example:
- You can make an exception that items belonging to the Reference policy only circulate to members belonging to the Staff patron policy. While the standard Transaction Period for the Reference item policy could be set to 0 days, an exception to the policy could be made so that the patron Staff policy may check out the reference books for 3 days.
- Similarly, if you have a patron policy for IT (Information Technology) and an item policy for Projectors, you may want to give your information technology specialists the ability to check out projectors, but only them and no other patrons under any other policies. Set the Transaction Period for Projectors to 0 days, then make an exception for your IT policy.
- While you usually allow your 4th Grade patrons to check out 5 items at a time, you may want to limit them when it comes to music CDs.
- Select the 4th Grade Patron Policy on the left and the Music CDs Item Policy on the right.
- Click the Exceptions tab (it will turn red).
- Change the Maximum Loaned Items checked out to 3.
| Policy exceptions are checked during each transaction but still apply to the patron as a whole. Continuing with the example above, let’s say a 4th grader already has 3 items checked out (of any type) and wants to check out another item. If that item is a music CD, they won’t be able to check it out because it references the exception and sees that their limit is 3 items. But if the item is a book, they will be able to check it out because their normal limit is 5 items. In other words, the Maximum Loaned Items is not looking at each item’s type; the exception is only referenced when there’s a transaction between a patron of this type and an item of this type. |
When you save your changes, the fields, dropdown menus, or checkboxes with exceptions will be highlighted in red to indicate that they’re exceptions to the default standards.
Policies subtabs that contain an exception will display an alert icon (i.e. warning sign) to the left of the name to indicate that an exception is present for the selected Patron/Item policy combination.
Exceptions: Step-by-Step Instructions
Click the Exceptions button and it will turn yellow to inform us that we are in Exceptions Mode. Once in this mode, make changes to the desired policy tabs and fields. When you save your changes, a yellow box will appear around the modified fields. Once you are finished, click the Exceptions button again to leave the Exceptions Mode.
When the Exceptions button is yellow, you know that there must be an exception involving your item and patron policies. The yellow alert icon (i.e. warning signs) that appear in the Policies tabs inform you as to where your exceptions are located. If you switch to a policy that does not have any exceptions, the Exceptions button will not be yellow and there not be an Alert icon.
To remove exceptions, click the Exceptions button and then the Actions drop-down menu. Here you can choose to remove any selected or all patron or item exceptions depending on which Actions drop-down menu you selected.
Create an Exception
- Go to Tools > Policies.
- From the dropdown menu, select the Patron Policy and Item Policy that, when combined, will create the policy exception.
- Click the Exceptions button (it should turn yellow).
- Go through the various Policies tabs (Check Out, Overdue, Hold, Reservation, and Other), changing the appropriate values to the fields, dropdown menus, and checkboxes.
- When you have successfully created your exceptions, click Save.
- A yellow outline should appear around every exception (field, dropdown menu, and checkbox) that was made.
Modify an Exception
To modify an exception:
- Go to Tools > Policies.
- From the dropdown menu, select the Patron Policy and Item Policy that, when combined, contain your policy exception.
- Click the Exceptions button (it should turn yellow).
- Go through the various Policies tabs (Check Out, Overdue, and Other), changing the appropriate values to the fields, dropdown menus, and checkboxes.
- When you’ve successfully modified your exception, click Save.
- A yellow outline should appear around every exception (field, dropdown menu, and checkbox) that was made.
Remove an Exception
To remove a policy exception:
- Go to Tools > Policies.
- From the dropdown menu, select the Patron Policy and Item Policy that, when combined, contain the policy exceptions that you would like to remove.
- Click the Exceptions button (it should turn yellow).
- Once in Exceptions Mode, use the Actions menu to remove policy exceptions using one of the following selections:
- Remove Patron/Item Exceptions. Depending on your selection, this will remove all of the Patron or Item policy exceptions. For example, selecting Remove Patron Exceptions from the Actions dropdown menu in the upper-right hand side of the Patron Policy section will clear all of the patron policy exceptions (fields, dropdown menus, and/or checkboxes outlined in red) from the selected Patron Policy.
- Remove All Exceptions. This selection will remove all the Patron and Item exceptions from the selected Patron and Item Policy.
- When you have successfully removed your exceptions, click Save.