
Best Practices for eBooks
About eBooks
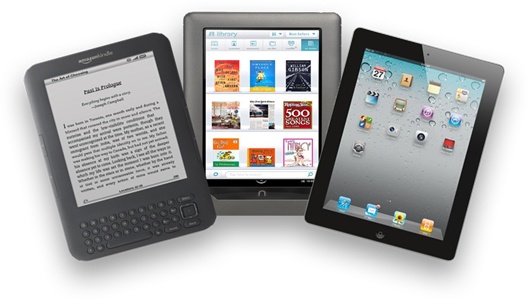
Ah, the digital world in which we live! Is it any wonder that eBooks are becoming more and more appealing to readers? With Alexandria, you too can take part in the eBook revolution! One of the many advantages of the eBook format is that you can configure it so that your patrons are no longer limited by your library hours; many eBooks have unlimited circulation with access around the clock—even from home. Additionally, eBooks are beneficial in that they promote multisensory learning (AVK).
With reputable publishers and distributors such as Capstone Interactive and Overdrive, you have access to bilingual versions of engaging content that you can trust in a digital library format. Most vendors now offer eBooks in non-fiction, fiction, picture books, interactive audio books, databases, and literacy programs for students in pre-kindergarten to high school.
 | Capstone Interactive allows unlimited circulation; other eBooks can circulate just like your hard copies with only one patron allowed to use them at a time and only for the specified check out time. For instance, OverDrive provides a service that essentially checks out eBooks and other electronic resources for a specified time and then forces them to expire on the device they have been downloaded at the specified termination time. Additionally, some eBook publishers require that libraries repurchase eBooks after a specified number of circulation. |
Want to try it out? To celebrate our partnership, Capstone Publishers is providing Alexandria users with twenty-four interactive eBook titles for FREE! Hard to believe? Maybe, but it’s true! Your kindergarten through 3rd grade and special education teachers will go wild about these eBooks! No more need for classroom Big Books—teachers can just connect their computer to a projector and the whole class can see the eBook and read along together. Of course, if you find that these titles are a hit with your library users, Capstone will be glad to provide you additional eBook titles. You’ve got nothing to lose, so give it a try and enjoy!
eBooks, eReaders, and Alexandria
If your library isn’t an eBook provider / eReader lender yet, you may soon find yourself joining the thousands of libraries that are incorporating them into their collections. Of course, there are several different types of eBook readers available and many sources of eBooks. As you decide on how you would like to support eBook reading (e.g. vendors or eBooks sources), this will also influence your choice of eBooks and, possibly, even eBook readers.
| An eBook reader is a portable electronic device that is designed primarily for the purpose of reading digital books and periodicals. |
Using the “look-before-you leap” philosophy, research all the eReader devices available to you before you decide which option(s) best suits your library. You may want to consider small things such as a subscription to a digital distributors of eBooks like OverDrive. Also, should you allow your patrons to download eBooks if they have other overdue items? If not, what do you need to do to prevent them from doing so?
One great internet resource that you may want to consult is the eBook Educators Group; you’ll want to peruse their various forums and investigate their Resources > Links.
The information in this document includes instructions on how to use Alexandria to:
- Set up an eBook Reader User Agreement.
- Catalog an eBook Reader.
- Catalog eBook titles that have been downloaded to an eReader.
Of course, you will have to adapt these instructions to fit your brand of eReader (e.g. Nook, Kindle, iPad, etc.) and their individual permissions/restrictions. For instance, Amazon allows you to install a purchased eBook title on up to six Kindles.
Integrated eBook Services
- Capstone Interactive Library… features over 2,000 eBook titles with unlimited user access.
- Capstone PebbleGo… databases feature expertly-leveled text specifically designed for beginning researchers.
- MackinVIA… is your one-stop portal for educational eBooks and online databases.
- OverDrive… offers digital media solutions for distribution of premium content over global networks.
eReaders
eReader Management
Although we may be using Amazon’s Kindle as our example eReader, you are free to choose whatever device works best for your specific situation and/or site (i.e. Nook, iPad, etc).
Of course, no matter what eReader you use, each one requires some initial proprietary setup such as registering the device and downloading eBook titles. For example, Amazon recommends that lending libraries “de-register” individual Kindle accounts after eBook titles have been downloaded to them and leave the Kindle in this “de-registered” state until you are ready to purchase and/or download more eBooks for that Kindle.
Create an eReader Policy
Whatever you do, we recommend that you create an eReader policy that is separate from Alexandria’s standard Equipment policy; this is because your eReader’s cost, checkout privileges, and transaction period are probably drastically different from your other library equipment. In addition, having separate policies for each will allow you to accumulate statistical data for only your eReader devices (e.g. how often they circulate at your library).
Provide Meaningful Item Record Titles
You will need to determine how detailed you want the item record information to be for your eReader devices. For instance, is it really necessary to have an eReader’s serial number as the title or would “Kindle Group 1” (since you’re allowed to download the same eBook title to six different Kindles) be sufficient if you provide the make, model, serial number(s) and District in the Copy Notes subtab for each individual eReader?
The method described above helps to prevent dreaded “catalog clutter”, and allows you to archive all your essential eReader information. Should an eReader end up missing or damaged, you should only need access to the make, model, and serial number information. In a Centralized Catalog environment, each school’s eReaders should be cataloged using a unique school identification number or abbreviation after the title (e.g. “Kindle Group 1 – 412” or “Kindle Group 1 – BHS”); this will keep all the eReaders for that school together and separate from another school’s equipment.
You can also include an eReader’s Copy ID as part of it’s Call # to make inventorying them easier. For example, you could use “KRG1-1” as the call number for the first Kindle in ‘group 1’ and “KRG1-2” for the second, etc. Your Kindles can then be shelved in call number order—this makes it easy to see which one(s) are missing or currently checked out.
 | If you don’t own a portable scanner for inventory, you should use the Copies Labels to print out a sheet containing all the barcode numbers of your available eReaders. During inventory, use this sheet to check which, if any, eReaders are missing and then inventory those remaining on the shelf. |
Use Alert Notes for Policies and Procedures
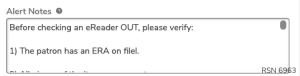
Consider whether or not using Alert Notes would be helpful when cataloging your eReaders. For instance, your Alert Notes could contain a list of eReader-specific check in/out procedures; things that should be returned as part of the “item” as well as helpful reminders for the operator checking the eReader in or out. There are possibly even some non-Alexandria procedures that you may want to post in your Alert Notes; for example, deactivate the district Kindle/Amazon account registration prior to check out so that patrons aren’t unintentionally granted access.
For instance, you might want to create Alert Notes like the one on the right.
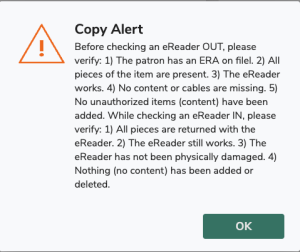
This way, every time an eReader (or group of eReaders) is made current in the Circulation window—during check in or check out—an Alert Notes warning will appear, espousing your policies and procedures; the current operator must deliberately click the Proceed button in order to continue.
Example text…
Before checking an eReader OUT, please verify:
1) The patron has an ERA on filel.
2) All pieces of the item are present.
3) The eReader works.
4) No content or cables are missing.
5) No unauthorized items (content) have been added.
While checking an eReader IN, please verify:
1) All pieces are returned with the eReader.
2) The eReader still works.
3) The eReader has not been physically damaged.
4) Nothing (no content) has been added or deleted.
Create a User Agreement
You’ll find several examples of previously made user agreements on the eBook Educators Group website. Some of the elements you may want to address include:
- treatment of the device,
- sharing the device with other students,
- caution against leaving the device unsupervised,
- downloading to the device,
- the purchasing of eBooks,
- and changing the content loaded on the device.
For parents, you’ll want to include a statement of responsibility to ensure proper treatment/use of the device, a safe and timely return, and financial responsibility for damage or loss.
Once you’ve written (or borrowed) a suitable user agreement, we recommend that you save your finished agreement as a PDF to make it readily available.
Identify Patrons with an ERA
To identify patrons who have signed your eReader User Agreement, you need to add the information to their patron profile.
- Go to the Patrons module.
- Look up your patron and open their profile.
- In the Personal Info tab, enter ERA (eReader agreement) in either the Homeroom or 2nd Location fields, whichever one you’re not using.
- Since the information is located in a field by itself, you can run a report on all patrons with the text ERA in the Homeroom or 2nd Location fields to find out who has ERAs on file.
If you are already using the Homeroom or 2nd Location fields for something else, you can always add this information after the existing information—just separate it with a slash or a hyphen. For example, if the current patron’s homeroom teacher or second location designation is Jones, and you want to indicate that they have an eReader agreement on file, your entry in the selected field of the patron record would be “Jones – ERA” or “ERA – Jones”. Then, if you want to print a list of those students who have an ERA on file, you would Select By that element (i.e. Homeroom or Second Location) first.
Import eBooks
There are several simple steps involved when importing eBooks into Alexandria.
For illustrative purposes, the examples below will use our downloadable Capstone Interactive Library selection of free eBooks to demonstrate the process of importing eBooks. Feel free to follow along (and get some free eBooks) or substitute our examples with eBooks of your own; either way, the method for importing remains the same.
See also Add Titles > Import Electronic Resources.
- Set Your Preferences
- Enable Capstone Interactive:
- Go to Preferences > Services.
- Select Capstone Interactive from the list on the left.
- On the Settings tab to the right, toggle the ON to enable, and make sure you have a valid Vendor URL.
- If you made any changes, click Save.
- Next, go to Tools > Policies.
- You should already have an eBook Item Policy. However, if you don’t (or you would like to modify it), you can do so here.
- Read Item Policies to find out how to add or modify item policies.
- As a general rule, eBook policies should have No Loan Period and allow no holds, reservations, or fine amounts.
- If you made any changes, click Save.
2. Download MicroLIF Records
- Go to https://www.goalexandria.com/resources/partner-files/ and scroll down to the partner files.
- Click both Capstone MicroLIF File and 24 Capstone Interactive Library Book Covers to download the ZIP files to your computer.
- In order to import the item records, you’ll need to open the zipped file. Find Microlif.001.zip on your computer and open it. Another file called Microlif.001 should appear.
- (See also Capstone Interactive)
3. Import Item Records
- Go to Operations > Import > Items.
- Click Choose File and find Microlif.001 on your computer. Select the file and click Open.
- On the Settings tab, select Add Titles.
- On the Options > Title subtab, select your eBook policy from the dropdown menu.
- Click Run.
4. Import Cover Art
- Go to Operations > Import > Images.
- Click Choose File and find CILcovers.zip on your computer. Select the file and click Open.
- On the Settings tab, select Item Cover Art.
- Click Run.
5. Access Your eBooks
- Go to Researcher > Search or Explore.
- In the Search field, type the exact name of one of your Capstone Interactive Library titles (e.g. “The Moon”).
- If a matching title is available, the requested eBook should appear in your Researcher’s search Results (note the “ONLINE” status):

- Next, click on the cover art or the link text to begin reading.
- Your internet browser will open the eBook in a new browser window.
- If, for some reason, your eBook doesn’t appear, make sure that your firewall is configured to allow access to the URLs in question and that you don’t have browser-integrated popup blocking inadvertently closing your eBooks.
Cataloging eBooks
Catalog an eBook
- In Items Management, click on the plus icon to add a new title.
- Choose how you want to add the eBook:
- To find a MARC record match, use Title Assistant. Click on the appropriate record to highlight it before clicking Continue or pressing <enter>. If the Medium is not “electronic resource” or “downloadable eBook”, remember that you can later change the Medium and Policy and add any additional information (e.g. notes) required to perfect your eBook record.
- Or, to add a record manually, Skip the Title Assistant.
- The new title record will appear in the record pane, where you can add or modify any information about the eBook. Here are some fields you should review:
- Call Number. Make the Call Number easily identifiable as a title that is (or can be) downloaded to an eReader. For example, if you were cataloging The Cat in the Hat by Dr. Seuss, you may want to add the prefix of KIN to the Call Number in order to designate it as an eBook title installed on a Kindle. Then, complete the call number as if you were cataloging a regular book (e.g. KIN CL SEU).
- Policy. Select your eBook policy. You’ll want to review it in your Policies to make sure it’s configured correctly. Specifically, check the following:
- On the Check Out tab, make sure that the Transaction Period drop-down menu is set to No Loan Period.
- On the Other tab, make sure the Allow Hold Requests option is unchecked.
- On the Other tab, verify that Show AS ONLINE in Researcher is checked.
- Medium. If necessary, change the Medium (245_h) to something like “electronic resource” or “downloadable eBook”.
- Subjects tab. Create a convenient link to the eReader group on which the eBook was downloaded/installed by using the title of the eReader group as a subject heading. See Add eReader Group as Subject Heading below.
- When you’re done customizing the record, click Save.
- You can also import multiple eBook records at once.
Site-specific eBook URLs
For centralized catalogs only.
To make only your eBooks show up in your search:
- Navigate to the title in Items Management and switch to MARC View.
- Find the 856 tag for electronic resources. This should already have your link (_u) and link text (_y).
- Add another subfield to the 856 for _8. In this field, put your site code e.g. EVE. An invalid site code could cause this item to not show up at all so make sure you get this right.
- if you have multiple URLs for your different sites, make sure there is an entry for each url.
- if you want this e-resource to show up at multiple sites, simply create an 852 tag for each site (be sure there is a _u and _y in addition to the _8).
- Note that _9 can also be used for the site code but we recommend _8.
- Talk to your vendors about including an 856 _8 for your site in their import files. Otherwise, you will need to do this for all new e-resource items.
- A title with 856 _8 or _9 ‘copies’ will ONLY show for the site you are searching; this applies in patron interfaces as well as in Items Management. These ‘copies’ will not count toward your license limits.
Optional Strategies
Here are some extras things you can do with your eBooks and electronic resources.
Add eBook Copies
Generally, we don’t recommend adding copies for eBooks and electronic resources. This is because it gives patrons the wrong impression on how to access those items, is often considered incorrect cataloging (since there aren’t actual copies), and it may contribute to your item limits. However, you might choose to add eBook copies if you want to track usage or have digital copies that can only be loaned to one person at a time.
If you want to add copies to your eBooks, first follow the instructions to Catalog an eBook. After you click Save, a dialog will pop up asking if you want to add a copy. Clicking Add will create a new, blank copy in the record pane. Fill out the copy’s information and click Save. You can add more copies by clicking on the Actions menu and selecting Add Copy (adds one new copy) or Duplicate Copy (adds multiple new copies).
Add eReader Group as Subject Heading
Create a convenient link to the eReader group on which the eBook was downloaded/installed by using the title of the eReader group as a subject heading. This way, patrons will be able to see the eReader group for an eBook by looking at its expanded details in Search or Explore’s results.
- Go to Items Management and select the eBook record.
- Click on the Subjects tab.
- At the top of the window, click the padlock icon to unlock the record for editing.
- Click Add and select 650 – Subject Added Entry – Topical Term.
- In the 650_a field, type the eReader group name (e.g. “Kindle Group 1”). This should exactly match the title of the record for the eReader(s) on which this particular eBook is installed.
- At the bottom of the window, click Save to keep the tag.
- Save the record at the top) to keep your subject heading changes or Revert to abandon them.
- Add the same subject heading to multiple records at once by using the Add a MARC Tag utility.
Visit the Library of Congress for more information about 650 – Subject Added Entry – Topical Term tags.
Create an eBook Barcode Reference Sheet
If you have eBook copies, run a Copy Labels (3×10) report to create a printable quick reference for all the eBooks in your collection. These are easy to use, distribute, and share at your organization!
- Go to Operations > Reports > Copies > Labels.
- Select Copy Labels (3×10) – Barcode Labels, Envelope Labels, Info Labels.
- Configure the Selections tab as shown below:
- Copies with a Status of: Any
- Copies with a Policy of: eBook
- Copies from: Copy Location
4. Click on the Options tab. Click the Sort By dropdown menu and select Title.
5. Click the Run button at the bottom of the window.
6. Next, click the Operations icon in the top right of the Reports window, or go to Operations from your sidenav.
7. Locate your report, which should be at the top of the list, and then click the PDF icon to download it to your device.
8. Print the PDF and keep a hard copy at your circulation desk so it is readily accessible for reference.
| Make this a Saved report and mark it as a Favorite so you don’t have to remember how to set it up again the next time you add more eBook titles. |
How to: Circulate ebooks
Check In/Out
Checking out an eReader is exactly the same as lending any other item. Be sure to carefully examine the Current Patron pane to see if the user agreement is signed, returned, and on file.
Remember, using Alert Notes are extremely helpful in reminding yourself (or other library staff) of the policies and procedures you want followed when eReaders are checked in and checked out.
Lastly, be sure to gather usage statistics for the eBook titles your patrons are checking out on the eReader.
Checking in an e-Reader is the same as returning any other item:
- Go to Circulation.
- Select Bookdrop (B) mode from the Command Line dropdown menu.
- Scan the eReader’s barcode.
- If any alert notes created when the eReader was first cataloged, they’ll remind you of your library’s Check Out and Bookdrop polices and procedures.
When an eReader is returned, it’s important that you thoroughly examine it to make sure it still works, that all pieces are there, and that nothing has been added or deleted.
How to: Place an eBook on Hold
Now that you’ve created an item record for each and every eBook, patrons can search for eBooks by title.
Remember when we added the subject heading that indicated the eReader group on which the title was installed?
- Have your patron log in to Researcher.
- Search for an eBook using the Title or Subject filters.
- Locate the book in your search results.
- In the example shown below, you can see that it’s an eBook because it’s availability says “ONLINE” and the cover art depicting a dog-eared left corner revealing the Capstone Interactive logo.
- Click on the blue title (e.g. Air) to open the Item Details.
- If you created a subject heading for this eBook, click on the associated eReader group listed in the Subjects section. This will cause the eReader record you created to open and allow the patron to Place Hold on one of the eReaders belonging to that “group”.
How to: Gather ebook usage statistics
Alexandria records title statistics when links are clicked in Researcher. However, you can also manually add statistics for ebooks used in other ways.
- Log in to the Circulation module.
- In the Command Line, type “Y” followed by an optional override date or usage count, and then press <enter>.
- Ask your patron which title on the eReader they want to read.
- Scan the barcode number associated with that eBook title to add a usage statistic on that eBook in your Copy Barcode Labels report.
- To exit Statistics mode, type a period (.) and press <enter>.
0 Comments