
Import Items
This page covers importing Library Items as well as Textbooks.
Be sure to review information on the main Imports page—especially Scheduling and importing from FTP.
See also…

Item Field Mapping

Import Items Video
COMING SOON

Import FAQs

Related Tips
While it is possible to manually enter item records, there is an easier way! Use Alexandria’s item imports to quickly add catalog records.
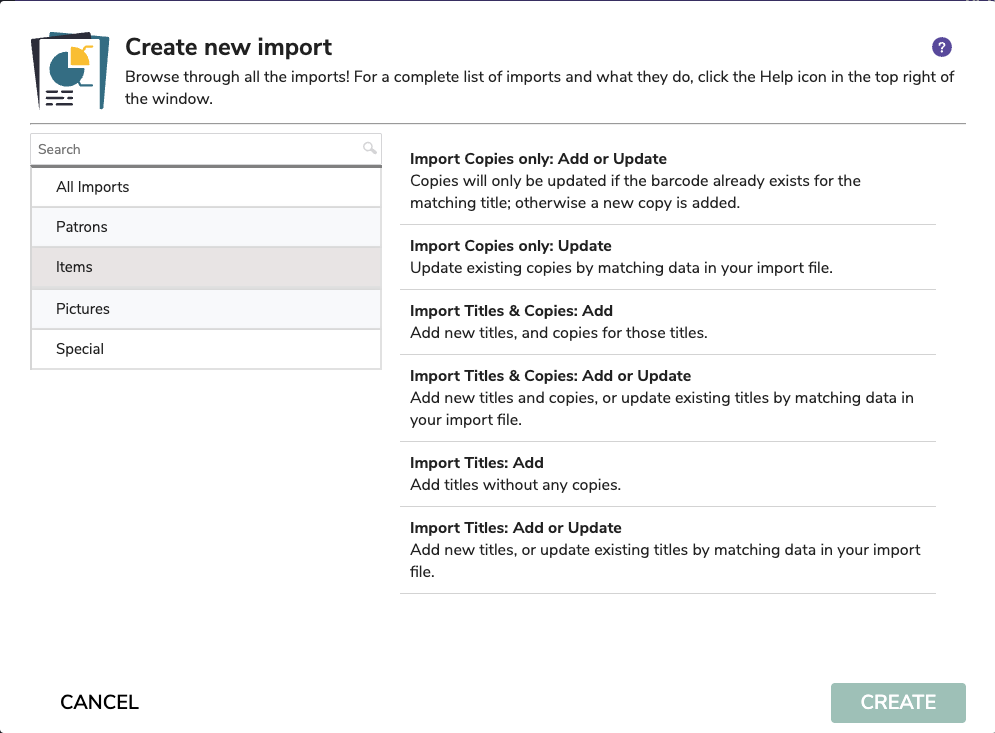
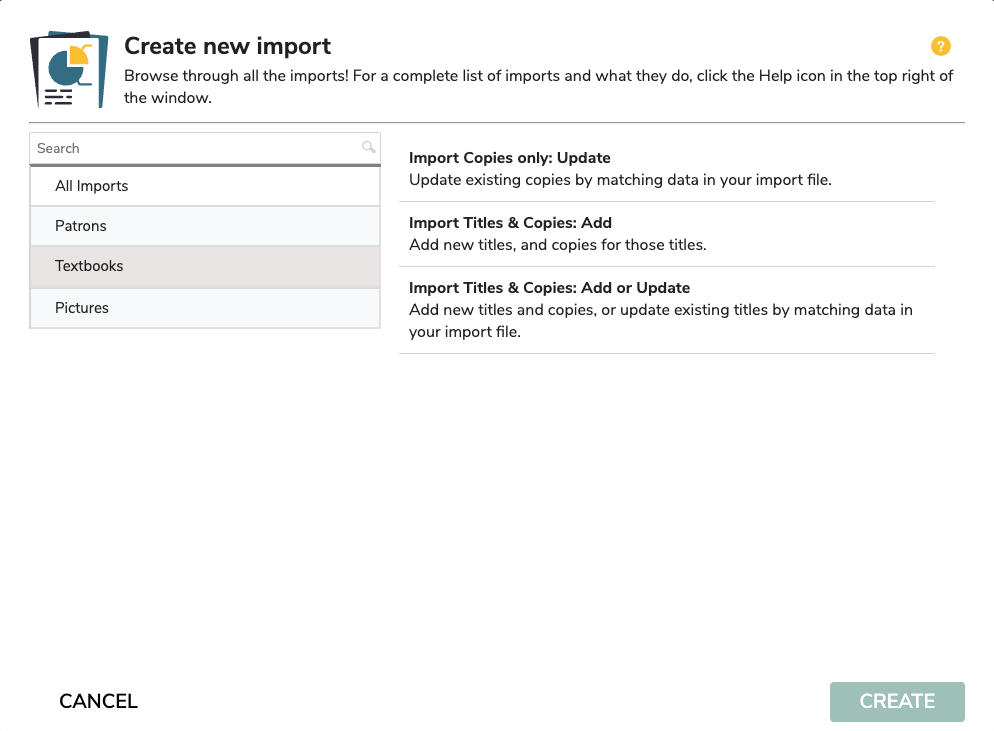
Table of contents
About Item Imports
There are several different imports that will determine how your records are processed. Note that as an operator you may have limited security to modify title data.
| import TYPE | old radio setting | use |
|---|---|---|
| Import Copies only: Add or Update | Add or Update Copies for Matching Titles | Alexandria only Used to Add or Update Copy Records for specific Titles. Valid for Tab Delimited import data. If no copy fields are included in import records this is logged and the import is terminated. |
| Import Copies only: Update | Update Copies | Alex + TT Used to modify existing Copy Records. Title fields are ignored. Select this option to modify Copy data in your collection based on the Copy Barcode. |
| Import Titles: Add | Add Titles | Alexandria only |
| Import Titles: Add or Update | Add or Update Titles | Alexandria only Used to add or update Title Records. Import Data for copy related fields is ignored, however copy barcode data may be used for matching a Title by copy barcode. |
| Import Titles & Copies: Add | Add Titles & Copies | Alex + TT Used to Add Title and Copy Records. Neither Title or Copies can be updated with this setting. |
| Import Titles & Copies: Add or Update | Add or Update Titles & Copies | Alex + TT Used to Add and Update Title and Copy Records during import. Copy records can be updated, but ONLY if they “belong” to the associated Title Record. |
| Mitinet MARC Update | n/a | Alexandria only |
Most book vendors provide title information for the items they sell in industry-standard MARC/MicroLIF records. These records usually accompany your order in an email attachment or on a disc. Conveniently, Alexandria can read MARC or MicroLIF records directly, saving you the hassle of typing item information directly into the computer. Also, if you move library books from one collection to another, you can provide associated title records that the new location can import into its Alexandria database.
If you are automating a new library, ask your book vendor for MARC or MicroLIF records when you order new items.
If you are automating an existing library with catalog information (usually catalog cards), consider using our retrospective conversion service to make the information machine-readable. We will create MicroLIF and MARC records for all items in your collection and give you an import file afterwards. This is a good time to examine your collection and remove unused and outdated items.
Alexandria performs an analysis on each and every MARC record imported so that information is correctly imported from a wide number of vendors. If you find records that don’t import correctly, send them to COMPanion and we’ll fine-tune Alexandria import them properly.
Supported Sources
Alexandria correctly imports records from the following sources:
- 1987 MicroLIF
- 1991 MicroLIF
- US MARC Communication & MARC 21
- SunLink, WisCAT
- Laser Cat
- Dynix, Follett
- Canadian MARC
- …and many more.
| Alexandria supports importing local holdings tags of 852. |
Supported File Types
While importing, Alexandria looks for a header that contains a file designation of “FT01” to specify item information (E.g. ###*FT01/fieldnumber/fieldnumber…/ <return>). Read more about Item Fields.
For item imports, Alexandria accepts MARC, MicroLIF, and other tab-delimited formats, including .txt, .tab, .tsv, .mrc, .mlif, .001, and .dat. Item imports now default to MARC or MicroLIF format for files, and you can upload either of those file types
For textbook imports, Alexandria accepts the tab-delimited .txt and .tsv file types.
All tab-delimited format import files that don’t have a header will require field mapping.
| Drag and drop Drag an import file from your computer and drop it in the File Source pane for a quick and easy import! |
Item Import Settings
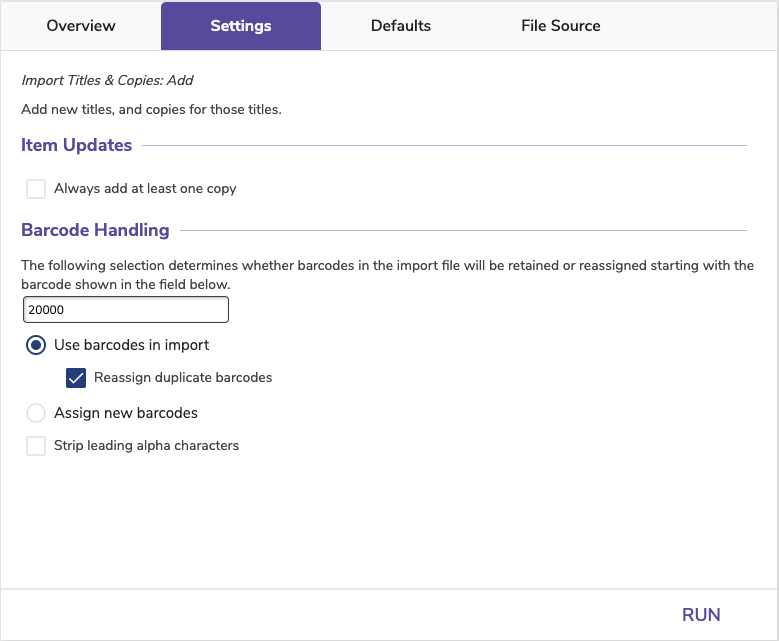
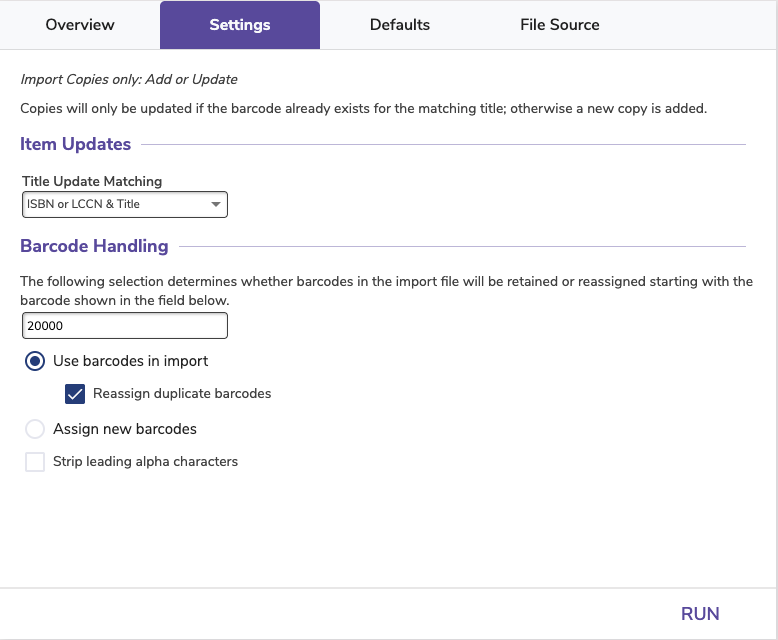
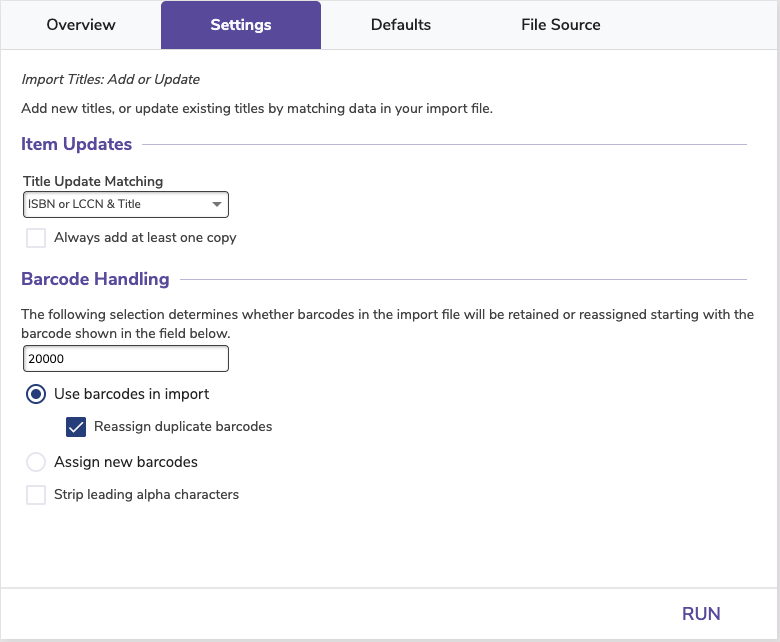
The Import window’s Item Settings tab allows you to configure how titles and copies are handled. The settings vary per import type. Here is an example of what it looks like:
Item Updates
- Title Update Matching (Import Items). Selects the Title Update Matching Rules. Of course Title Matching is only used when the Import Rule needs it i.e. Add or Update Titles & Copies or Add or Update Titles. NOTE: Title matching is an ‘exact’ match and includes 245_a and 245_b. ISBNs are reliable identifiers for title match purposes and should be included in quality MARC records obtained from reputable sources, such as OCLC.
- ISBN or LCCN & Title
- ISBN or LCCN & Title & Title Call Number
- Title & Author & Medium
- Title & Author & Medium & Title Call Number
- Copy Barcode
- Title Update Matching (Import Textbooks). Match up and update existing titles by either Title ID or ISBN. Note: Title matching is an ‘exact’ match.
- Title ID
- ISBN & Title
- Always add at least one copy. (For Title imports only.) This setting is used to automatically add at least ONE copy for every Title updated or added during the import. This option specifies that at least ONE new copy is always added when the Title is added or modified. If one or more copies are added when the title is added or modified, additional copies are NOT added. The next available barcode is used when adding a Copy. This checkbox is ONLY enabled for: Add Titles; Add or Update Titles, Add Titles & Copies, Add or Update Titles & Copies — otherwise it’s disabled and ignored.
Barcode Handling
The following selections determine whether the barcodes in your import file will be retained or reassigned starting with the barcode number shown in the field below.
- Starting Item/Textbook Barcode. If a new item barcode number is required, Alexandria will assign numbers beginning with the value you enter in this field. Alexandria always checks first to see if a barcode is already in use, and if it is, a new barcode number is automatically selected.
- Use barcodes in import. When selected, trying to add Copy Data with duplicate barcodes causes the imported record to be ignored. Use this setting if you want existing Copy Data to be updated.
- Reassign duplicate barcodes. When selected, any barcodes that are duplicates of barcodes that already exist within your Alexandria database will be reassigned. This is the default setting.
- Assign new barcodes. When selected, all item barcodes are reassigned using the Starting Item Barcode number (above). If you know for sure that your vendor assigned “dummy” barcode numbers with your MARC records, you’ll want to use this option to force Alexandria to assign new barcode numbers according to the Next Barcode setting in your Patron Defaults preferences.
- Use barcodes in import. When selected, trying to add Copy Data with duplicate barcodes causes the imported record to be ignored. Use this setting if you want existing Copy Data to be updated.
- Strip leading alpha characters. When checked, any barcodes being imported (or assigned on import) that start with alpha characters (i.e. letters of the alphabet) will have the starting letters removed before barcodes are saved. The default setting is Off.
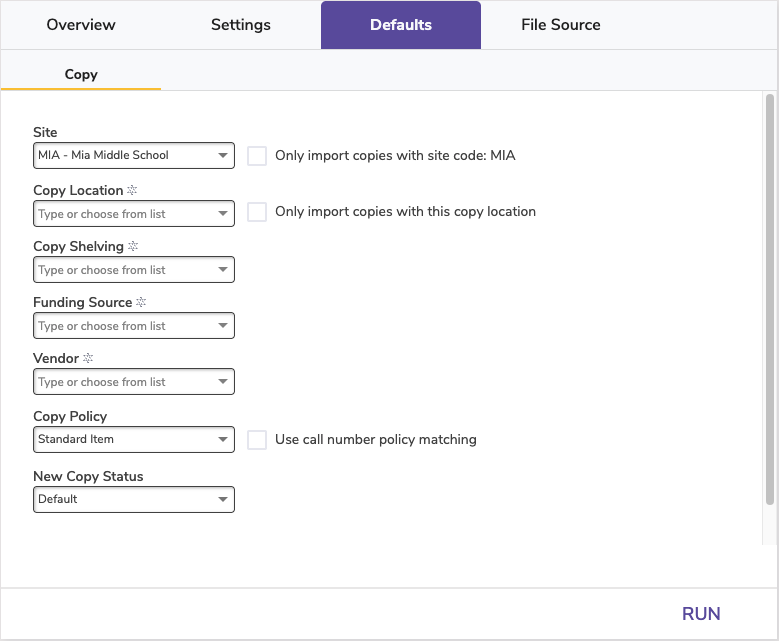
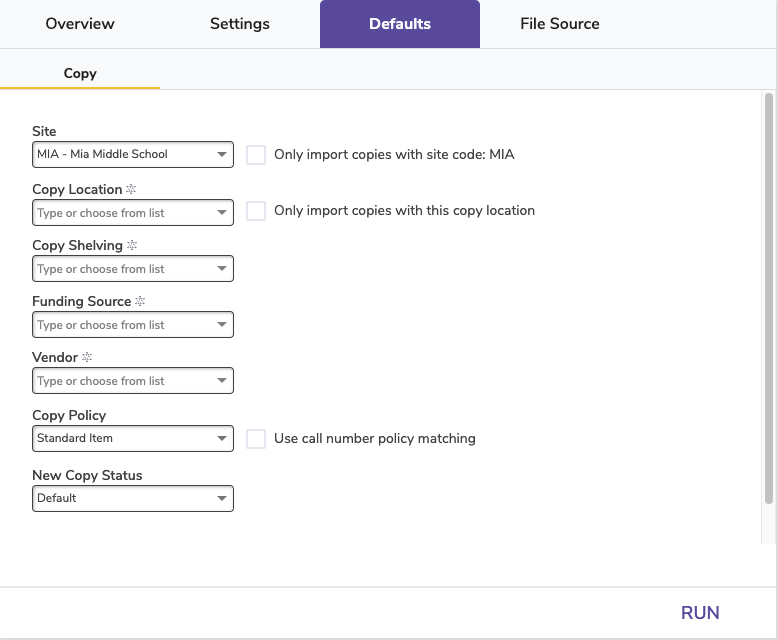
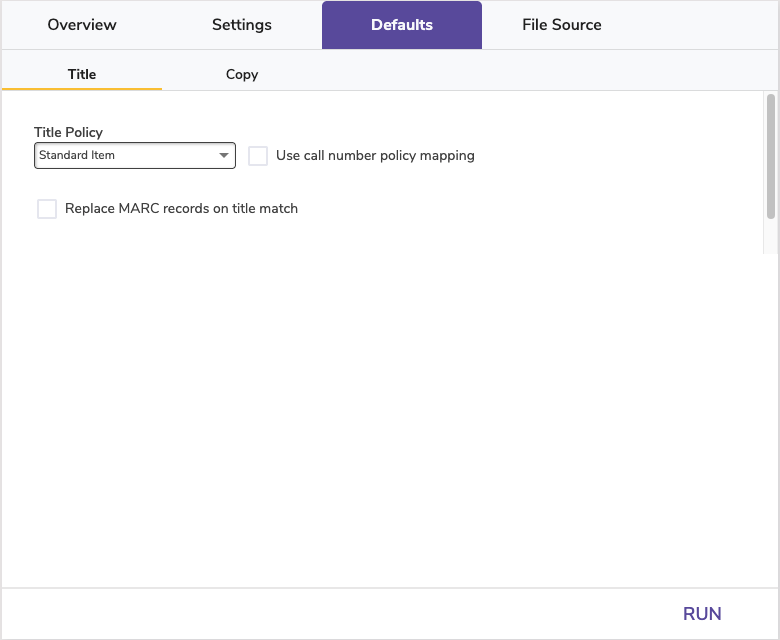
Defaults
These options allow you further control over Title and Copy data on import. For example, if this collection of items comes from a particular funding source, you can enter that information in the Copy subtab to have it applied to every imported copy. For some imports, Title or Copy data isn’t relevant and you won’t see those defaults.
 | If this individual data is included in the import file, that data will NOT be overwritten. I.e. these values are applied only if that information is not specified in the import file. |
Note that some options are only found on Alexandria Library Item imports; they are not applicable to Textbooks.
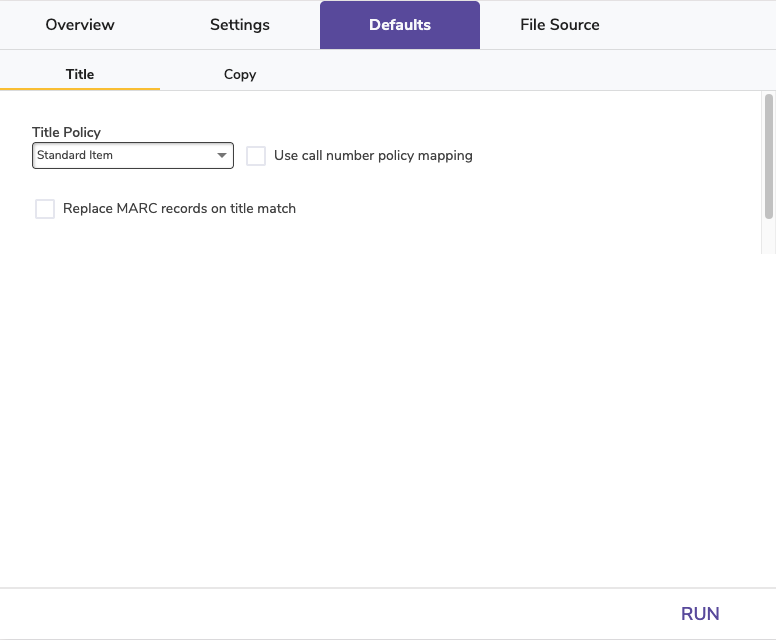
Title options
- Title Policy. Select the policy to be applied to the items you are importing.
- Use call number policy mapping. When checked, any titles with call numbers within the call number range specified in your Policy Mapping will be assigned to that particular item policy.
- Replace MARC records on title match. When selected, the tags in MARC records less than (or equal to) 839 will be completely replaced with the imported records. This is usually only used for data cleanup, i.e. Mitinet.
Copy options
These options apply to imported copies, or when the ‘always add at least one copy’ is on. Some of these use terminology.
- Site. If the site code for the record you’re importing isn’t specified, this value is assigned to the 852_a tag in its place. Disabled if you only have 1 site.
- Only import items with site code. When checked, copy data is ignored where the 852_a site code doesn’t match the current library identification code specified in the Sites Management window. When there is no 852_a information, it is assumed to be the local collection code. When unchecked, all copies are imported—no matter what the 852_a tag contains.
- Copy Location. If the location code for the record you’re importing isn’t specified, this location value is assigned to the 852_b tag in its place. This information can help patrons find items in your library. Patrons generally locate copies by call number, but if you have items outside of the library or in an unusual place, you can enter that location here. Examples: Music Room or Computer Lab.
- Only import items with this copy location. When this box is checked, only information with this Copy Location (or none) is imported. All other library locations are ignored.
- Copy Shelving. This is a second location indicator option if you want to further detail the location of items on specific shelves at your location. If the second location for the record you’re importing isn’t specified, this location value is assigned to the 852_c tag in its place.
- Funding Source. If the funding source for the record you’re importing isn’t specified, this source value is assigned to the 852_1 tag under a specially-formatted subfield.
- Vendor. Enter the name of the vendor from which the copy was received. If the vendor code for the record you’re importing isn’t specified, this value is assigned to the 852_1 tag under a specially-formatted subfield.
- Copy Policy. If the record you’re importing doesn’t have an item policy defined, the policy you select from this dropdown menu will be used. Default is Standard Item. The default policy for the site performing the import is specified in Item Preferences > Item Defaults > Default Policy.
- Use call number policy mapping. When checked, any copy with call numbers within the call number range specified in your Policy Mapping preferences will be assigned to that particular item policy.
- New Copy Status. There are times when items are imported into Alexandria, but they are not ready for the shelf. For example, sites that purchase MARC records from a vendor need to be imported before your operators can finish processing the books. This option allows you to change the copy status of all items being imported from whatever your Default is to In Processing. Later, you can run a utility to automatically change the copy of the items to Available.
Step-by-Step Instructions
Import Item Records
Item records may be imported in MARC, MicroLIF, or tab-delimited formats.
- Log in to the Alexandria Imports module by adding /imports to the end of your login URL.
- Add a new import and pick (for example) Items > Import Titles & Copies: Add
- Click on the items Settings tab; these settings determine what changes are made to a item data file on import. During import, if Alexandria detects an item barcode that is less than three alphanumeric digits, it will pad the beginning of the barcode with Xs. For example, if you are importing an item with the barcode of “7”, then Alexandria will automatically import it as “XX7”.
- Under File Source, click Choose File; this allows you to locate and select a file to import using your operating system standard explorer window.
- If the item import file is recognized, Alexandria will automatically sort, organize, and match the information to the correct, specified fields. If the item import file is missing a header, it will not be recognized; Alexandria will ask you to set your item field mapping in order to proceed.
- Set your Field Mapping to match data in the item import file to specific Alexandria fields. Data from the import file is shown on the left-hand of the window while Alexandria field names are shown on the right-hand side.
- Items are imported in sequential order; use the white up and down arrows to correctly align the fields of the import file. Click on a field to exclude it from the import. See Import Field Mapping > Item Fields or Textbook Fields for more information on the fields that can be imported.
- When you have finished matching Alexandria fields to the information in your file, click the Save button.
- Ready, set, lets go! Click Run, and your file will be imported and a summary file will be logged in Operations Management.
Item Imports
Choose the import that describes what you are doing—i.e. adding titles, copies, or both; updating titles, copies, or both; or both adding and updating records.
Import Copies only: Add or Update
(Alexandria only) — Previously: Add or Update Copies for Matching Titles
This is used to Add or Update Copy Records for specific Titles. Valid for Tab Delimited import data only. If no copy fields are included in the import records, this is logged and the import is terminated. If the import filed does not have information that can be used to identify a matching Title according to the current matching rules, this is logged and the import is terminated. If there is no matching Title, an error is logged. Each import record can result in Copy records getting added or updated for a matching Title.
Error conditions: If the import file isn’t a Tab Delimited file, this is an error or there are no Copy defined fields in the import this is an error and the import will be terminated with “Copy Data required in import records. Import Canceled.” The import will be cancelled. If the import file does not have information that can be used to identify a matching Title according to the current matching rules, this is also an error (“No fields to match Titles. Import Canceled.”) and the import will be cancelled.
Ignore Rules Always add at least one copy; Title Data Options. NOTE—Add & Updated related Copy Defaults are honored. NOTE—Each import record can result in Copy records getting added or updated for a matching Title.
Record Error Logging: If a matching Title can not be found, this is an error and the record is ignored with “Title {matching data} can not be matched. Record Ignored.” in the Summary. If the associated Copy can’t be processed because of restriction in the Barcode Rules. “Copy Barcode {the barcod} Error, Record Ignored.”
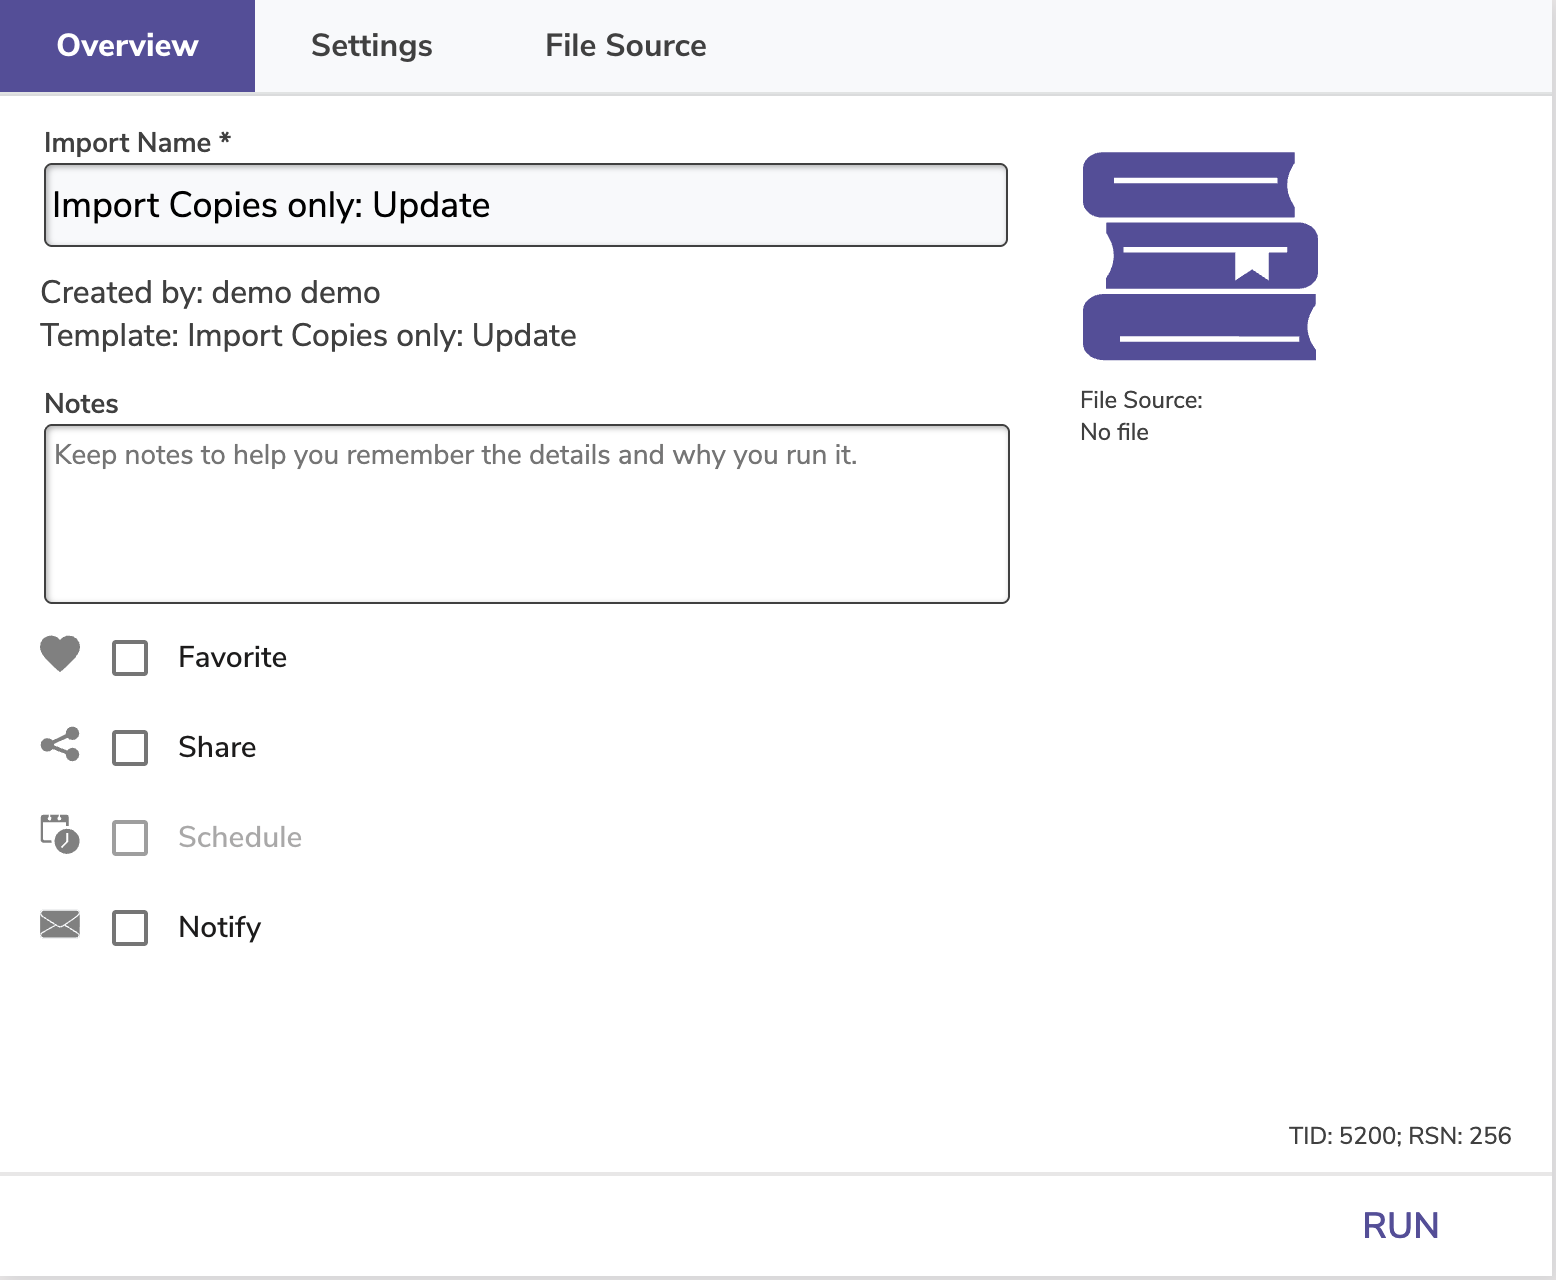
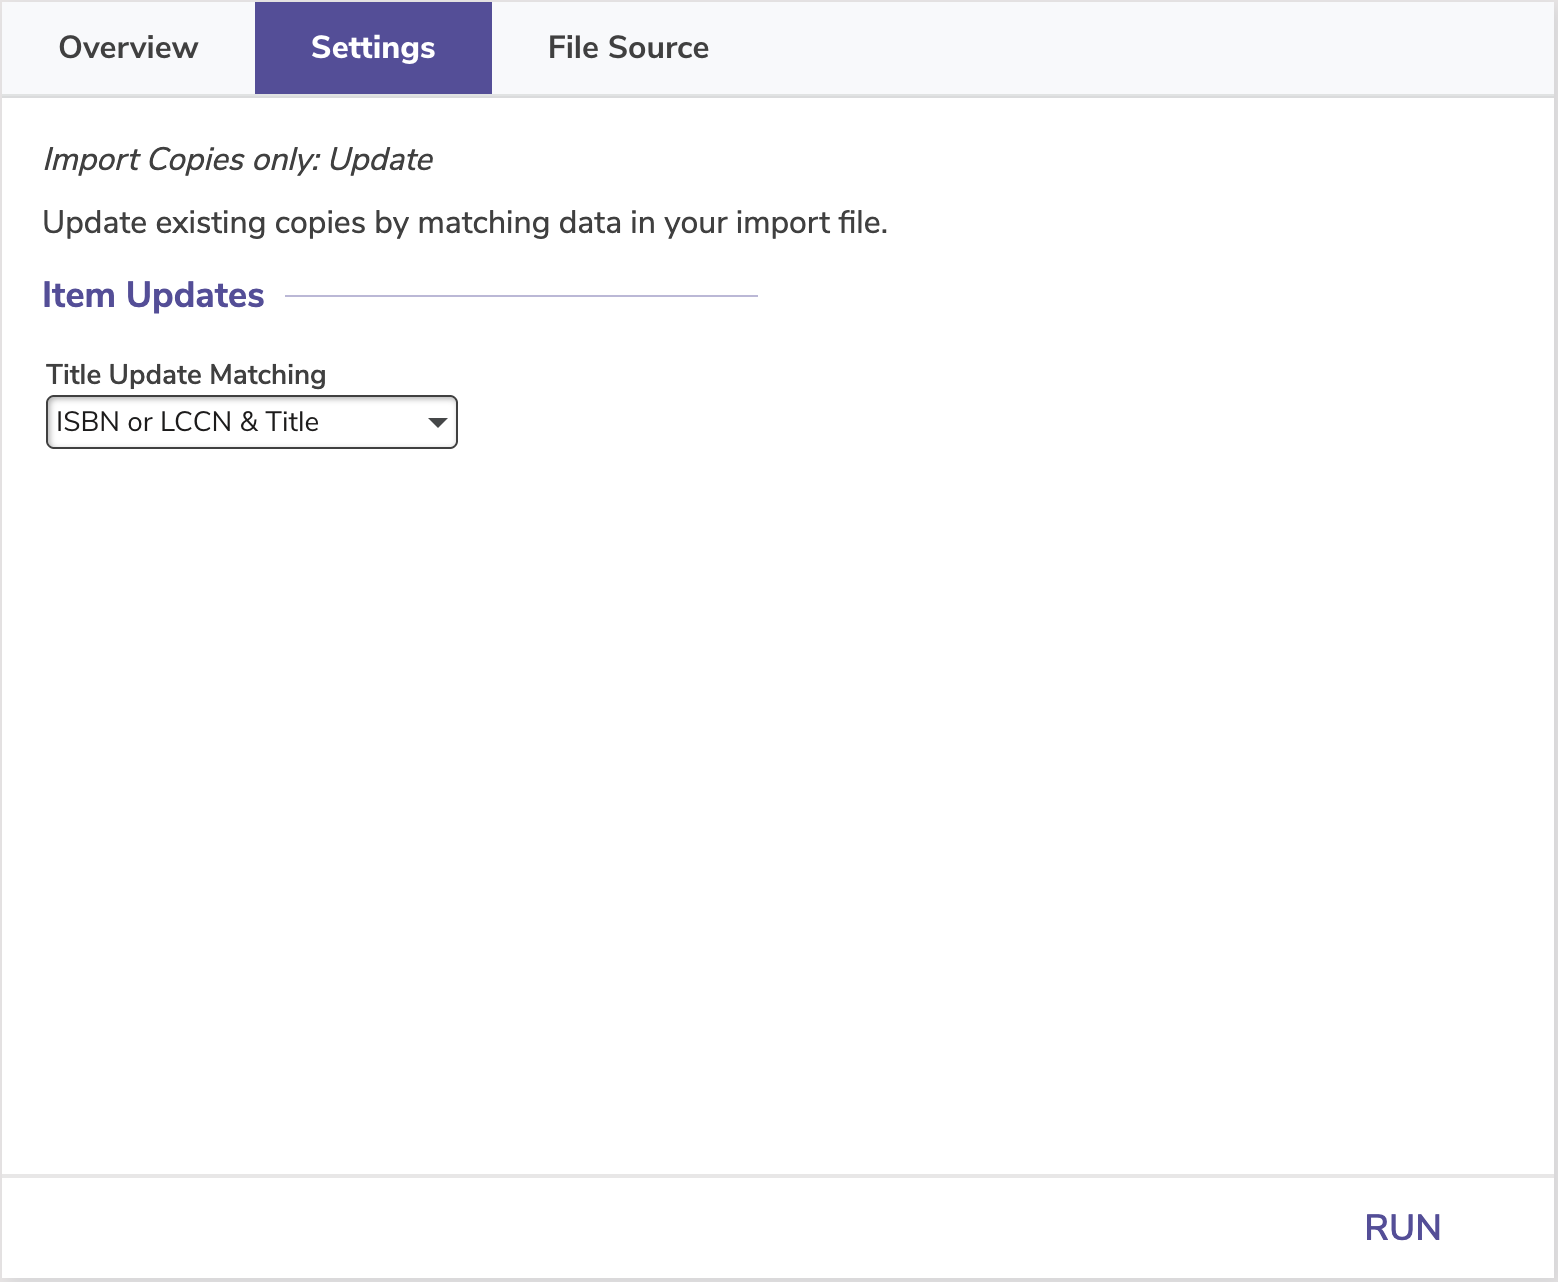
Import Copies only: Update
(Alex + TT) — Previously: Update Copies
This is used to modify existing Copy Records. Select this option to modify Copy data in your collection based on the Copy Barcode. Title fields are ignored. This is valid for Tab Delimited import data only.
For each import record, only the Copy fields are examined and if matching Barcodes are found, that copy record is updated. All non matching Barcodes are logged as an error. An import file without the Barcode field is an error, which is logged and the import is then terminated.
- If a copy record number is used to match, the import can be used to update the matching copy record’s barcode using Barcode Handling rules.
- If a matching copy record is not found, the imported record will be ignored.
If a Barcode matches, that Copy record is updated.
Error conditions: If the import file isn’t a Tab Delimited file, or the copy barcode isn’t defined in the import, this is an error and the import is terminated.
Scenario – Import Update Copies
Import Copies only: Update
You would like to change or fix certain data that is either harder to do in the management windows or utilities (e.g. working off a spreadsheet) or not possible / practical in these modules. For example, adding serial number, location, or shelving information to copies or standardizing / correcting the cAsE or punctuation used in call numbers. You must include the copy barcode for the copy records you wish to update, along with the data you are trying to add or change in a tab delimited file.
Supported Data Formats
- Tab-delimited and must include Copy Barcode.
Import Settings
- Title Update Matching. Select Copy Barcode. Matching on copy barcode for updating copy records only.
File Source
- Skip first record. For field mapping. This setting should be checked if you have included a header row in your spreadsheet. Leave it unchecked if there is no header row identifying the column contents.
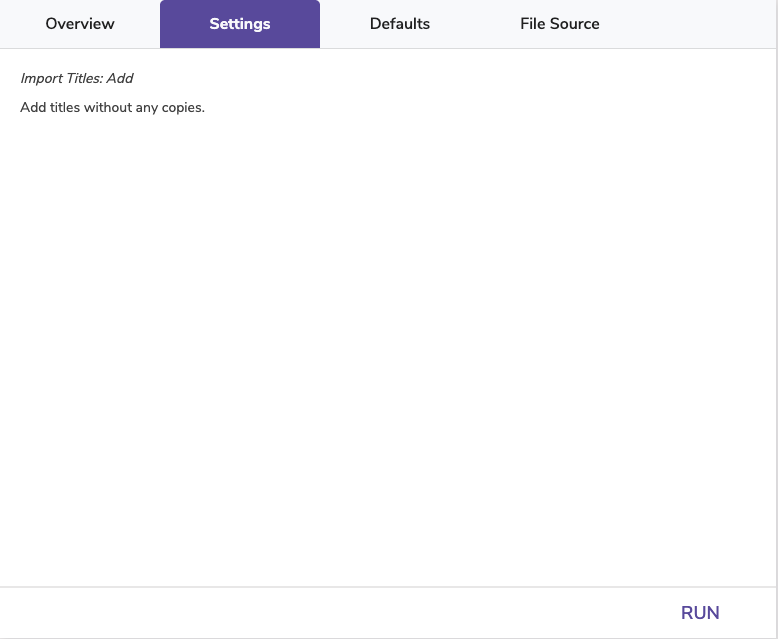
Import Titles: Add
(Alexandria only) — Previously: Add Titles
This is used to add new Title Records. Import Data for copy related fields is ignored. This is valid for Tab Delimited and MARC import data. For each import record, only Title fields are examined so that only new Title Records are added. Import Data for copy related fields is ignored.

Error conditions: If the import file is a Tab Delimited file and there is no “Title” field in the import header this is an error and the import terminated. The added Title must have a valid Title of one or more characters (at 245a).
Title Import Options are honored. A new Title is created for every import file record with valid Title Data.
There are no valid import settings for this import.
Scenario: Import Electronic Resources
Import Titles: Add
File Type: If your eBook records are from a vendor, we recommend using a MicroLIF or MARC file. Use tab-delimited instead if you’re importing records from a spreadsheet or want to catalog a list of webpage or PDF links.
Import eBooks or Electronic Resources:
- Go to Operations > Import > Add > Items > Import Titles: Add
- From the File Source tab, click Choose File to open a finder/explorer window.
- On your computer, locate the file you want to import, and then click Open.
- Make the appropriate selections on the Settings tab.
- Make the appropriate selections on the Options > Titles tab.
- Title Policy / Use call number policy mapping. Select the policy for any new titles, which would be the eBook or electronic resource policy for your library. Or, turn on Use call number policy mapping to let the system determine policies based on call number; only use this selection if Policy Mapping has been configured AND your file contains call numbers.
- Replace MARC records on title match. N/A. This setting is ignored; leave it unchecked.
- Copy settings are ignored.
- Click Run at the bottom of the Import interface to queue the selected import.
File Source
- Skip first record. For field mapping. This setting should be checked if you have included a header row in your spreadsheet. Leave it unchecked if there is no header row identifying the column contents.
Import settings and barcode options are ignored.
| See eBooks for more information on adding these to your catalog. |
Import Titles: Add or Update
(Alexandria only) — Previously: Add or Update Titles
This is used to add or update Title Records. Import Data for copy related fields is ignored, however copy barcode data may be used for matching a title by copy barcode. This is valid for Tab Delimited and MARC import data.
For each import record, only Title fields are examined so that only new Title Records are added. Import Data for copy related fields is ignored. If a matching Title is found, it is updated, otherwise a new title Record is created. If Always add at least one copy is selected a copy with the next available barcode (Starting Item Barcode in the import window) is added with the Copy Defaults to the added or updated Title record.
Error conditions: If the import file is a Tab Delimited file and there is no “Title” field in the import header this is an error and the import is terminated. Added Title must have a valid Title of one or more characters (at 245a).
Add and Update Title Defaults are honored. If a matching Title record can be identified, that record is Update, ELSE a new Title Record is Added. If Always add at least one copy is selected a copy with the next available barcode is added with the Copy Defaults to the added or updated Title record.
Ignore Rules: Barcode Handling, and Copy Defaults (unless Always add at least one copy is selected).
Step-by-Step Instructions
- In the imports module, add a new import, and select Items from the categories pane.
- Choose the import Import Titles: Add or Update
- In the Settings tab, choose the following settings:
- Title Update Matching: ISBN or LCCN & Title
- Vendor supplied records should contain accurate ISBNs, which make it a reliable identifier for title matching.
- Barcode Handling: Select Use barcodes in import and Reassign duplicate barcodes
- Title Update Matching: ISBN or LCCN & Title
- Go to the Defaults tab and the Title subtab. Then choose the following options:
- Title Policy: Choose a default policy for any new items.
- Use call number policy mapping: Leave unchecked.
- Replace MARC records on title match. Leave unchecked so any title record being updated is not inadvertently replaced!
- In the File Source tab, click Choose File.
- Locate the import file on your computer and click Open.
- Skip first record. Check this option if your import file includes a header row, or leave unchecked if there is not.
- If your import file does not have a header, set up the Field Mapping.
- Save the import and review your settings.
- Click Run.
Scenario – Import Title Update
Import Titles: Add or Update
You would like to change or fix certain data that is either harder to do in the management windows or utilities (e.g. working off a spreadsheet) or not possible / practical in these modules. For example, adding Lexile values or standardizing / correcting the cAsE or punctuation used in call numbers. You should include the ISBN for the titles they wish to update, along with the data you are trying to add or change in a tab delimited file.
- Import Settings
- Title Update Matching. ISBN or LCCN & Title
- Barcode Handling. Use barcodes in import and Reassign duplicate barcodes
- Title Defaults
- Title Policy. Choose a default policy for any new items.
- Use call number policy mapping. Leave unchecked.
- Replace MARC records on title match. Leave unchecked so any title record being updated is not inadvertently replaced!
- File Source
- Skip first record. Check if you mapped your fields or the import file includes a header row. Leave unchecked if there is not a header row.
- No Copy Options. This import will not add or update any copies, so you don’t need to modify settings in the Copy Defaults subtab.
Now, if you’re ready, click Run.
Import Titles & Copies: Add
(Alex + TT) — Previously: Add Titles & Copies
Add a new title record for every import file record.


This is used to add new title and copy records. Neither Title or Copies can be updated with this setting. Valid for Tab Delimited and MARC import data. Each import record can result in both Title and Copy records getting added. A new Title Record is created for every imported record that contains Title (ie 245a) data, otherwise the imported record is ignored. If Always add at least on copy is selected, a copy with the next available barcode is added with the Copy Defaults to the added Title record.
- If there are any copy fields, or if Always add at least one copy is selected, a copy record will be created for the new title.
- Titles and copies cannot be updated with this setting.
Error conditions: If the import file is a Tab Delimited file and there is no Title field in the import header this is an error and the import is terminated. Each added Title must have a valid Title of one or more characters (at 245a).
Add and Update Title Defaults are honored. If a matching Title record can be identified, that record is Update, ELSE a new Title Record is Added. If Always add at least one copy is selected a copy with the next available barcode is added with the Copy Defaults to the added or updated Title record.
Ignore Rules: Barcode Handling, and Copy Defaults (unless Always add at least one copy is selected).
Scenario – Import Used Books
Import Titles & Copies: Add
You’ve obtained some physical items but have no electronic records for them. You are looking for the best method to get this information into Alexandria so you can search and circulate these additions.
There are multiple strategies for this situation. You can use one more more of these strategies to quickly enter the data into your system.
Option 1 – Use SmartMARC Title Assistant
Use the SmartMARC® Title Assistant to locate the books via their ISBN or UPC code. SmartMARC will help you find a matching Title in your collection to which you can add a new Copy, or will locate a Title Record from your configured Z39.50 servers. Once you find a matching Title, you can assign a copy to the title record, give it a barcode, and affix a barcode label to the physical item before you save the information into Alexandria.
Option 2 – Use a Spreadsheet
Enter the title information into a simple spreadsheet with one unique title per row. Include as much information as relevant, including title, author, call number, and ISBN, if possible. Import the tab delimited data into Alexandria using the “Import Titles & Copies: Add” Import Option and “Always add at least one copy”. If you have more than one copy of any given title you will need to locate those records following the import to create additional copies.
When using this option you will want to run a Copy Labels report following the import to generate the necessary labels to affix to the physical items. Use the Copies Added selection to easily limit the report to creating labels only for items added today!
Supported Data Formats: Tab Delimited
Each row in the import file contains title information only. You will want Alexandria to create a new title for the information in each row, and also add or create a copy to go along with it.
Import Settings
- Always add at least one copy. Selected. See note above.
Barcode Handling
- Starting Item Barcode. Ensure this is set to an appropriate value for the next barcode to be assigned.
- Assign new barcodes. Selected. Since Alexandria is creating copies and assigning the barcodes, always assign new barcodes.
- Strip leading alpha characters. This option is not used in this case and should be left unchecked.
Title Defaults
- Default Title Policy / Use call number policy mapping. Select the most appropriate item item policy for your library. Either select the default policy for any new titles, or, select to let the system determine these based on call number, if Policy Mapping has been configured AND your file contains the call number.
- Replace MARC records on title match. This option is not used in this case and should be left unchecked.
Copy Defaults
- Site. If you are part of a centralized-catalog you will want to ensure that this is set to site you are importing from.
- Only import copies with site code. This is a special option generally only used for data conversions where you are splitting a centralized-catalog into separate databases. Leave this unchecked.
- Copy Location. Include the location for ALL items included in the import, if applicable.
- Only import copies with this copy location. This is a special option generally only used for data conversions where you are splitting a catalog into separate databases. Leave this unchecked.
- Copy Shelving. Include the shelving for ALL items included in the import, if applicable.
- Funding Source. Include the funding source for ALL items included in the import, if applicable.
- Vendor. Include the vendor, supplier, or donator for ALL items included in the import, if applicable.
- Policy / Use call number policy mapping. Select the most appropriate item policy for your library. Either select the default policy for any new copies, or, choose to let the system determine these based on call number, if Policy Mapping has been configured AND your file contains the call number.
- New Copy Status. In this case you would typically leave this option set Available rather than In Processing, since you are not waiting for the items to arrive—they are ready to circulate as soon as you finish adding them!
File Source
- Skip first record. For field mapping. This setting should be checked if you have included a header row in your spreadsheet. Leave it unchecked if there is no header row identifying the column contents.
Option 3 – Upload MARC Records
Obtain MARC records from an online source, such as OCLC. Download these as MARC or MicroLIF files and import them into Alexandria using the Import Titles & Copies: Add Import option and selecting Always add at least one copy.
When using this option you will want to run a Copy Labels report following the import to generate the necessary labels to affix to the physical items. Use the ‘Copies Added’ selection to easily limit the report to creating labels only for items added today!
Supported Data Formats: MARC, MicroLIF
Import Settings
Each record in the import file contains title information only. You will want Alexandria to create a new title for the information in each record, and also add or create a copy to go along with it.
- Always add at least one copy. Selected. See note above.
Barcode Handling
- Starting Item Barcode. Ensure this is set to an appropriate value for the next barcode to be assigned.
- Assign new barcodes. Selected. Since Alexandria is creating copies and assigning the barcodes, always assign new barcodes.
- Strip leading alpha characters. This option is not used in this case and should be left unchecked.
Title Defaults
- Default Title Policy / Use call number policy mapping. Select the most appropriate item policy for your library. Either select the default policy for any new titles, or, select to let the system determine these based on call number, if this has been configured AND your file contains the call number.
- Replace MARC records on title match. This option is not used in this case and should be left unchecked.
Copy Defaults
- Site. If you are part of a centralized-catalog you will want to ensure that this is set to site you are importing from.
- Only import copies with site code. This is a special option generally only used for data conversions where you are splitting a centralized-catalog into separate databases. Leave this unchecked.
- Copy Location. Include the location for ALL items included in the import, if applicable.
- Only import copies with this copy location. This is a special option generally only used for data conversions where you are splitting a catalog into separate databases. Leave this unchecked.
- Copy Shelving. Include the shelving for ALL items included in the import, if applicable.
- Funding Source. Include the funding source for ALL items included in the import, if applicable.
- Vendor. Include the vendor, supplier, or donator for ALL items included in the import, if applicable.
- Policy / Use call number policy mapping. Select the most appropriate item policy for your library. Either select the default policy for any new copies, or, choose to let the system determine these based on call number, if this has been configured AND your file contains the call number.
- New Copy Status. In this case you would typically leave this option set Available rather than In Processing, since you are not waiting for the items to arrive—they are ready to circulate as soon as you finish adding them!
File Source
- Skip first record. This setting is used to skip the header row in a tab delimited import file. It should be left unchecked in this case.
Import Titles & Copies: Add or Update
(Alexandria + TT) — Previously: Add or Update Titles & Copies
This is used to add and update title and copy records during import. Valid for Tab Delimited and MARC import data.
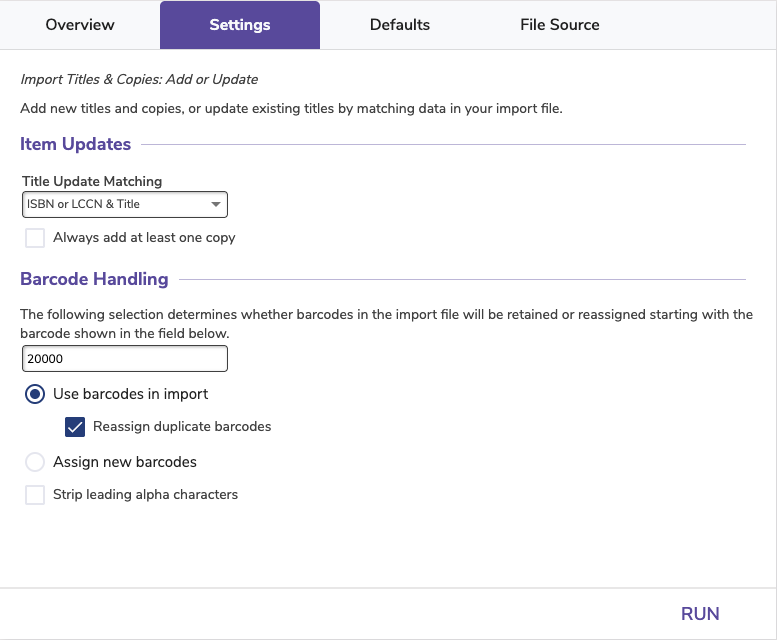
Each import record can result in both title and copy records being added or updated. The import can modify existing titles if a matching title can be identified, and can modify existing copies if the barcode matches for that title—otherwise the data is used to create new title and copy records.
In order for a copy record to be updated, rather than added, the copy barcode in the import record must match an existing title.
Copy records are added if they have an associated title record; if that title exists, the copy is added; if the title doesn’t exist, a title and copy is added.
This is the preferred method when importing new records provided by a vendor. If your collection already had one of the titles, the title MARC record will be updated, and the new copies added.
- Title records will be updated if they match the title record number, title ID, ISBN, copy record number, or copy barcode (checked in that order). Otherwise a new title will be added.
- If copy data is in the import file, a copy record will be created and added to the title record.
- Copies will only be updated if they match the associated title record.
- If a title is added and the associated copy barcode is in use, the import will follow Barcode Handling rules.
If Always add at least one copy is selected, a copy with the next available barcode is added with the Copy Defaults to the added or updated title record (if a copy for that title hasn’t already been added or updated with this import).
Error conditions: If the import file is a Tab Delimited file and there is no “Title” field in the import header, this is an error and the import is terminated. Added titles must have a valid title of one or more characters (at 245a). If a copy can not be added due to Barcode rules, it will not be added.
Scenario – Import New Books
Import Titles & Copies: Add or Update
You purchased an order of books from your vendor of choice and now you need to add them to Alexandria so that they can be circulated and searched. In this case the book vendor has already barcoded the items so the records will contain both title data and copy data. On import, if you already have an existing title, you likely expect the existing title to be updated and any new copies to be added to it. For new titles, Alexandria will add both the title and copy records. Book orders frequently contain a mix of new titles AND new copies of existing titles.
Supported Data Formats: MARC, MicroLIF
Import Settings
- Title Update Matching. Select ISBN/LCCN. Vendor supplied records will typically contain accurate ISBNs which are reliable identifiers for title match purposes.
- Always add at least one copy. This should be unchecked as you do not want to add any new copy data if the vendor did not supply it.
Barcode Handling
- Starting Item Barcode. Ensure this is set to an appropriate value for the next barcode to be assigned in the event the vendor supplied information conflicts with existing records.
- Use barcodes in import and Reassign duplicate barcodes. Selected. Book vendors typically know your barcode range (for their use) and will properly barcode the new items and include those data in the records. However, if they make a mistake, and accidentally assign a barcode that is already in use, the system will need to reassign it so the copy gets added without conflict.
- Strip leading alpha characters. This should be unchecked in this case. Adding title records only. Copy settings are ignored.
Title Defaults
- Title Policy / Use call number policy mapping. Select the most appropriate item policy for your library. Either select the default policy for any new titles, or, choose to let the system determine these based on call number, if Policy Mapping has been configured.
- Replace MARC records on title match. Ensure this is unchecked so that any title record being updated is not replaced, potentially eliminating local cataloging such as study program or subject tags. Only select this option if your intention is to completely replace existing records with the new records being supplied by the vendor.
Copy Defaults
- Site. If you are part of a centralized-catalog you will want to ensure that this is set to site you are importing from or for which the items should belong to.
- Only import copies with site code. This is a special option generally only used for data conversions where you are splitting a centralized-catalog into separate databases. Leave this unchecked.
- Copy Location. If the vendor did not supply any copy location information in the records you can define it here, and it will be applied to ALL copies in the import. For this case it should usually be left empty.
- Only import copies with this copy location. This is a special option generally only used for data conversions where you are splitting a catalog into separate databases. Leave this unchecked.
- Copy Shelving. If the vendor did not supply any copy shelving information in the records you can define it here, and it will be applied to ALL copies in the import. For this case it should usually be left empty.
- Funding Source. If the vendor did not supply any funding source information in the records you can define it here, and it will be applied to ALL copies in the import. For this case it should usually be left empty.
- Vendor. If the vendor did not supply their information in the records you can define it here, and it will be applied to ALL copies in the import.
- Copy Policy /Use call number policy mapping. select the most appropriate item policy for your library. Either select the default policy for any new copies, or, choose to let the system determine these based on call number, if this has been configured.
- New Copy Status. If you are importing your records before the items are expected to physically arrive, set this option to In Procssing so that they will display as “In Processing” to your patrons. Once delivered, bookdrop them to make them available.
File Source
- Skip first record. This setting is used to skip the header row in a tab delimited import file. It should be left unchecked in this case.
Scenario – Import Data Enhancement
Import Titles & Copies: Add or Update
You have sent your data to an enhancement service such as Mitinet and are now trying to import the data back into Alexandria to update existing titles, completely replacing the existing MARC data with the enhanced version. You will not be adding or removing any titles or copies data.
Supported Data Formats: MARC, MicroLIF
Import Settings
You primarily want to modify title data, but copies could be updated as well if call numbers were standardized or corrected.
- Title Update Matching:
- [Preferred] Copy Barcode. For the most accurate matching to occur, titles must include at least one copy with its barcode, which is a unique ID that will be used for matching purposes. NOTE: This option does NOT work for updating Titles without copies. If a Title is imported without Copy data, the Title is added since no copy barcode exists.
- [Alternate] ISBN or LCCN & Title . In some cases it may not be possible to match on a copy barcode as some title records may not contain copies. An example of this would be title records for ebooks, cataloged web pages, or other electronic only resources. In this case it may be suitable to match on ISBN or LCCN OR ISBN or LCCN & Title Call Number (If your call numbers were not changed as part of the enhancement). It should be noted that this method is more prone to some errors as there is not a guaranteed unique ID to match on. Use the preferred method whenever possible, but use the alternate method if your data contains enhanced titles without copies.
- Always add at least one copy. This should be unchecked as we do not want to add any new copy data.
Barcode Handling
- Starting Item Barcode. Since you are not creating any new copies and are using your existing copy barcodes for matching purposes, this field can be left empty. It will not be used.
- Use barcodes in import and Reassign duplicate barcodes. Selected. The barcodes in this data are the actual barcodes on the existing copies and they are the ones we will want to maintain and use.
- Strip leading alpha characters. This is a special option generally only used for data conversions and other situations where the barcodes being imported contain alpha characters that should be removed. Leave this unchecked in this case.
Title Defaults
- Default Title Policy / Use call number policy mapping. In this case all of your items already have assigned policies and you do not want to affect them. Leave Use call number policy mapping unchecked, and select your preferred Title Default Policy as a fallback, though it generally should not apply.
- Replace MARC records on title match. This should be checked to ensure that the cleaned or enhanced data replaces the existing and now outdated MARC tags, rather than being added to them. For example, you want your new juvenile subject headings only and NOT your previous subject headings plus the new, correct juvenile headings. This applies to all repeatable MARC tags.
Copy Defaults
You aren’t adding any new copies in this case, so you can leave everything in this tab empty/unchecked.
- Site. If you are part of a centralized-catalog you will want to ensure that this is set to site you are importing from.
- Only import copies with site code. This is a special option generally only used for data conversions where you are splitting a centralized-catalog into separate databases. Leave this unchecked.
- Copy Location. For this case it should be left empty.
- Only import copies with this copy location. This is a special option generally only used for data conversions where you are splitting a catalog into separate databases. Leave this unchecked.
- Copy Shelving. For this case it should be left empty.
- Funding Source. For this case it should be left empty.
- Vendor. For this case it should be left empty.
- Policy / Use call number policy mapping. In this case all of your items already have assigned policies and you do not want to affect them. Leave Use call number policy mapping unchecked, and select your preferred Copy Default Policy as a fallback, though it generally should not apply.
- New Copy Status. In this case no new copies are being added, so you can ignore this.
File Source
- Skip first record. For field mapping. This setting is used to skip the header row in a tab delimited import file. It should be left unchecked in this case.