
Policies and how to assign them
February 5, 2024
Miss Honey just set some new policies for her library, but she doesn’t remember how to assign them.
Policies are important because they establish rules that regulate how library resources are used by your patrons, including how items circulate, how long items can be checked out, how much overdue fines cost, whether an item can leave the building, and more.
But how can you assign them once they are created?
Patron Policies
There are several different methods you can use to assign patron policies.
Method 1: Utility
The Change Patron Policy utility works great if you have a way to group the patrons together, such as by grade or a grade range. Check out Are your Utilities running?—Take the right steps for more info on running utilities.
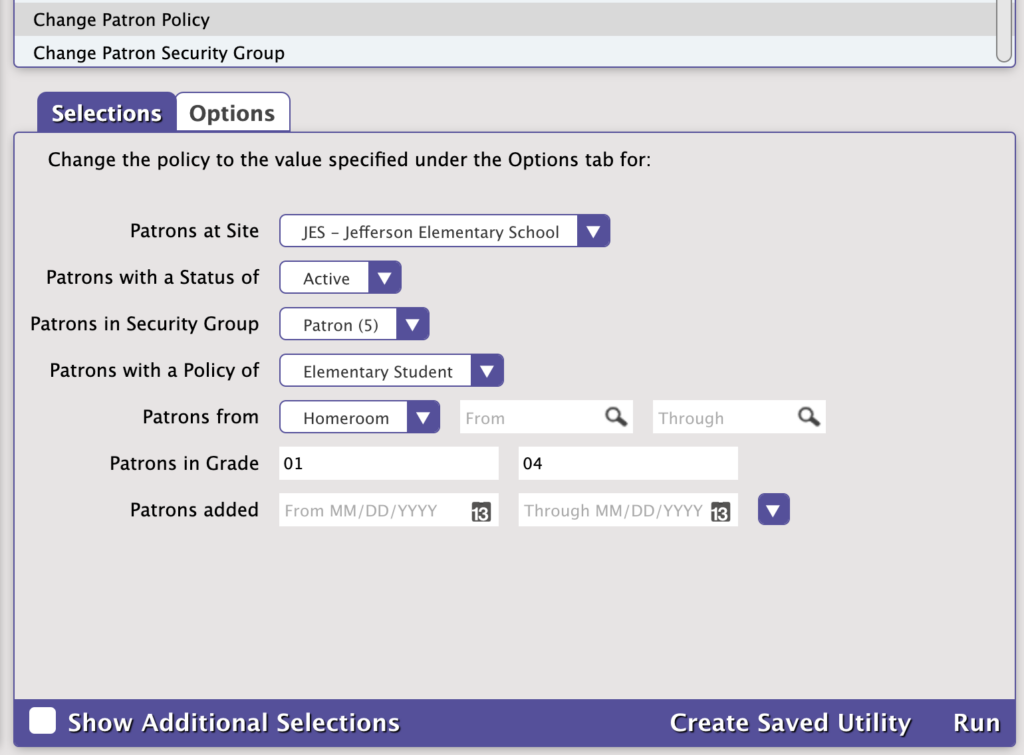
- Go to Operations > Utilities > Patrons and select the Change Patron Policy utility on the right.
- In the Selections tab, enter the criteria needed to select the patrons you want to update.
- Patrons with a Status of: Limit the operations to one particular status, like Active, or choose Any to include them all.
- Patrons in Grade: Enter the user-defined value for the grade(s) you need to change. Check Tools > Authority Control > Grade to ensure there are no stray grade numbering patterns and be sure to use the exact value you see there. Example: 01 is not the same as 1. When selecting a range of grades, you may also want to check the Preferences > Patrons > Grade Table to ensure your grades are sorted in the correct order.
3. In the Options tab, choose the policy that will be assigned to the selected patrons.
4. Run the utility.
Method 2: Circulation Command
You can also assign patron policies by using the Circulation Command Change Patron Policies.
This is a good method if you have patrons come in as groups, and you either don’t have them grouped in Alexandria, or you don’t feel comfortable using Utilities.
- From Circulation, enter the two-letter “UP” command and hit <enter>.
- Select the Policy you are assigning to the patrons.
- Scan or enter the patron barcodes into the command line.
- When done, use the “.” command and hit <enter> to exit the mode.
 | Hot tip! If you want to change the policy for an entire homeroom in Circulation, go through steps 1 & 2, then open the homeroom tab to the correct homeroom and just double click each patron down the list. |
Method 3: Import File

See Import Patrons and Patron Imports Best Practices for assistance with Imports.
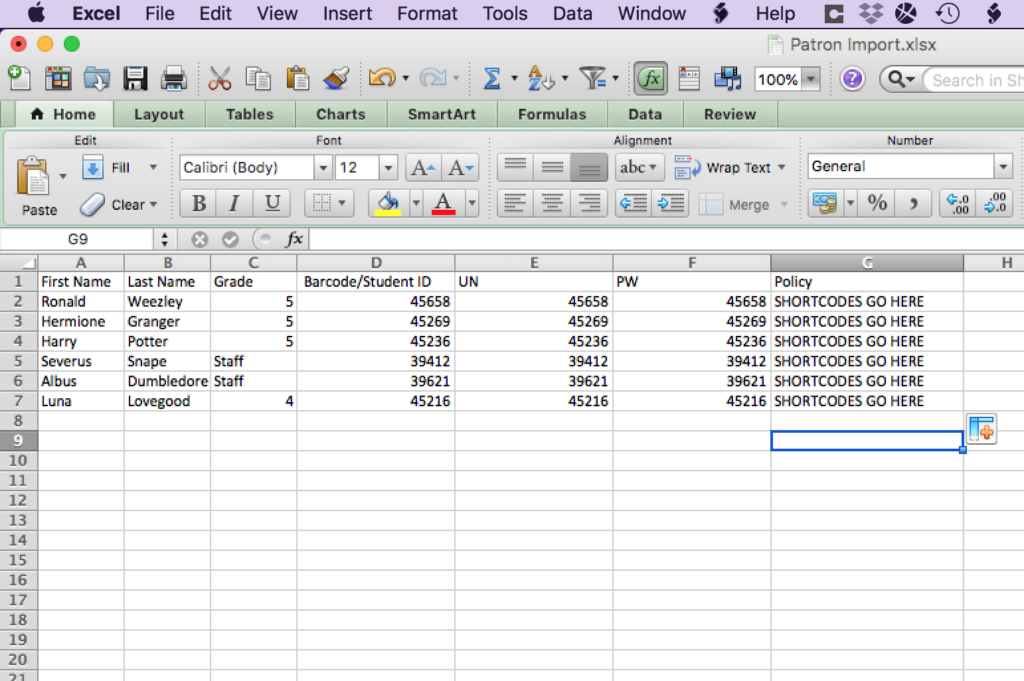
- Make your import do twice the work by using the Policy dropdown to assign everyone in the file to the same policy when you’re running an import.
- You can also use a tab-delimited export file in your favorite spreadsheet program to change the set policy shortcodes. Find the shortcodes you need by going to Tools > Policies and selecting the policy you need from the drop down. Be careful to limit your changes to the policy column and import your changes when you’re done.
Method 4: Manual Changes
This method can be time consuming, because you modify the records one patron at a time.
- Go to Patron Management and find the patron record you want to modify.
- Unlock the record.
- Use the Policy dropdown to select the new policy.
- Click Save.
Item Policies
Method 1: Utility
You can use the Change Title Policy utility (if your policies are the same across all sites) or the Change Copy Policy utility (if your policies differ by site). Check out Are your Utilities running?—Take the right steps for more info on running utilities.
These utilities work great if you have your items in a call number range (e.g. the fiction policy can be selected by FIC AAA- FIC ZZZ).
- Go to Operations > Utilities > Titles > Change Title Policy.
- On the Selections tab, use the field Title in call number range (this will need to match the actual call numbers you are using).
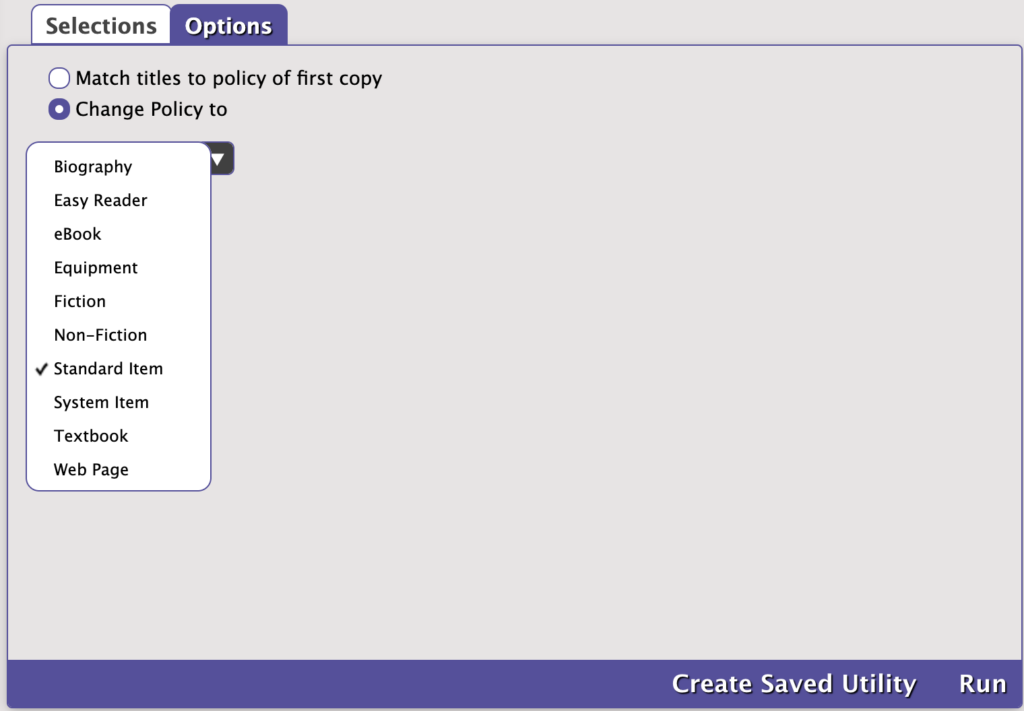
- On the Options tab, select Change Policy To menu and select Fiction (or whichever you are changing).
- Run the utility.
Method 2: Circulation Command
You can also assign item policies by using the Circulation Command Change Item Policy.
- From Circulation, enter the “UI” command and hit <enter>.
- Select the policy that you’re changing the items to.
- Scan the barcodes of the items you’re modifying.
- When done, use the “.” command and hit <enter> to exit the mode.
Method 3: Import File
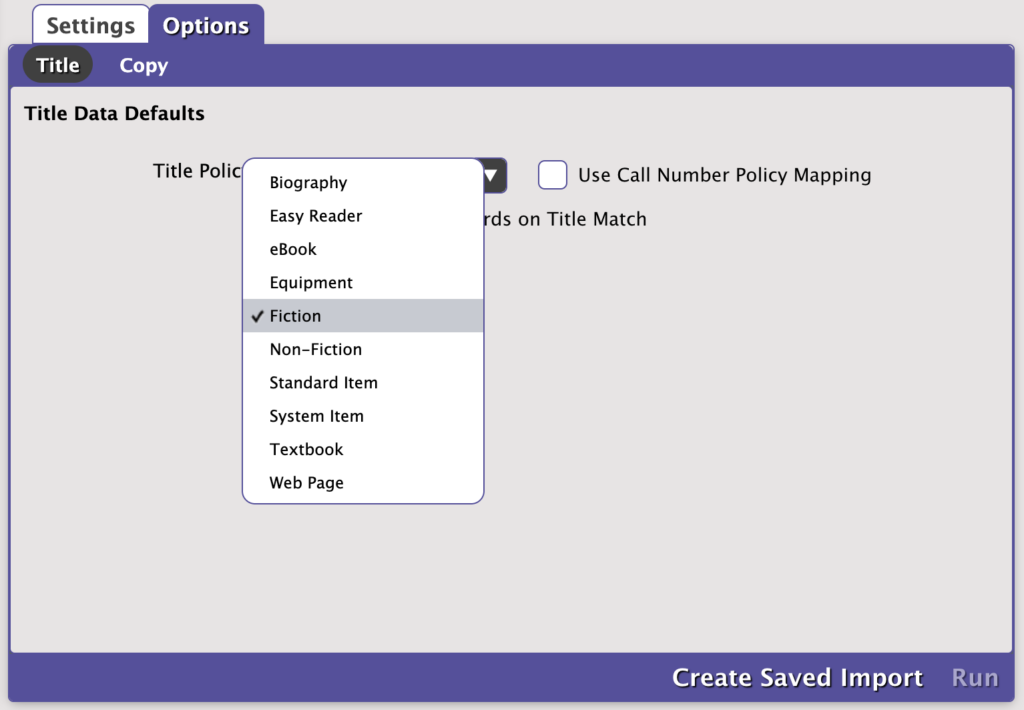
- When running the item import, go to Options > Title and/or Copy subtab, and use the Policy dropdown to assign all items in the file to the same policy. This works great if you have one import file per policy you are assigning.
- You can also use a tab-delimited export file in your favorite spreadsheet program to change the set policy shortcodes. Find the shortcodes you need by going to Preferences > Policies and selecting the policy you need from the drop down. Be careful to limit your changes to the policy column and import your changes when you’re done.
- Or you can use Policy Mapping.
Method 4: Manual Changes
Modifying records one item at a time is awfully time-consuming. (Are you sure you want to do that?)
- Go to Item Management and find the item record you’re modifying.
- Unlock the record.
- Use the Policy dropdown to select the new policy (there are both Title and Copy Policy drop-downs)
- Click Save.
 | Changes made to existing policies are only applied from that point forward. If you want the updated policies to apply to existing checked out items, go to Operations > Utilities > Circulation > Recompute Due Dates and run. |
As always, feel free to reach out to our support team at (800) 347-4942 · support@companioncorp.com. We’re here to help!
0 Comments