How do I see which items have been inventoried?
Run a report. In the Review step of the inventory process, run the Inventory Items Report. And in the Reports module, run the Copies Inventoried or Copies Not Inventoried reports.

Run a report. In the Review step of the inventory process, run the Inventory Items Report. And in the Reports module, run the Copies Inventoried or Copies Not Inventoried reports.
Check your session overview and take a look at your Call Number Range. Make sure the “From” and “Through” fields have the same number of characters.
For example:
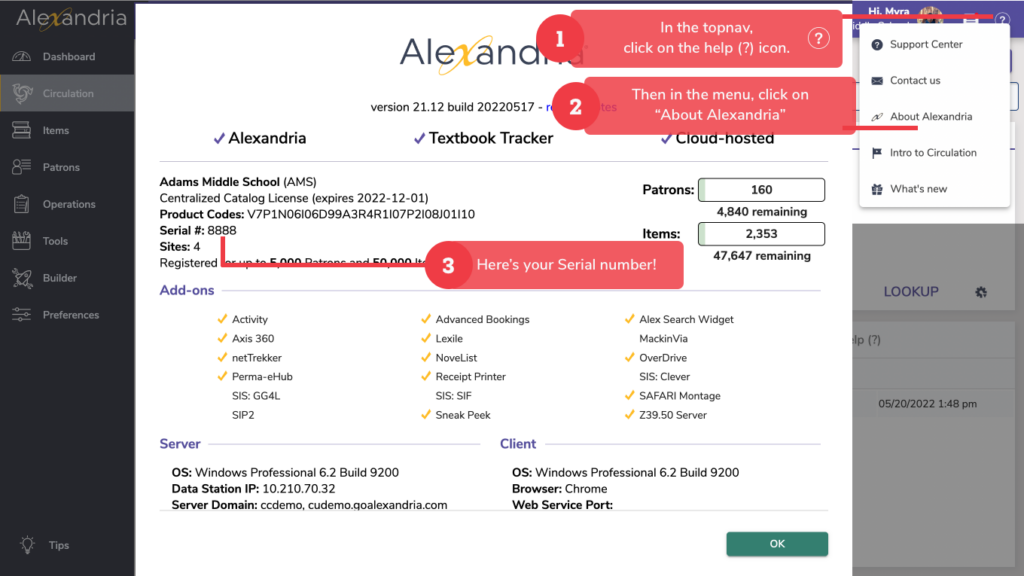
Your Alexandria serial number can be located under the question mark at the top right of the Alexandria screen, then under About Alexandria. The serial number is located at the far left and is seven digits long.
Clever is a third-party service used by school districts to facilitate the secure transfer of student rosters between their school information system (SIS) and digital learning applications. SchoolDay is a K-12 industry collaborative that provides schools with various EdTech tools, including the secure exchange of school roster data between applications.
These programs access information from a district’s SIS such as Powerschool, Infinite Campus or Skyward and then work when set up with Alexandria to import and update patron information. Usually these services are managed at the district level and synced in Alexandria sites with IT personnel and our Customer Support assistance. Depending on the needs of each school, the decision to use one or the other is decided by the school administration before adding the services to the Alexandria license.
Librarians, students, staff, and admins are all added into the system as patrons, but have different levels of access based on their Security Group. Take a look at Adding Operators. We also recommend reviewing our Security Best Practices to ensure organized operator records and seamless access.
The “Labels” tab is not currently functioning, it is there to inform our customers in the future we will be changing the way you will access labels. Until we have made this change, you will want to access labels through the “Reports” Tab.
4. Click on Copy Labels (3×10) — Barcode Labels, Envelope Labels, Info Labels
Click on the ‘?’ Icon in the top right corner of Alexandria, and select ‘About Alexandria’. This will give you a total number of items and patrons currently in your catalog, and also tell you how many you are allowed to have based on your license.
While you can only have one Slideshow active from the primary /slideshow location, you can always show additional Slideshows by creating Explore buttons that link to a Slideshow URL.
You know you can go to /slideshow to view a slideshow of items as determined by your settings in Preferences > Researcher > Slideshow.
You know you can create an Explore button that links to your Slideshow.
But did you now that you’re not limited to a single slideshow? You can set up as many custom slideshows as you want, each with a specific URL.
Here’s how:
Now you can use that custom Slideshow URL with any Explore button to lead your patrons to your beautiful Slideshow.
Absolutely! You can have as many maps as you need to accurately show your item locations. Though you may need to get creative with your call numbers if you’re running the same call-numbered materials in different locations (i.e. 100S – 300S for a storage location and 100 – 300 for shelved items).
You can create a map using any type of image creation software, like Photoshop, Illustrator, Paint, etc. You can also take pictures of where the shelf is situated in the library, or hold an art contest with your students to create distinctive markers for each shelf. You can also use text to describe the location for the visually impaired. This article from Classroom Architect might help.