
Circulation Tabs
Circulation
The Circulation tab is where you’ll find your transaction log, to keep track of things happening during your session, and the homeroom subtab so you can locate or view students by the homeroom (location) they are in.
Transaction Log (TL)
The transaction log contains a history of everything that has occurred on your machine during your current session (for the last 100 transactions), and most of the changes that are made through management, utilities, and importing. It will also record who has logged in to your workstation and performed certain transactions and changes. You can print the Transaction Log using CMD/CTRL + P.
If you’re Self-Hosted, archived transaction logs are placed in the Log folder, located in Alexandria’s shared application support folder.
Homeroom (HW)
The Homeroom subtab contains a list of the patrons in a particular homeroom, with their barcode, name, number of items they have out and items checked out today. With the Pictures checkbox checked, the patron’s picture will also load. Double clicking on a patron makes them current.
You can use the homeroom shortcut (HW) to not only jump to this subtab, but also directly to a particular homeroom. For example, HW Jones will select the homeroom Jones. Using a patron barcode instead of the homeroom name will open the patron’s homeroom, e.g. HW 1001.
 | “Homeroom” is a term that can be altered in Terminology Preferences. This list shows all homerooms in your system; to clean up this list, update your patrons with the Change Patron Location utility, and clean up homerooms via Authority Control. See also: Changing teacher names in Alexandria. |
Items out (QE)
The Items out tab displays a list of all items checked out to the Current Patron, allowing you to choose which items to renew or declare lost. If one of the patron’s items is past due, it will be listed in red.
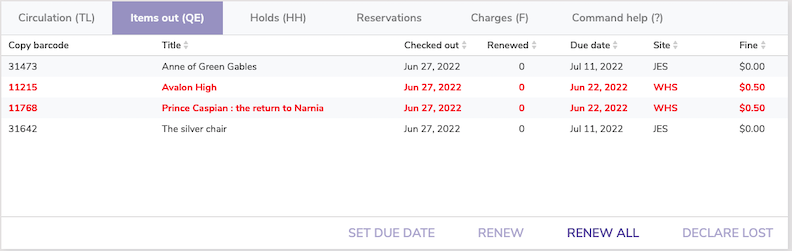
Additional Options
| Button | Description |
|---|---|
| Set Due Date | This function is sometimes referred to as an override date, which replaces the default due date normally used by the system. |
| Renew | Renews one item, or a range of selected items. |
| Renew All | Renews all of the current patron’s items, even if your policies or circulation preferences indicate that renewing items with holds is disallowed. |
| Declare Lost | The selected item is assigned to the Lost system patron, and you’ll have options to charge the patron. |
Step-by-Step Instructions
Renew A Single Item
To renew a single item for a patron:
- Make the patron the current patron.
- Click on the Items out tab.
- Select the item that you would like to renew.
- Click on the Renew button.
Renew Multiple Items
To renew multiple items for a patron:
- Make the patron the current patron.
- Click on the Items out tab.
- Select the items to renew by using one of the following methods:
- For consecutive items: Select the first item that you would like to renew, hold down the <shift> key and click on the last item in the group of desired items.
- For non-consecutive items: Hold down the <Cmd/Ctrl> key and select/highlight/click on each item that you would like to renew.
- Click Renew.
Renew All Items
To renew all items:
- Make the patron the current patron.
- Click on the Items out tab.
- Click Renew All.
| Unless your preferences are set differently, items with holds can not be renewed. When you renew an item that has fines, the fine window will open for each copy that is overdue. If the item has been renewed the maximum number of times, Alexandria will ask if you wish to override the policies for each copy. |
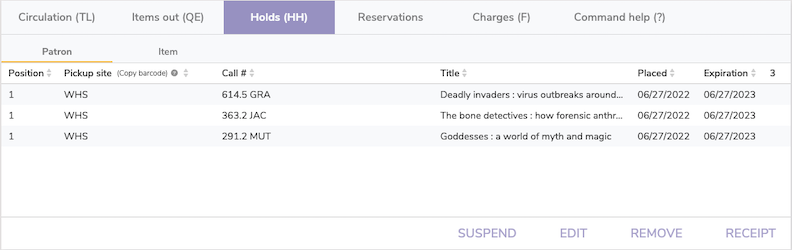
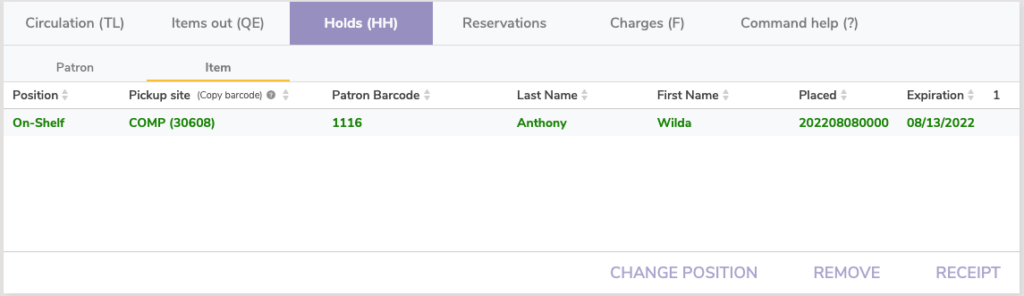
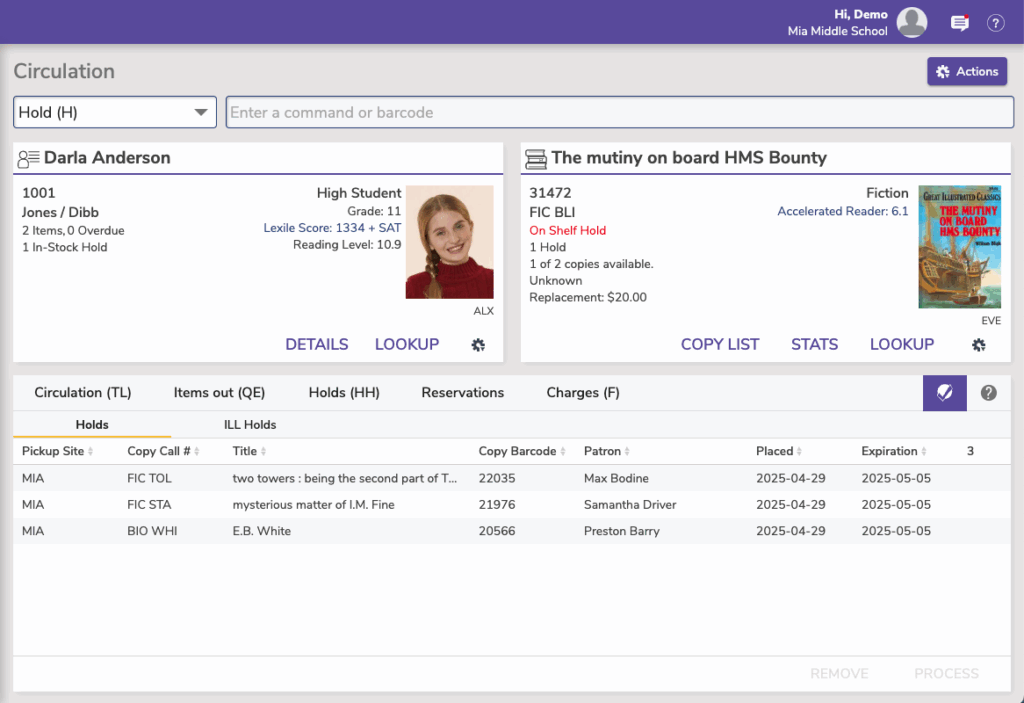
Holds (HH)
The Patron subtab shows items that have holds placed on them by the current patron.
The Item subtab shows information for any holds placed on the current item.
Suspend a Hold
In some cases, you might wish to suspend a hold for a period of time. To do so:
- Click on the Patron subtab from the Holds tab.
- Select the item you wish to suspend and click Suspend. You will then be presented with a calendar window.
- From the Suspend Hold window, enter a date and click Save. The hold will be suspended until this date.
Edit a Hold
In order to change the site copies can come from and the pickup location for a hold:
- Click on the Patron subtab from the Holds tab.
- Select the item you wish to edit and click Edit. You will be presented with a Edit Hold window.
- Choose the site copies can come from and the desired pickup location.
- Click Save.
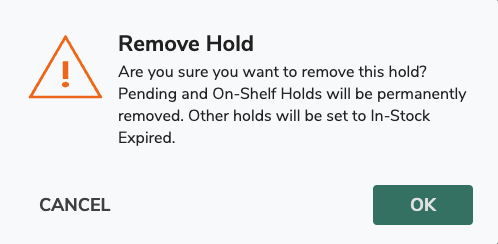
Remove a Hold
In order to remove hold requests for the current item:
- Click on the Item subtab from the Holds tab. Removal of all current item hold requests are done here.
- To remove an item hold request, select the hold you want to remove and click Remove. You will then be presented with a window to confirm the removal of the hold.
- Click OK. The hold will vanish from the field and be permanently deleted.
If an in-stock hold is removed, it will show as expired, and you can run the Expired In-Stock Holds report to pull those items.
Remove a Patron’s Hold
In order to remove a patron hold:
- Click the Circulation window’s Holds tab and then click on Patron.
- To remove a patron hold request, select (highlight) the hold you want to remove from the Patron holds and click Remove.
- The hold will vanish from the window and be permanently deleted.
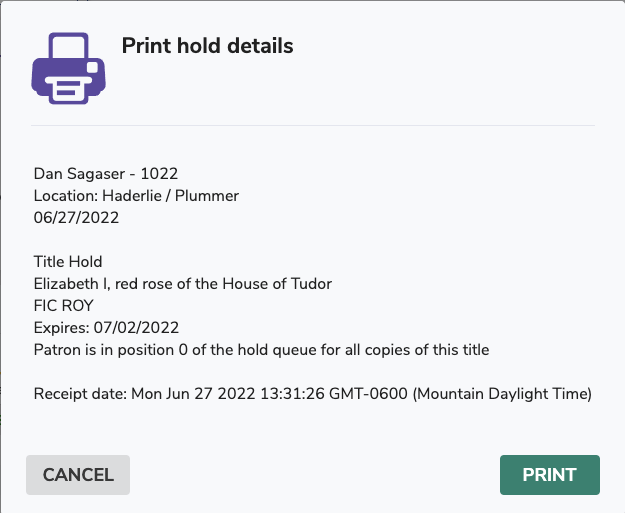
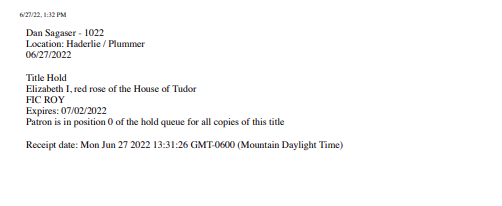
Print a Holds Receipt
Click Print Receipt when viewing holds from either the Patron or Item subtabs.
See also Best Practices for Holds.
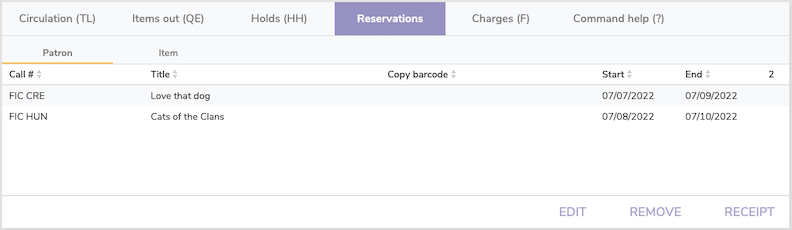
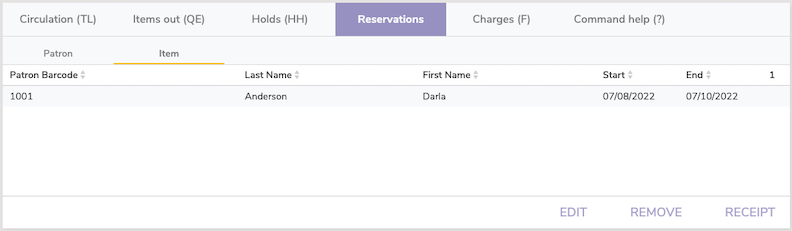
Reservations
Patron / Item Subtabs
Use reservations when patrons want to check out items from the library for specified future dates. When patrons have item reservations, they are only available for checkout by the requesting patron during their specified dates. If another patron tries to check out an item during it’s reservation period, Alexandria rejects the request or adjusts the date range to accommodate the reservation.
Reservations are shown on patron and item status reports. Unlike hold requests, reservations are placed on specific copies. If you have multiple copies of an item, you must place the reservation on one copy. Alexandria will automatically remove expired reservations.
You can also use reservations with the For Library Use patron (barcode 3) to ensure that an item is available for use in the library during a specified date range. For example, you can use the For Library Use patron to make reservations for all Thanksgiving books on November 15th through the 30th. No other patrons can check out Thanksgiving books while those reservation dates are active. Another method is to place the copies on Reserve (J).
Placing Reservations in Librarian
Placing Reservations in Researcher
Charges (F)
In the Charges tab, view Patron charges, fees, payments, as well as forgiven charges and refunded payments. Charges differ, but Payments includes data for both Alexandria and Textbook Tracker.
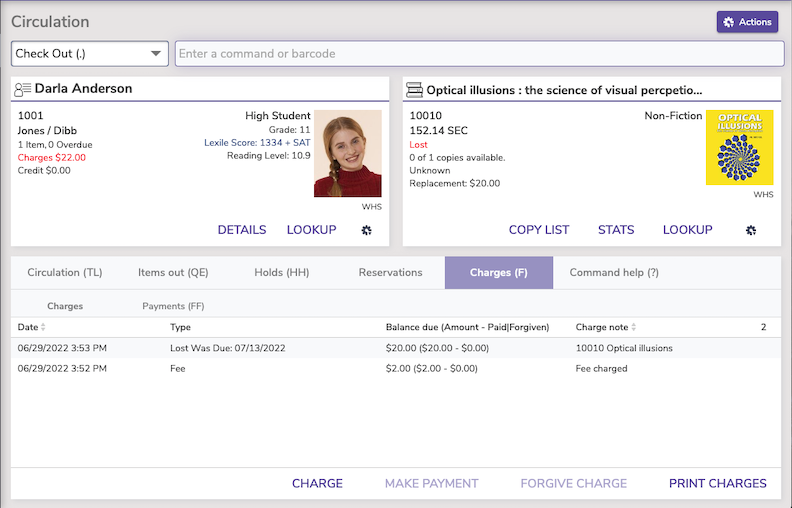
Types of Charges
Lost Item Fee
When a book is lost, the patron is automatically charged a lost fee equal to the replacement cost. Additionally, when an item is declared lost, if it was overdue, the patron can be charged an overdue fine (up to the Maximum Fine for an Overdue Item in your Overdue patron policies). When an item that was declared Lost is later found and bookdropped, you have the option to add an extra fee.
Overdue Fines
If the item you check in is past due and carries a fine, a payment can be made through the Make Payment option by either selecting the subtab at the bottom of the window or double clicking on the line item.
Additional Options
Charge
This option allows the librarian to manually assign charges to a Patron or for Alexandria to automatically assign charges based upon your preferences. This can be used for late fees, lost or damaged books, or miscellaneous charges.
Make Payment
Select a charge to get this option. Select multiple charges (command or shift + click) to make a payment on multiple items.
Print Charges
Print all charges for the current patron. Click Print Charges at the bottom of the Charges window to download a PDF report of the patron’s charges.
If the Network Printer is enabled, the receipt will be sent to the printer. However, if the Network Printer is not enabled, an HTML receipt will open in a new tab so it can be saved as a PDF and/or printed from your browser.
Payments tab (FF)
The Payments subtab contains a record of the payments made by the selected patron, as well as Refund, Details, Add Credit, Refund Credit, and Print Receipt options.
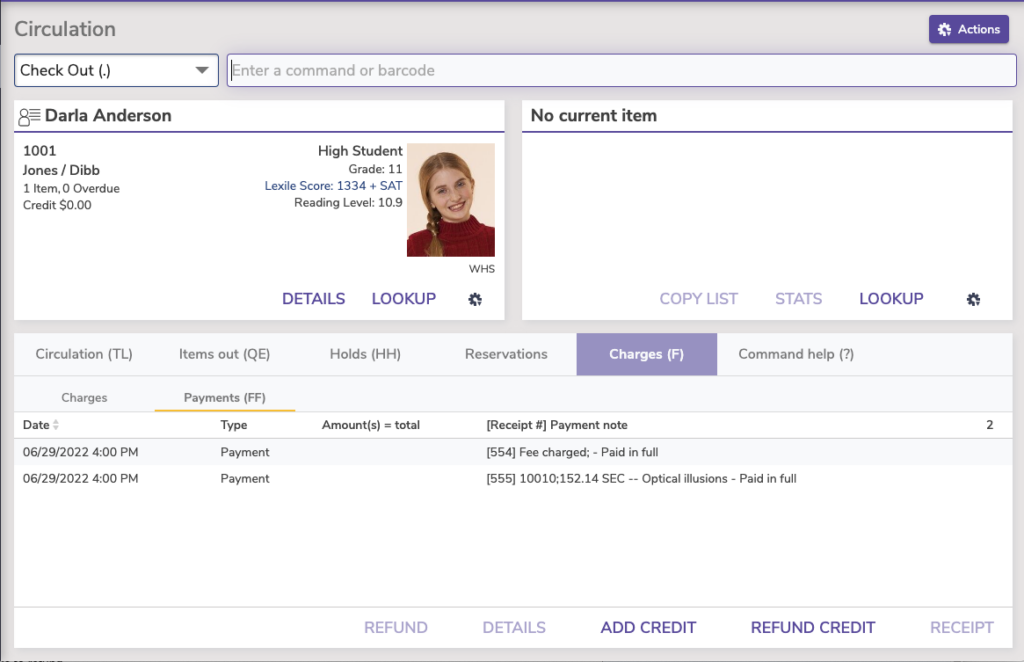
Refund a Payment
This allows the librarian to refund a payment on the current patron’s account.
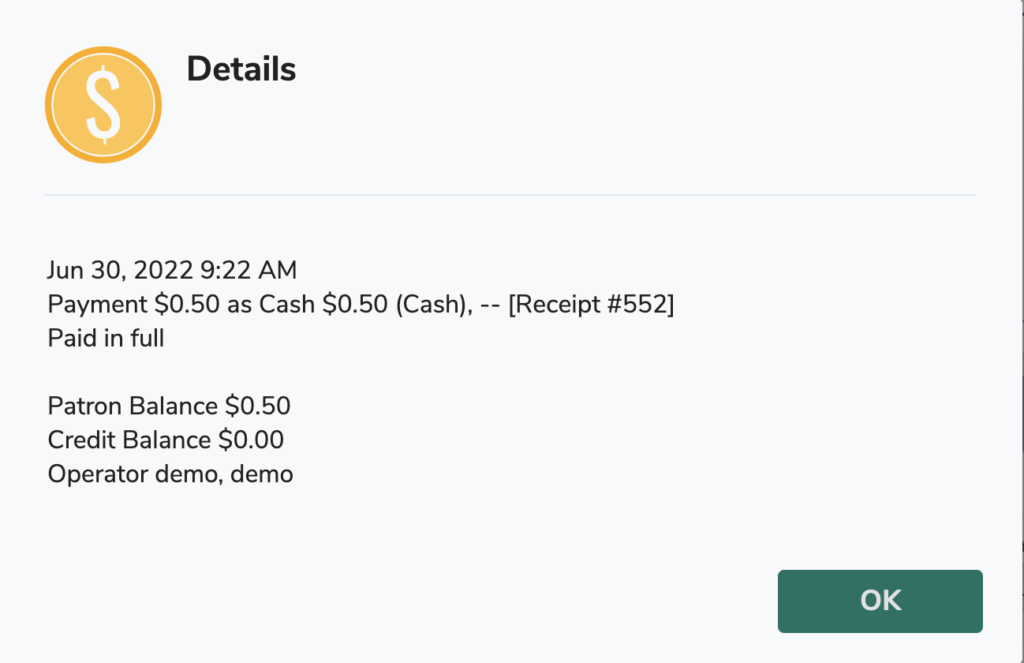
Details
Select a transaction and then click the Details button to view more information about the transaction.
Add Credit
The Add Credit windows allows the librarian to add credit to the account of the selected patron.
Refund Credit
This allows the librarian to refund credit to the selected patron, if they have credit on their account.
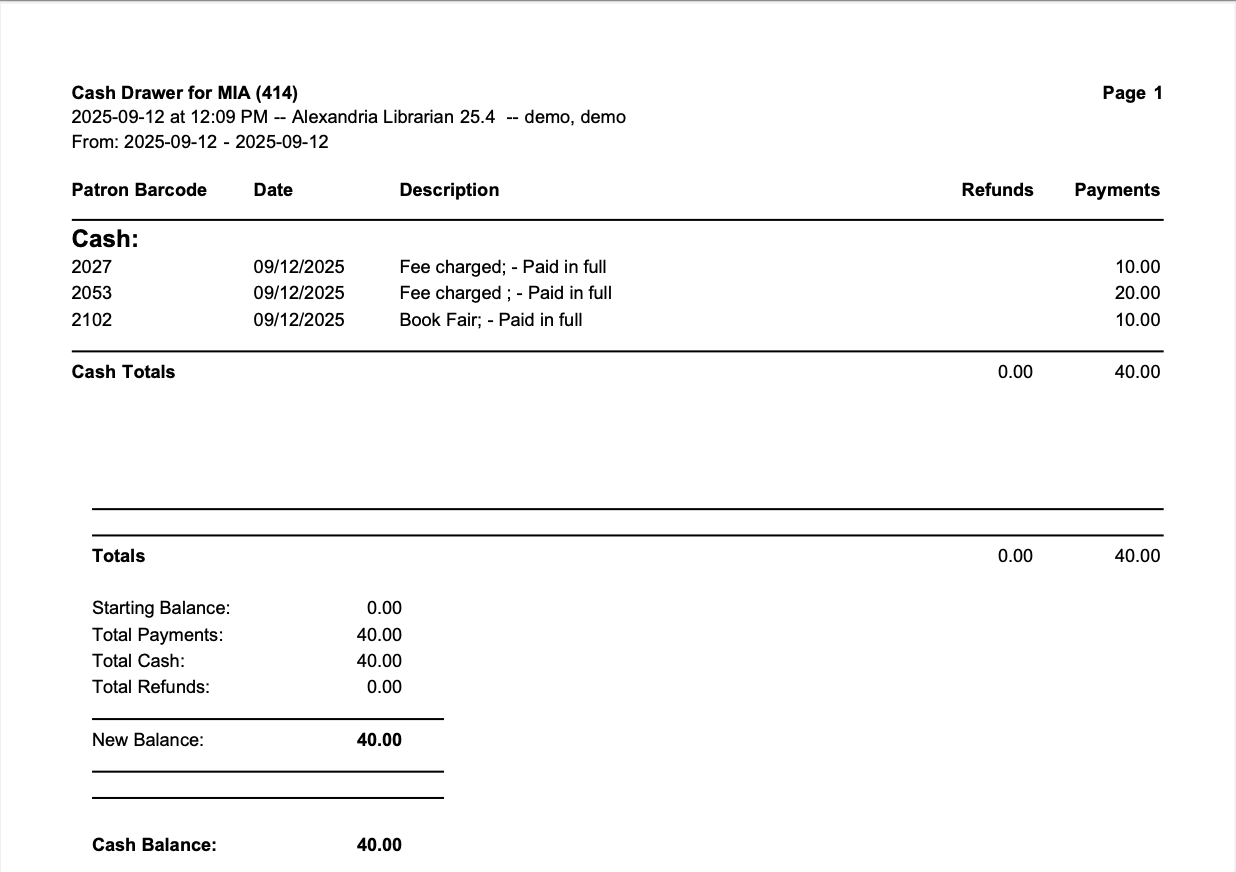
Print Receipt
The Payments subtab lets you print or email additional receipts for past transactions.
Tasks
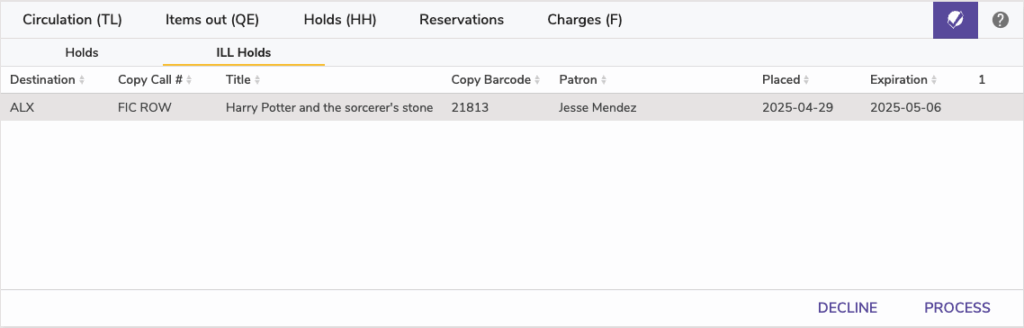
The Tasks tab shows holds and ILL (Interlibrary Loans) holds that need to be pulled.
The Tasks > Holds subtab is for holds needing to be pulled at your site. In other words, on-shelf holds that are for patrons at your site. You don’t need to do anything special, just bookdrop and print the hold receipt and put it on your hold shelf. You can accomplish this by bookdropping the item or pressing Process.
The Tasks > ILL Holds subtab is for holds needing to be pulled, that are going to be sent to a different site. In other words, on-shelf holds that are for patrons NOT at your site. This requires bookdropping to place the item in-transit and print the receipt. You can accomplish this by bookdropping the item or pressing Process.
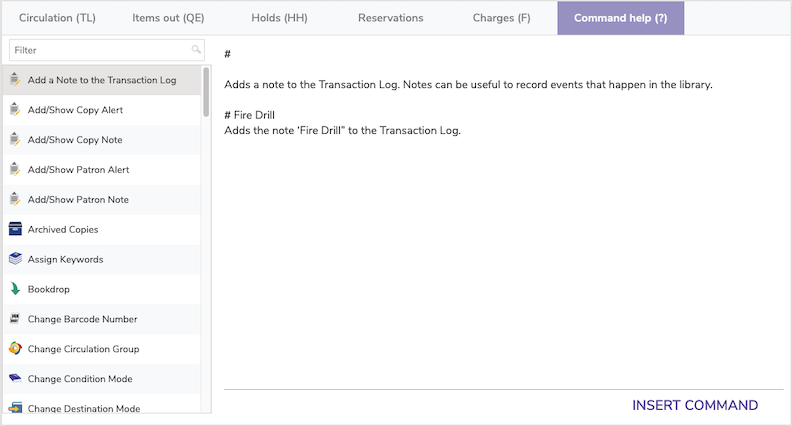
Command Help (?)
The Command Help tab contains information about Alexandria commands and how to use them. Select a command from the list to see its code and a description of its functionality on the right. You can also double-click the command to insert it into the Command Line.
To execute the command you’ve selected, type or scan a barcode.
If you select a command and click Enter without entering a barcode, the action taken depends on the command you selected. For example:
- If the command you select is a mode, Alexandria changes the current mode and displays the Circulation window under this mode.
- If you select the locate command, a Lookup browse window will appear. You may then make a selection from the Browse window.
- If the command you select performs a circulation function, then that function is performed, the Circulation window will appear, and the transaction log records the results. For example, if you select the Hold Request command and enter a barcode, Alexandria puts a hold on the item and the Circulation window will appear, appropriately logging the entry.
See Circulation Commands for a complete list of commands and how to use them.