Best Practices for Reservations
Reservations are used for reserving materials for a specific timeframe. If the timing isn’t important, you might place a hold instead.
Placing Reservations in Librarian
Part 1: Initiate a Reservation
There are two circulation modes you could use to start placing a reservation:
- Reservation (G): Places a reservation for the current patron on whichever item(s) you enter a barcode for or scan.
- Reservation by Patron (GP): Places a reservation on the current item for whichever patron(s) you enter a barcode for or scan.
Alternatively, you could use one of these two circulation commands to automatically set the reservation once you enter the command (then you can skip Part 2):
- Reservation for Any Copy: Places a reservation for the current patron on any available copy of the title for the specified date. The full formula is GA [barcode] -D [beginning date in mm/dd/yyyy format] : [ending date in mm/dd/yyyy].
- Reservation for Specific Copy: Places a reservation for the current patron on the specified copy for the specified date. The full formula is GB [barcode] -D [beginning date in mm/dd/yyyy format] : [ending date in mm/dd/yyyy].
Part 2: Fill out the Place Reservation dialog box
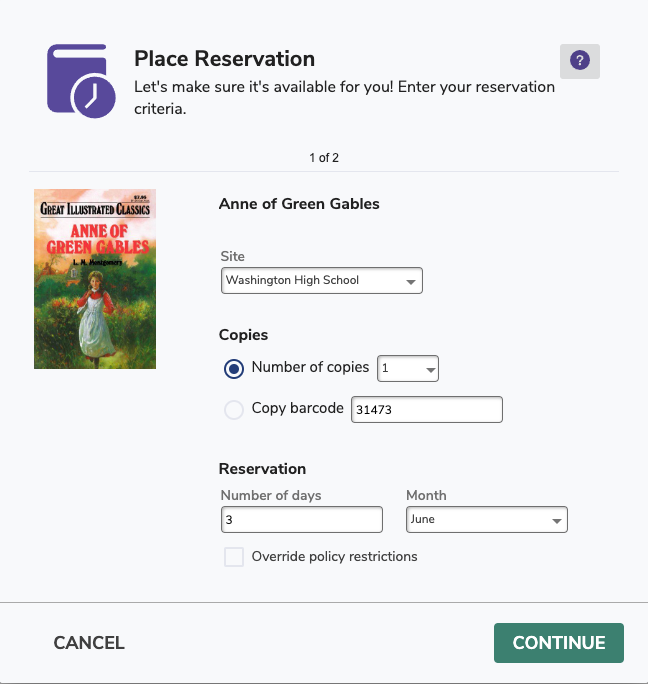
- The Place Reservation dialog box will pop up. Here you will select the site, number of copies (or enter the copy barcode if you want one specific copy), how many days you need the reservation to last, and during which month you need the reservation. Your policies determine the maximum number of days allowed for a copy reservation and how many reservations patrons can place. If you have the proper security clearance, you can check the box to override these policy restrictions.

2. After you have made the appropriate selections, click Continue.
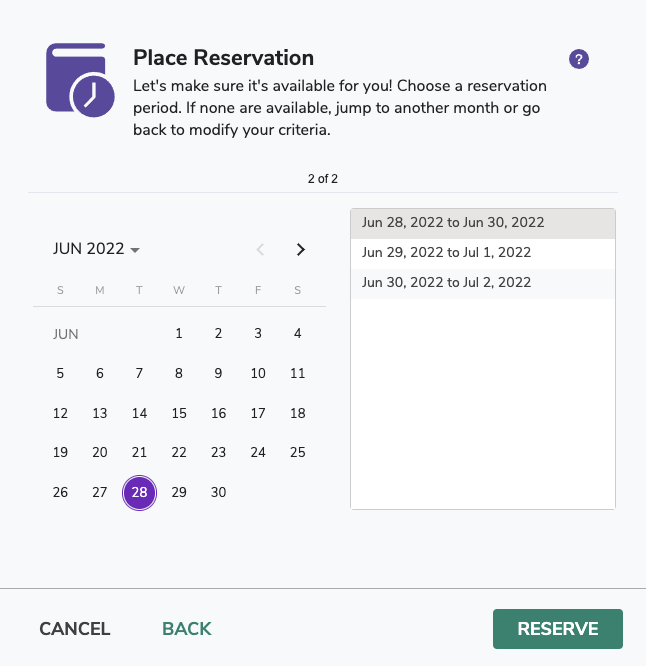
3. Next, you’ll see a calendar view. This is where you’ll choose the specific date range for which you want to place the reservation. You can select days by clicking on the calendar itself or by clicking on a date range in the list to the right. Note that if you double click on a date range in the list, the reservation will be set and a confirmation will pop up. Reservations can begin only on open days but can end on closed days; if it does end on a closed day, the due date is actually the next open day. If there aren’t enough copies available for a date range, it will not show on the list.

4. Click Reserve when you have selected the appropriate days. You could also click Cancel to stop making a reservation or Back to return to part one of the Place Reservation dialog box.
5. A record of the reservation will show in the Transaction Log. It will also appear under the Reservations tab when the patron or item is current.
 | To deactivate reservations, you can set the maximum number of days to “zero” in your policies. |
Edit a Reservation
Make sure the patron/item is current, select the reservation, and then click Edit. You can change the number of copies, the copy barcode, the site location, and the start/end dates. When you’re done, click Reserve to save your changes. Please note that if you placed reservations on multiple copies, you will need to edit the reservation for each copy.
Click Print Receipt to view the reservation details, then either click Cancel to close the dialog or Print to print the receipt.
Remove a Patron/Item Reservation
- Click the Circulation window’s Reservations tab and then click on the Patron reservations subtab.
- A list of reservations for the current patron will be shown in the Patron reservations subtab field.
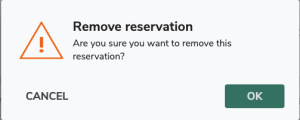
- To remove a patron reservation, select (highlight) the reservation you want to remove and click on Remove.
- The reservation will be permanently deleted.

 | You cannot undo a remove you made to a reservation in this window. The only way to restore a reservation that was incorrectly removed is to place a new reservation for the patron. |
Placing Reservations in Researcher
When a patron makes an item reservation, the item(s) are only available for checkout by the requesting patron during their specified dates. If another patron tries to check out an item during its reservation period, Researcher rejects the request or adjusts the date range to accommodate the reservation.
Reservations can be placed on specific copies. If you have multiple copies of an item, a patron can specify the copy that is available on the day(s) they want the item reserved. Researcher will automatically remove expired reservations.
As Researcher’s Place Reservation dialog box works similarly to Librarian’s Reservations Tab, you may review that section for more information about patron reservations.
Step-by-steps
- If you’re not already logged in to Search, enter your username and password.
- Search for an item and select the one you want.
- Click the menu and select Reserve.
- The Place Reservation dialog box will pop up. Here you will select the site, number of copies (or enter the copy barcode if you want one specific copy), how many days you need the reservation to last, and during which month you need the reservation. Your policies determine the maximum number of days allowed for a copy reservation and how many reservations patrons can place. If you have the proper security clearance, you can check the box to override these policy restrictions. To deactivate reservations, you can set the maximum number of days to “zero” in your policies.
- After you have made the appropriate selections, click Continue.
- A calendar will pop up. This is where you’ll choose the specific date range for which you want to place the reservation. You can select days by clicking on the calendar itself or by clicking on a date range in the list to the right. Note that if you double click on a date range in the list, the reservation will be set and a confirmation will pop up. Reservations can begin only on open days but can end on closed days; if it does end on a closed day, the due date is actually the next open day.
- Click Reserve when you have selected the appropriate days. You could also click Cancel to stop making a reservation or Back to return to part one of the Place Reservation dialog box.
- A confirmation will pop up with the item name and date range for which you made a reservation.
Canceling or Editing Existing Reservations
- To cancel a reservation, go to Patron Status > Reservations, select the reservation you want to cancel, and click on the X icon.
- You can only edit reservation details in Librarian’s Reservations Tab.

0 Comments