
Getting equipped: Cataloging items for your library
March 24, 2025
Miss Honey’s library got twenty new Google Chromebooks to benefit students and teachers. It’s easy to use Chromebooks in your library with Alexandria. You can use them as stations in your library, or set them up as regular circulating items for your teachers, your patrons, or both. Let’s review how you can use Alexandria to properly catalog these, along with other equipment items like projectors.

Setting up policies
One policy or multiple policies—Do different types of equipment have different check-out periods? Would it be useful to have detailed statistics for projectors, TV carts, and Chromebooks individually? If so, you will want multiple policies. On the other hand, if all your equipment checks out for similar periods, and you only want general statistics, you can create just one policy for Equipment.
Teachers or rooms—Sometimes it makes more sense to check out projectors, etc., to a room rather than to a teacher. If so, you will want to create a policy for Rooms and then create individual ‘patron’ records for each room.
Exceptions—The best way to handle item policies is to set them as they apply to the majority of your patrons, then create exceptions. So if your students can’t check out equipment, set your equipment policies to have No Loan Period, then create exceptions for the patron types who can check out equipment.*
Hard Due Dates—Rather than checking an item out for two weeks, you could set the Transaction Period for a number of months (or 9999 days) and instead set a Hard Due Date when these types of items are due. For example, it may be more useful if you check out your projectors to classrooms for the entire school year, but keep in mind you will need to set these dates every year, and renew the items if they are staying checked out.
 | *To learn how to create patron and item policies and learn more about policy exceptions, visit our YouTube channel. Please note that the policy videos are from before the Makeover and Policies are now accessed by going to Tools > Policies. The videos will be updated once the policy section has joined the Makeover. For more information, be sure to keep up with our Release Notes! |
To create an exception for teachers to check out equipment:
- Go to Tools > Policies.
- On the Patron Policy side, bring up the Teachers policy.
- On the Item Policy side, bring up the Equipment policy.
- Click the Exceptions tab at the top. It will turn red, indicating you are in Exceptions mode.
- On the Item Policy side, under Check Out, change the No Loan Period drop-down to Transaction Period.
- Fill in the appropriate number of days, or enter a Hard Due Date.
- Save the preference.
- Click on Exceptions again to exit the mode.
 | Read this article for more info about Policy Exceptions. |
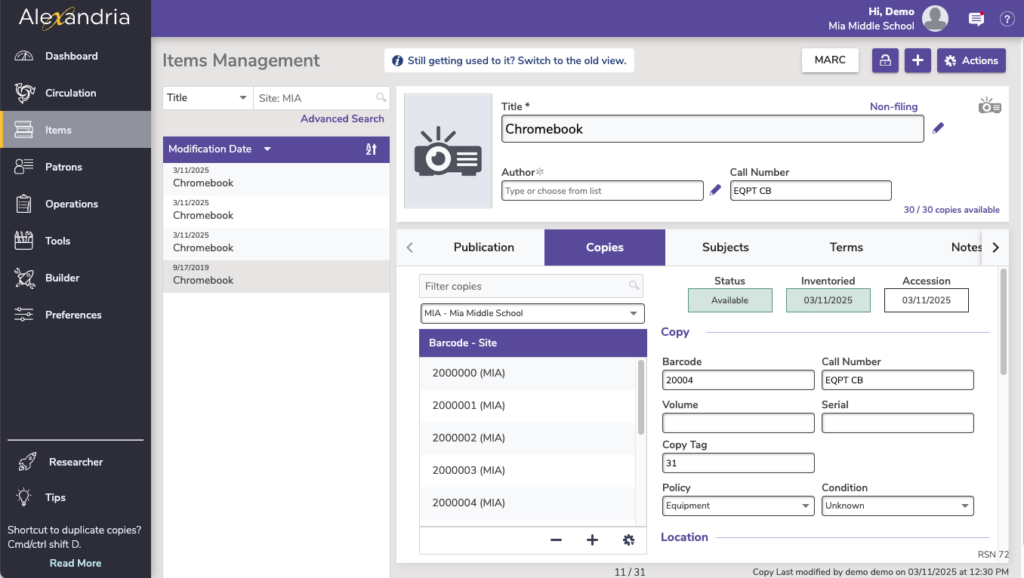
Item Management—Create titles for the types of equipment you are using (e.g. Overheads), and add copies. These copies can include their specific Serial Numbers by using the Serial field on the Copies tab in Items Management. Include a copy number as part of the call number to make inventory easier, e.g. OH-1 for the first Overhead, OH-2 for the second. The overheads can then be shelved in call number order, making it easy to see which ones are missing or out.
Adding items manually
- Open Items Management and unlock the window by clicking the lock icon at the top right
- Click Add Items or the plus sign + to the top right and select Add title
- Hit Enter on your keyboard or click Skip
- Enter the title as whatever type of item you are adding, such as Chromebook
- Change the policy (e.g. Equipment, Chromebook, etc.)
- Unless you want these items showing up in your catalog, check the box to ‘Hide item in researcher’
- Enter any other title-based information you want to keep track of
- Click Save. Alexandria will then ask if you would like to add copies, click Yes, Add
- Enter your copy specific information
- If necessary, enter the Serial number for each Chromebook in the Copy Information tab.
- You can use the Copy Tag, or a suffix on the copy call number, to help identify copies and make inventory easier; for example OH-1 for the first overhead, OH-2 for the second.
- Consider using Copy Alert Notes if the equipment has multiple parts or pieces.
- Save the record
- To manually add additional copies, use the plus sign + at the bottom of the copy list, or to duplicate the record, use the Actions Menu (gear icon) at the bottom of the copy list and click Duplicate title
| Learn more about Best Practices for Cataloging. |
Adding items using an import file
You can add equipment with an import file that has all of the info you need, such as title, medium, barcode, serial number, purchase/replacement cost, etc. Usually this file would come from your technology department.
Instead of creating hundreds of separate titles, you may want to create a single title with multiple copies for that equipment.
You can easily ensure the copies are added under one title:

- Include title, author, and medium in the file
- Change the Title Update Matching setting in Imports to Title & Author & Medium.
- Use the Import Setting of Add or Update Titles & Copies.
Labels
Tired of students picking the labels off the Chromebooks? We also sell label protectors that can help keep the labels on: Label Protectors Package
Reach out to our Sales team for more info on label protectors:
1-800-347-6439 (U.S. & Canada)
1-801-973-7277 (Worldwide)
sales@goalexandria.com
 | Have questions? Reach out to our stellar support team at (800) 347-4942 · support@companioncorp.com for help! |
0 Comments